话不多说,直接上代码
|
1 2 3 4 5 6 7 8 9 10 11 12 13 14 15 16 17 18 19 20 21 22 23 24 25 26 27 28 29 30 31 32 33 34 35 36 37 38 39 40 41 42 43 44 45 46 47 48 49 50 51 52 53 54 55 56 57 58 59 60 61 62 63 64 65 66 67 68 69 70 71 72 73 74 75 76 77 78 79 80 81 82 83 84 85 86 87 88 89 90 91 92 93 94 95 96 97 98 99 100 101 102 103 104 105 106 107 108 109 110 111 112 113 114 115 116 117 118 119 120 121 122 123 124 125 126 127 128 129 130 131 132 133 134 135 136 137 138 139 140 141 142 143 144 145 146 147 |
import copy import cv2 import numpy as np
WIN_NAME = 'draw_rect'
class Rect(object): def __init__(self): self.tl = (0, 0) self.br = (0, 0)
def regularize(self): """ make sure tl = TopLeft point, br = BottomRight point """ pt1 = (min(self.tl[0], self.br[0]), min(self.tl[1], self.br[1])) pt2 = (max(self.tl[0], self.br[0]), max(self.tl[1], self.br[1])) self.tl = pt1 self.br = pt2
class DrawRects(object): def __init__(self, image, color, thickness=1): self.original_image = image self.image_for_show = image.copy() self.color = color self.thickness = thickness self.rects = [] self.current_rect = Rect() self.left_button_down = False
@staticmethod def __clip(value, low, high): """ clip value between low and high Parameters ---------- value: a number value to be clipped low: a number low limit high: a number high limit Returns ------- output: a number clipped value """ output = max(value, low) output = min(output, high) return output
def shrink_point(self, x, y): """ shrink point (x, y) to inside image_for_show Parameters ---------- x, y: int, int coordinate of a point Returns ------- x_shrink, y_shrink: int, int shrinked coordinate """ height, width = self.image_for_show.shape[0:2] x_shrink = self.__clip(x, 0, width) y_shrink = self.__clip(y, 0, height) return (x_shrink, y_shrink)
def append(self): """ add a rect to rects list """ self.rects.append(copy.deepcopy(self.current_rect))
def pop(self): """ pop a rect from rects list """ rect = Rect() if self.rects: rect = self.rects.pop() return rect
def reset_image(self): """ reset image_for_show using original image """ self.image_for_show = self.original_image.copy()
def draw(self): """ draw rects on image_for_show """ for rect in self.rects: cv2.rectangle(self.image_for_show, rect.tl, rect.br, color=self.color, thickness=self.thickness)
def draw_current_rect(self): """ draw current rect on image_for_show """ cv2.rectangle(self.image_for_show, self.current_rect.tl, self.current_rect.br, color=self.color, thickness=self.thickness)
def onmouse_draw_rect(event, x, y, flags, draw_rects): if event == cv2.EVENT_LBUTTONDOWN: # pick first point of rect print('pt1: x = %d, y = %d' % (x, y)) draw_rects.left_button_down = True draw_rects.current_rect.tl = (x, y) if draw_rects.left_button_down and event == cv2.EVENT_MOUSEMOVE: # pick second point of rect and draw current rect draw_rects.current_rect.br = draw_rects.shrink_point(x, y) draw_rects.reset_image() draw_rects.draw() draw_rects.draw_current_rect() if event == cv2.EVENT_LBUTTONUP: # finish drawing current rect and append it to rects list draw_rects.left_button_down = False draw_rects.current_rect.br = draw_rects.shrink_point(x, y) print('pt2: x = %d, y = %d' % (draw_rects.current_rect.br[0], draw_rects.current_rect.br[1])) draw_rects.current_rect.regularize() draw_rects.append() if (not draw_rects.left_button_down) and event == cv2.EVENT_RBUTTONDOWN: # pop the last rect in rects list draw_rects.pop() draw_rects.reset_image() draw_rects.draw()
if __name__ == '__main__': #image = np.zeros((256, 256, 3), np.uint8) image = cv2.imread("111.jpg") draw_rects = DrawRects(image, (0, 255, 0), 2) cv2.namedWindow(WIN_NAME, 0) cv2.setMouseCallback(WIN_NAME, onmouse_draw_rect, draw_rects) while True: cv2.imshow(WIN_NAME, draw_rects.image_for_show) key = cv2.waitKey(30) if key == 27: # ESC break cv2.destroyAllWindows() |
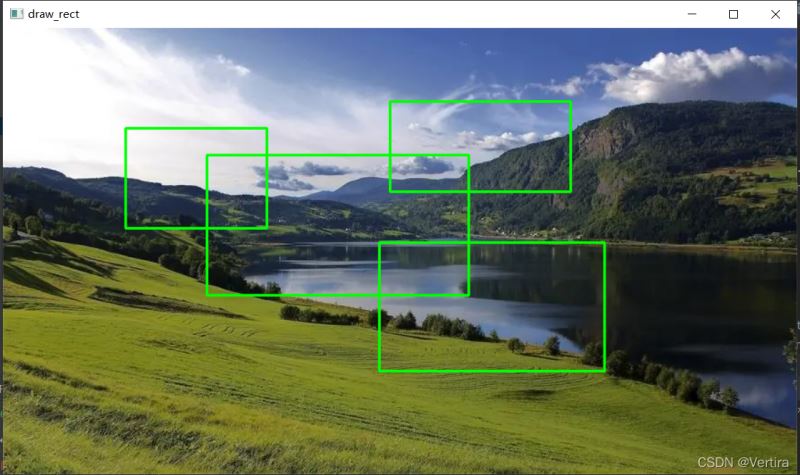
运行效果
补充
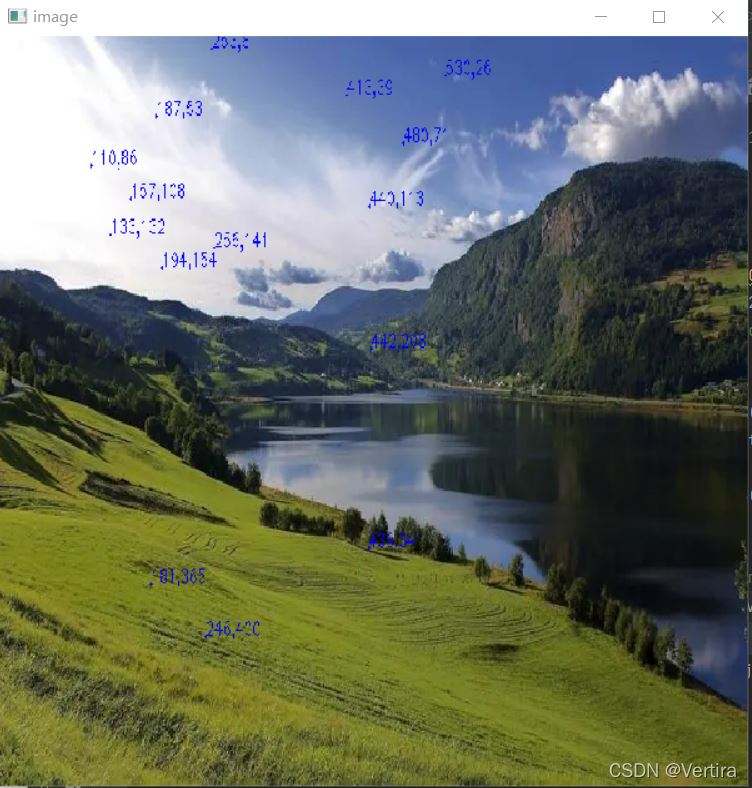
当然Python+OpenCV不仅能做到在图像上绘制任意大小矩形,还能实现鼠标点击图像时会显示其坐标值
下面是实现代码
|
1 2 3 4 5 6 7 8 9 10 11 12 13 14 15 16 17 18 19 20 21 22 23 24 25 26 27 28 29 30 31 32 |
import cv2 import numpy as np
img = cv2.imread("111.jpg")
# print img.shape
def on_EVENT_LBUTTONDOWN(event, x, y, flags, param): if event == cv2.EVENT_LBUTTONDOWN: xy = "%d,%d" % (x, y) xy cv2.circle(img, (x, y), 1, (255, 0, 0), thickness=-1) cv2.putText(img, xy, (x, y), cv2.FONT_HERSHEY_PLAIN, 1.0, (255, 255, 255), thickness=1) cv2.imshow("image", img)
cv2.namedWindow("image",cv2.WINDOW_KEEPRATIO) cv2.setMouseCallback("image", on_EVENT_LBUTTONDOWN) cv2.imshow("image", img)
while (True): try: cv2.waitKey(100) except Exception: cv2.destroyWindow("image") break
cv2.waitKey(0) cv2.destroyAllWindow() |
运行结果: