任务调度(Task Scheduling)是很多软件系统中的重要组成部分,字面上的意思是按照一定要求分配运行一些通常时间较长的脚本或程序。在爬虫管理平台 Crawlab 中,任务调度是其中的核心模块,相信不少朋友会好奇如何编写一个任务调度系统。本篇文章会教读者用 Go 语言编写一个非常简单的任务调度系统。
思路
我们首先理清一下思路,开发最小化任务调度器需要什么。
- 交互界面(API)
- 定时任务(Cron)
- 任务执行(Execute Tasks)
整个流程如下:
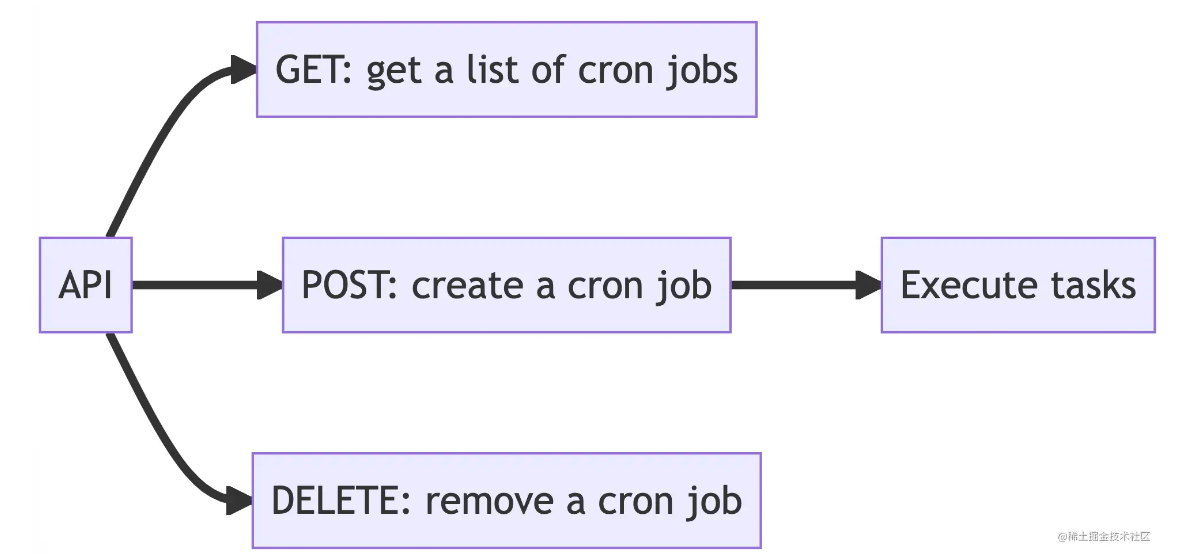
我们通过 API 创建定时任务,执行器根据定时任务标准定期执行脚本。
实战
交互界面
首先我们来搭个架子。在项目目录下创建一个 main.go 文件,并输入以下内容。其中 gin 是非常流行的 Go 语言 API 引擎。
|
1 2 3 4 5 6 7 8 9 10 11 12 13 14 15 16 17 18 19 20 21 22 23 |
package main ? import ( "fmt" "github.com/gin-gonic/gin" "os" ) ? func main() { // api engine app := gin.New() ? // api routes app.GET("/jobs", GetJobs) app.POST("/jobs", AddJob) app.DELETE("/jobs", DeleteJob) ? // run api on port 9092 if err := app.Run(":9092"); err != nil { _, err = fmt.Fprintln(os.Stderr, err) os.Exit(1) } } |
然后添加 api.go 文件,输入以下内容,注意,这里没有任何代码实现,只是加入了占位区域。
|
1 2 3 4 5 6 7 8 9 10 11 12 13 14 15 |
package main ? import "github.com/gin-gonic/gin" ? func GetJobs(c *gin.Context) { // TODO: implementation here } ? func AddJob(c *gin.Context) { // TODO: implementation here } ? func DeleteJob(c *gin.Context) { // TODO: implementation here } |
定时任务
然后是任务调度的核心,定时任务。这里我们使用 robfig/cron,Go 语言比较流行的定时任务库。
现在创建 cron.go 文件,输入以下内容。其中 Cron 就是 robfig/cron 库中的 Cron 类生成的实例。
|
1 2 3 4 5 6 7 8 9 10 11 |
package main ? import "github.com/robfig/cron" ? func init() { // start to run Cron.Run() } ? // Cron create a new cron.Cron instance var Cron = cron.New() |
现在创建好了主要定时任务实例,就可以将核心逻辑添加在刚才的 API 占位区域了。
同样是 api.go ,将核心代码添加进来。
|
1 2 3 4 5 6 7 8 9 10 11 12 13 14 15 16 17 18 19 20 21 22 23 24 25 26 27 28 29 30 31 32 33 34 35 36 37 38 39 40 41 42 43 44 45 46 47 48 49 50 51 52 53 54 55 56 57 58 59 60 61 62 |
package main ? import ( "github.com/gin-gonic/gin" "github.com/robfig/cron/v3" "net/http" "strconv" ) ? func GetJobs(c *gin.Context) { // return a list of cron job entries var results []map[string]interface{} for _, e := range Cron.Entries() { results = append(results, map[string]interface{}{ "id": e.ID, "next": e.Next, }) } c.JSON(http.StatusOK, Cron.Entries()) } ? func AddJob(c *gin.Context) { // post JSON payload var payload struct { Cron string `json:"cron"` Exec string `json:"exec"` } if err := c.ShouldBindJSON(&payload); err != nil { c.AbortWithStatus(http.StatusBadRequest) return } ? // add cron job eid, err := Cron.AddFunc(payload.Cron, func() { // TODO: implementation here }) if err != nil { c.AbortWithStatusJSON(http.StatusInternalServerError, map[string]interface{}{ "error": err.Error(), }) return } ? c.AbortWithStatusJSON(http.StatusOK, map[string]interface{}{ "id": eid, }) } ? func DeleteJob(c *gin.Context) { // cron job entry id id := c.Param("id") eid, err := strconv.Atoi(id) if err != nil { c.AbortWithStatus(http.StatusBadRequest) return } ? // remove cron job Cron.Remove(cron.EntryID(eid)) ? c.AbortWithStatus(http.StatusOK) } |
在这段代码中,我们实现了大部分逻辑,只在 AddJob 的 Cron.AddFunc 中第二个参数里,剩下最后一部分执行任务的代码。下面将来实现一下。
任务执行
现在需要添加任务执行的代码逻辑,咱们创建 exec.go 文件,输入以下内容。这里我们用到了 Go 语言内置的 shell 运行管理库 os/exec,可以执行任何 shell 命令。
|
1 2 3 4 5 6 7 8 9 10 11 12 13 14 15 16 17 18 19 20 21 22 23 24 25 26 27 28 |
package main ? import ( "fmt" "os" "os/exec" "strings" ) ? func ExecuteTask(execCmd string) { // execute command string parts, delimited by space execParts := strings.Split(execCmd, " ") ? // executable name execName := execParts[0] ? // execute command parameters execParams := strings.Join(execParts[1:], " ") ? // execute command instance cmd := exec.Command(execName, execParams) ? // run execute command instance if err := cmd.Run(); err != nil { _, err = fmt.Fprintln(os.Stderr, err) fmt.Println(err.Error()) } } |
好了,现在我们将这部分执行代码逻辑放到之前的占位区域中。
|
1 2 3 4 5 6 |
... // add cron job eid, _ := Cron.AddFunc(payload.Cron, func() { ExecuteTask(payload.Exec) }) ... |
代码效果
OK,大功告成!现在我们可以试试运行这个极简的任务调度器了。
在命令行中敲入 go run .,API 引擎就启动起来了。
|
1 2 3 4 5 6 7 8 9 10 |
[GIN-debug] [WARNING] Running in "debug" mode. Switch to "release" mode in production. - using env: export GIN_MODE=release - using code: gin.SetMode(gin.ReleaseMode) ? [GIN-debug] GET /jobs --> main.GetJobs (1 handlers) [GIN-debug] POST /jobs --> main.AddJob (1 handlers) [GIN-debug] DELETE /jobs/:id --> main.DeleteJob (1 handlers) [GIN-debug] [WARNING] You trusted all proxies, this is NOT safe. We recommend you to set a value. Please check https://pkg.go.dev/github.com/gin-gonic/gin#readme-don-t-trust-all-proxies for details. [GIN-debug] Listening and serving HTTP on :9092 |
现在打开另一个命令行窗口,输入 curl -X POST -d '{"cron":"* * * * *","exec":"touch /tmp/hello.txt"}' http://localhost:9092/jobs,会得到如下返回结果。表示已经生成了相应的定时任务,任务 ID 为 1,每分钟跑一次,会更新一次 /tmp/hello.txt。
{"id":1}
在这个命令行窗口中输入 curl http://localhost:9092/jobs。
[{"id":1,"next":"2022-10-03T12:46:00+08:00"}]
这表示下一次执行是 1 分钟之后。
等待一分钟,执行 ls -l /tmp/hello.txt,得到如下结果。
-rw-r--r-- 1 marvzhang wheel 0B Oct 3 12:46 /tmp/hello.txt
也就是说,执行成功了,大功告成!
总结
本篇文章通过将 Go 语言几个库简单组合,就开发出了一个极简的任务调度系统。所用到的核心库:
- gin
- robfig/cron
- os/exec
整个代码示例仓库在 GitHub 上: https://github.com/tikazyq/codao-code/tree/main/2022-10/go-task-scheduler