1. 安装vscode插件
- C/C++
- C/C++ Extension
2. 配置文件修改
vscode中每个项目都有一套配置文件集合,位于.vscode目录下,其中有:
- tasks.json:编译的相关配置
- launch.json:debug的相关配置
- c_cpp_properties.json:c/c++程序相关配置
2.1 自定义c_cpp_properties.json
|
1 2 3 4 5 6 7 8 9 10 11 12 13 14 15 16 17 |
{ "configurations": [ { "name": "Linux", # 配置标识符 linux, mac, win32 "includePath": [ "${workspaceFolder}/**" #头文件搜索路径 # **:表示递归搜索 ], "defines": [], "compilerPath": "/usr/bin/gcc", # 编译器路径 "cStandard": "gnu11", # c语言的标准版本 "cppStandard": "gnu++14", # c++语言的标准版本 "intelliSenseMode": "linux-gcc-x64" } ], "version": 4 } |
2.2 自定义tasks.json文件
|
1 2 3 4 5 6 7 8 9 10 11 12 13 14 15 16 17 18 19 20 21 22 23 24 25 26 27 28 |
{ "tasks": [ { "type": "shell", "label": "test", "command": "make", // "args": [ // "-fdiagnostics-color=always", // "-g", // "${file}", // "-o", // "${fileDirname}/${fileBasenameNoExtension}" // ], // "options": { // "cwd": "${fileDirname}" // }, // "problemMatcher": [ // "$gcc" // ], "group": { "kind": "build", "isDefault": true }, "detail": "调试器生成的任务。" } ], "version": "2.0.0" } |
其他参数含义:
- workspaceFolder:打开的vscode目录
- workspaceFolderBasename:workspaceFolder的根目录
- fileDirname: 当前VsCode打开文件的目录
- fileBasenameNoExtension:file里每个文件不带后缀
2.3 Debug
|
1 2 3 4 5 6 7 8 9 10 11 12 13 14 15 16 17 18 19 20 21 22 23 24 25 26 27 28 29 30 31 32 33 34 35 36 37 38 39 |
{ // 使用 IntelliSense 了解相关属性。 // 悬停以查看现有属性的描述。 // 欲了解更多信息,请访问: https://go.microsoft.com/fwlink/?linkid=830387 "version": "0.2.0", "configurations": [ { "name": "test", "type": "cppdbg", // debug的模式,分为launch和attach两种 "request": "launch", // 程序可执行文件的完整路径 "program": "${workspaceFolder}/deepstream-test-rt-src-add-del", // 传递给程序的命令行参数 "args": ["file:///opt/nvidia/deepstream/deepstream-6.0/samples/streams/sample_720p.h264"], // 可选参数。如果为 true,则调试程序应在目标的入口点处停止 "stopAtEntry": false, // 目标的工作目录 "cwd": "${workspaceFolder}", // 要添加到程序环境的环境变量 "environment": [], "externalConsole": false, // 指示 MIDebugEngine 要连接到的控制台调试程序。允许的值为 "gdb"、"lldb"。 "MIMode": "gdb",
"setupCommands": [ { "description": "Enable pretty-printing for gdb", "text": "-enable-pretty-printing", "ignoreFailures": true } ], // 调试会话开始前要运行的任务 "preLaunchTask": "test", // MI 调试程序(如 gdb)的路径。如果未指定,将首先在路径中搜索调试程序 "miDebuggerPath": "/usr/bin/gdb" } ] } |
3. Makefile环境下
使用 -g 来启动调试环境
4. Python调试
|
1 2 3 4 5 6 7 8 9 10 11 12 13 14 15 16 17 18 19 |
{ // 使用 IntelliSense 了解相关属性。 // 悬停以查看现有属性的描述。 // 欲了解更多信息,请访问: https://go.microsoft.com/fwlink/?linkid=830387 "version": "0.2.0", "configurations": [ { "name": "test", "type": "python", "request": "launch", "program": "${workspaceRoot}/tools/inference.py", "args": ["--config", "anomalib/models/padim/config.yaml", "--weight_path", "results/padim/mvtec/test7/weights/model.ckpt", "--image_path", "datasets/MVTec/test7/train/good/", "--save_path", "results/padim/mvtec/test7/train_data"], "console": "integratedTerminal", "cwd":"${workspaceRoot}", "justMyCode": true } ] } |
5. 调试gstreamer源码
GStreamer 是用来构建流媒体应用的开源多媒体框架(framework),其目标是要简化音/视频应用程序的开发.
下载gstreamer源码
使用gst-inspect1.0工具可以获取gstreamer中element的信息,以multifilesrc element为例,输入如下命令:
|
1 |
gst-inspect-1.0 multifilesrc |
即可输出下图的信息,找到源码下载地址。

选择如下版本
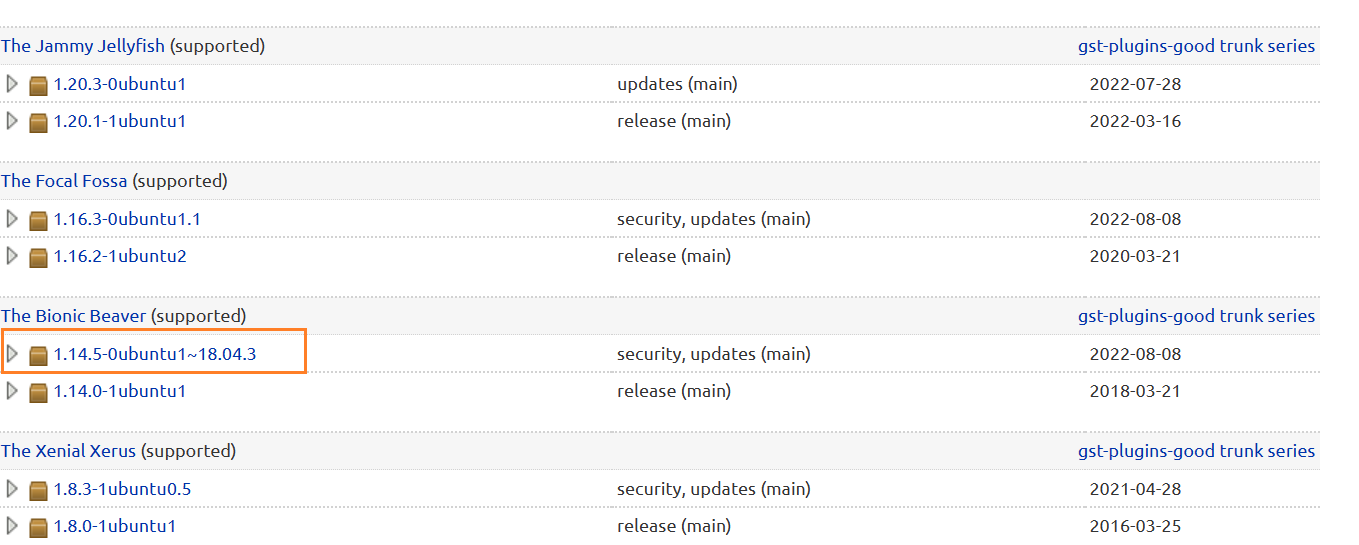
下载源码,解压
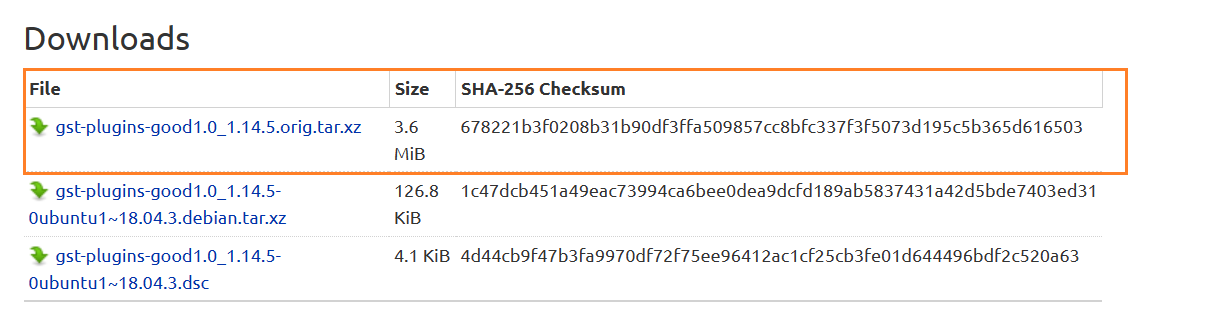
编译源码
编译源码可以参考如下文章【编译gstreamer插件-multifilesrc】
修改Makefile
搜索-g选项信息

将-O2选项修改未-O0

重新编译得到动态库
|
1 2 3 4 5 6 7 8 9 10 11 12 13 14 15 16 17 |
root@2a2466b40131:~/homework/gst_plugin_good/gst/multifile# make CC test_splitmux_part_reader-test-splitmuxpartreader.o CC test_splitmux_part_reader-gstsplitmuxpartreader.o CC test_splitmux_part_reader-gstsplitmuxsrc.o CC test_splitmux_part_reader-gstsplitutils.o CC test_splitmux_part_reader-patternspec.o CCLD test-splitmux-part-reader CC libgstmultifile_la-gstmultifilesink.lo CC libgstmultifile_la-gstmultifilesrc.lo CC libgstmultifile_la-gstmultifile.lo CC libgstmultifile_la-gstsplitfilesrc.lo CC libgstmultifile_la-gstsplitmuxsink.lo CC libgstmultifile_la-gstsplitmuxpartreader.lo CC libgstmultifile_la-gstsplitmuxsrc.lo CC libgstmultifile_la-gstsplitutils.lo CC libgstmultifile_la-patternspec.lo CCLD libgstmultifile.la |
4.将动态库拷贝到系统路径下
|
1 2 |
make install cp /root/homework/gst_plugin_good/bin/lib/gstreamer-1.0/libgstmultifile.so /usr/lib/x86_64-linux-gnu/gstreamer-1.0/ |
修改launch.json文件内容
launch.json文件内容重点需要修改如下三个参数:

整个launch.json文件内容如下,具体测试的pipeline如下:
|
1 |
gst-launch-1.0 multifilesrc location=test%d.jpg ! jpegparse ! jpegdec ! videoconvert ! jpegenc ! multifilesink location=output%d.jpg |
|
1 2 3 4 5 6 7 8 9 10 11 12 13 14 15 16 17 18 19 20 21 22 23 24 25 26 27 28 29 30 31 32 33 34 35 36 37 38 39 |
{ // 使用 IntelliSense 了解相关属性。 // 悬停以查看现有属性的描述。 // 欲了解更多信息,请访问: https://go.microsoft.com/fwlink/?linkid=830387 "version": "0.2.0", "configurations": [ { "name": "test", "type": "cppdbg", // debug的模式,分为launch和attach两种 "request": "launch", // 程序可执行文件的完整路径 "program": "/usr/bin/gst-launch-1.0", // 传递给程序的命令行参数 "args":["multifilesrc", "location=test%d.jpg", "!", "jpegparse", "!", "jpegdec", "!", "videoconvert", "!", "jpegenc", "!", "multifilesink", "location=output%d.jpg"], // 可选参数。如果为 true,则调试程序应在目标的入口点处停止 "stopAtEntry": false, // 目标的工作目录 "cwd": "${workspaceFolder}/data", // 要添加到程序环境的环境变量 "environment": [], "externalConsole": false, // 指示 MIDebugEngine 要连接到的控制台调试程序。允许的值为 "gdb"、"lldb"。 "MIMode": "gdb",
"setupCommands": [ { "description": "Enable pretty-printing for gdb", "text": "-enable-pretty-printing", "ignoreFailures": true } ], // 调试会话开始前要运行的任务 // "preLaunchTask": "test", // MI 调试程序(如 gdb)的路径。如果未指定,将首先在路径中搜索调试程序 "miDebuggerPath": "/usr/bin/gdb" } ] } |
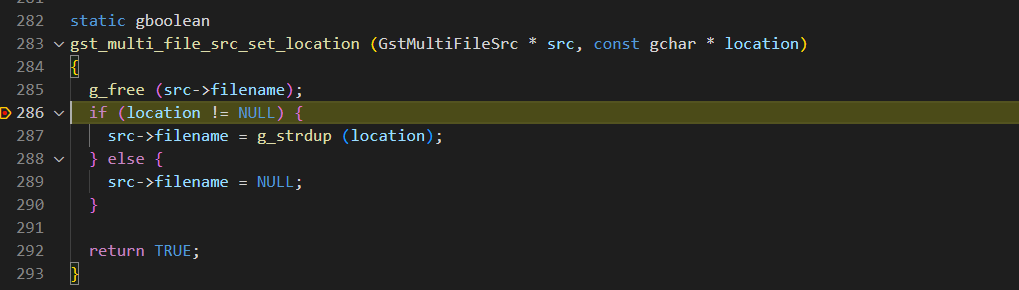
输入断点
在如下gst_multi_file_src_set_location函数中打上断点,按F5启动调试,即可进行调试
总结
在本文中,主要介绍了如何使用vscode调试C++和python程序,并进一步分析了如何调试gstreamer源码,讲述了如何调试gstreamer源码的具体流程。