Nginx详解
Nginx与Apache一样,都是web服务器,但是Nginx比Apache多一些功能,比如Nginx可以做代理,可以做负载均衡……
1. Nginx关键特性
- 支持高并发
- 单机Nginx可支持十万级别的并发连接,经过优化后可支持百万级别并发
- 内存资源消耗低
- 在同级web中,Nginx占用的内存最少,一万非活跃的http长连接仅消耗2.5M内存
- 高扩展性
- 和Apache一样,Nginx采用模块化设计,并支持非常多丰富的第三方模块
- 高可靠性
- Nginx采用master-worker模式,如果worker出现故障,master可以快速开启一个新的worker来提供服务
2. Nginx配置
|
1 2 3 4 5 6 7 8 9 10 11 12 13 14 15 16 17 18 19 20 21 22 23 24 25 26 27 28 29 30 31 32 33 34 35 36 |
[root@ceph conf.d]# grep -Ev "^#|^$|#" /etc/nginx/nginx.conf |cat -n user nginx; worker_processes auto; error_log /var/log/nginx/error.log; pid /run/nginx.pid; include /usr/share/nginx/modules/*.conf; events { worker_connections 1024; } http { log_format main '$remote_addr - $remote_user [$time_local] "$request" ' '$status $body_bytes_sent "$http_referer" ' '"$http_user_agent" "$http_x_forwarded_for"'; access_log /var/log/nginx/access.log main; sendfile on; tcp_nopush on; tcp_nodelay on; keepalive_timeout 65; types_hash_max_size 4096; include /etc/nginx/mime.types; default_type application/octet-stream; include /etc/nginx/conf.d/*.conf; server { listen 80; listen [::]:80; server_name _; root /usr/share/nginx/html; include /etc/nginx/default.d/*.conf; error_page 404 /404.html; location = /40x.html { } error_page 500 502 503 504 /50x.html; location = /50x.html { } } } |
由于之前很详细的写过Apache的配置了,这里就说一下这俩服务之间的差异,nginx的配置文件每行配置结束必须以分号;结尾
Nginx也可以配置启动的用户,默认为nginx,可以修改Nginx工作进程,默认为auto(与CPU核心数保持一致),也可以手动修改定义nginx的错误日志
这两个都是Apache服务里面也有的,这里就简答说一下
2.1 event
第六行event这个是指定nginx的工作模式,默认的,Apache也有这个模式,这个段落里面的内容
|
1 2 3 |
events { worker_connections 1024; 指定单个进程的连接数 } |
2.2 http
这个段落里面就是一些http的配置
2.2.1 log_format
首先就是定义日志的格式log_format,然后就是access.log这个就不细写
2.2.2 sendfile
sendfile on;这个代表高效传输,也就是可以将文件直接从磁盘传输到网络中,而不先读到内存
2.2.3 tcp_nopush
tcp_nopush on 立刻回应tcp的请求
2.2.4 tcp_nodelay
tcp_nodelay on 对于小数据包直接回应
2.2.5 keepalive_timeout
keepalive_timeout 65,这个通过名字就可以知道,是长连接的超时时间
2.2.6 include
我跳过了types_hash_max_size,这个是hash散列表,我也不知道是干嘛的
include /etc/nginx/mime.types; 这里是载入nginx能够识别的类型,你可以打开这个文件去看这里面都定义了什么,打开就一目了然了
2.2.7 default_type
default_type application/octet-stream; 二进制的文件可以直接下载
2.2.8 server
|
1 2 3 4 5 6 7 8 9 10 11 12 13 14 |
server { listen 80; listen [::]:80; server_name _; root /usr/share/nginx/html; include /etc/nginx/default.d/*.conf; error_page 404 /404.html; location = /40x.html { } error_page 500 502 503 504 /50x.html; location = /50x.html { } } } |
这里的server对应的就是Apache的虚拟主机
listen 监听的端口,他这里默认监听了2个,一个是IPv4,另一个是IPv6
server_name:对外提供的服务名,也就是域名
root:网站根目录
include: 定义虚拟主机的特性,可以将一些其他的特性卸载conf.d/下之后他会自动加载配置
error_page 404 :这个是错误页,当404出现的时候,nginx会返回网站根目录下的404.html
locatioin: 这个是nginx的重头戏,叫做路由规则,你可以将路由策略写在这,他就会根据你的策略来处理流量,这个我们稍后细讲
error_page 500当服务发生500以上的错误的时候,nginx返回网站根目录下的50x.html
3. 配置Nginx虚拟主机
Nginx也支持3种虚拟主机,与Apache一样
- 基于端口的虚拟主机
- 基于IP的虚拟主机
- 基于域名的虚拟主机
3.1 基于端口
虚拟主机我们可以在conf.d下进行配置
|
1 2 3 4 5 6 7 8 9 10 11 12 13 14 15 16 |
[root@ceph conf.d]# vim virthost.conf server { listen 81; root /web1; } server { listen 82; root /web2; } [root@ceph conf.d]# echo 81 > /web1/index.html [root@ceph conf.d]# echo 82 > /web2/index.html [root@ceph conf.d]# systemctl restart nginx [root@ceph conf.d]# curl localhost:82 82 [root@ceph conf.d]# curl localhost:81 81 |
基于端口的虚拟主机这样就配好了
3.2 基于IP
首先配置一个临时IP
|
1 2 3 |
[root@ceph conf.d]# sudo ip addr add 192.168.1.100/24 dev ens33 [root@ceph conf.d]# ip a |grep 192.168.1.100 inet 192.168.1.100/24 scope global ens33 |
虚拟的IP就配置好了,接下来配置nginx
|
1 2 3 4 5 6 7 8 9 10 11 12 13 14 15 16 17 |
[root@ceph conf.d]# vim virthost.conf server { listen 81; root /web1; } server { listen 82; root /web2; } server { listen 192.168.200.210:80; root /web3; } server { listen 192.168.1.100:80; root /web4; } |
然后我们创建对应的网站根目录以及index.html
|
1 2 3 4 5 6 7 |
[root@ceph conf.d]# echo 192.168.200.210 > /web3/index.html [root@ceph conf.d]# echo 192.168.1.100 > /web4/index.html [root@ceph conf.d]# systemctl restart nginx [root@ceph conf.d]# curl 192.168.200.210 192.168.200.210 [root@ceph conf.d]# curl 192.168.1.100 192.168.1.100 |
可以看到,通过不同的ip访问回显是不同的内容
3.3 基于域名
|
1 2 3 4 5 6 7 8 9 10 11 |
[root@ceph conf.d]# vim virthost.conf server { listen 80; server_name test.com; root /web5; } server { listen 80; server_name example.com; root /web6; } |
创建根目录以及重启服务,还需要做hosts解析
|
1 2 3 4 5 6 7 8 9 10 |
[root@ceph conf.d]# echo web5 > /web5/index.html [root@ceph conf.d]# echo web6 > /web6/index.html [root@ceph conf.d]# systemctl restart nginx [root@ceph conf.d]# vim /etc/hosts 192.168.200.210 test.com 192.168.200.210 example.com [root@ceph conf.d]# curl test.com web5 [root@ceph conf.d]# curl example.com web6 |
这样也是可以访问到对应的文件的
4. Location
这个是nginx最重要的配置了,在Apache里面访问控制是用Directory和Files来做的,那么在nginx里面的做法就是location了
4.1 拒绝访问
我不想你访问网站根目录下的/test.html,那么我的路由规则就应该这样写,还是在虚拟主机里定义
|
1 2 3 4 5 6 7 8 9 |
[root@ceph conf.d]# vim virthost.conf server { listen 80; server_name test.com; root /web5; location /test.html { return 403; } } |
我们来创建这个test.html文件,并尝试访问
|
1 2 3 4 5 6 7 8 9 10 |
[root@ceph conf.d]# echo "test file" > /web5/test.html [root@ceph conf.d]# systemctl restart nginx [root@ceph conf.d]# curl 192.168.200.210/test.html <html> <head><title>403 Forbidden</title></head> <body> <center><h1>403 Forbidden</h1></center> <hr><center>nginx</center> </body> </html> |
看到了吗?他就返回的是403,这样做之后,访问test.html的请求就被拒绝掉了,但是如果我们需要拒绝掉所有以test开头的文件呢?也是跟Apache一样使用 * 号吗?不,Nginx是另外的做法
4.2 拒绝访问test开头的所有文件
|
1 2 3 4 5 6 7 8 9 10 11 12 |
[root@ceph conf.d]# vim virthost.conf server { listen 80; server_name test.com; root /web5; location ^~ /test { return 403; } } [root@ceph conf.d]# echo test > /web5/test.1 [root@ceph conf.d]# echo test > /web5/test.2 [root@ceph conf.d]# systemctl restart nginx |
我们在/web5下创建了test.1和test.2包括之前创建的test.html一共有3个test开头的文件,那我们现在来尝试访问一下
|
1 2 3 4 5 6 7 8 9 10 11 12 13 14 15 16 17 18 19 20 21 |
[root@ceph conf.d]# curl 192.168.200.210/test.html -I HTTP/1.1 403 Forbidden Server: nginx Date: Tue, 02 Jul 2024 09:09:49 GMT Content-Type: text/html Content-Length: 146 Connection: keep-alive [root@ceph conf.d]# curl 192.168.200.210/test.1 -I HTTP/1.1 403 Forbidden Server: nginx Date: Tue, 02 Jul 2024 09:09:56 GMT Content-Type: text/html Content-Length: 146 Connection: keep-alive [root@ceph conf.d]# curl 192.168.200.210/test.xxx -I HTTP/1.1 403 Forbidden Server: nginx Date: Tue, 02 Jul 2024 09:10:12 GMT Content-Type: text/html Content-Length: 146 Connection: keep-alive |
看到了吧,尽管我们访问一个不存在的文件,按道理应该是返回404,但是这个文件是以test开头,那么他会被拒绝访问,不管这个文件存不存在
但是这样配置,只能拒绝掉以test开头的,我如果访问的是Test,那么他就不会被拒绝了
|
1 2 3 4 5 6 7 |
[root@ceph conf.d]# curl 192.168.200.210/Test -I HTTP/1.1 404 Not Found Server: nginx Date: Tue, 02 Jul 2024 09:12:57 GMT Content-Type: text/html Content-Length: 146 Connection: keep-alive |
对吧,因为我们没有这个资源,所以他返回了404,而不是403,说明没有被拒绝,如果想忽略大小写,可以这样做
4.3 忽略大小写
|
1 2 3 4 5 6 7 8 9 |
[root@ceph conf.d]# vim virthost.conf server { listen 80; server_name test.com; root /web5; location ~* /test { return 403; } } |
只需要将^~这个地方改为~*,我们来访问一下看看
|
1 2 3 4 5 6 7 8 9 10 11 12 13 14 15 16 17 18 19 20 21 |
[root@ceph conf.d]# curl -I 192.168.200.210/test HTTP/1.1 403 Forbidden Server: nginx Date: Tue, 02 Jul 2024 09:15:17 GMT Content-Type: text/html Content-Length: 146 Connection: keep-alive [root@ceph conf.d]# curl -I 192.168.200.210/Test HTTP/1.1 403 Forbidden Server: nginx Date: Tue, 02 Jul 2024 09:15:21 GMT Content-Type: text/html Content-Length: 146 Connection: keep-alive [root@ceph conf.d]# curl -I 192.168.200.210/TEst HTTP/1.1 403 Forbidden Server: nginx Date: Tue, 02 Jul 2024 09:15:23 GMT Content-Type: text/html Content-Length: 146 Connection: keep-alive |
现在的配置,不管你的大写的TEST还是小写的test,亦或者是大小写都有的,一律都会被拒绝访问
4.4 反向代理
我们还可以通过location来做反向代理,比如你现在访问我网站下的/那我就直接给你代理到baidu.com去,你要搜索啥你自己去搜吧,你以为这个百度是我给你提供的,其实不然,我是把你的请求给到百度了
|
1 2 3 4 5 6 7 8 9 |
[root@ceph conf.d]# vim virthost.conf server { listen 80; server_name test.com; root /web5; location / { proxy_pass https://www.baidu.com; } } |
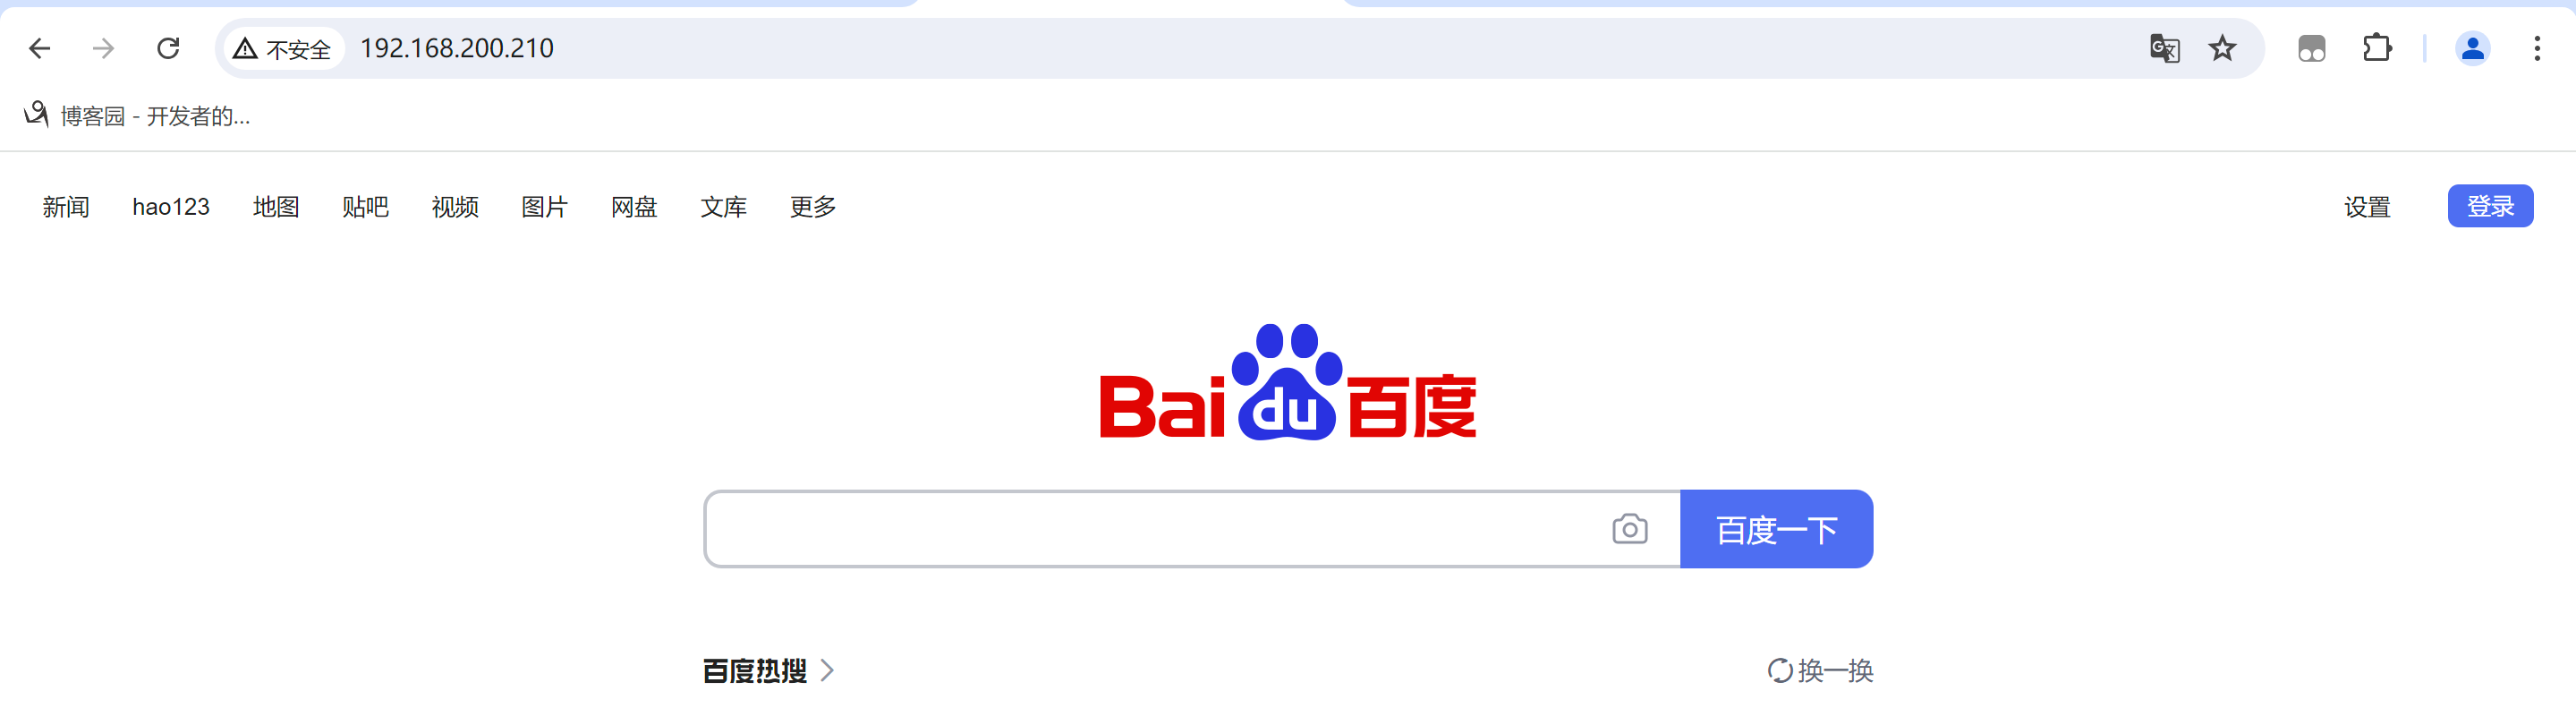
看到了吗?这是货真价实的百度哦,可以搜索内容的
怎么样,你现在就搭建了一个反向代理,客户端只知道他访问的是192.168.200.210这个IP,他并不知道你把他的请求给了百度,所以客户端会以为你就是百度
5. 配置https
nginx配置https的方式其实跟Apache是差不多的,直接告诉他你的密钥文件放在哪,有2种方式可以配置https,第一种是直接改主配置文件,主配置文件里是有https段落的,只不过默认被注释了。
第二种方式就是自己写一个虚拟主机,我这里直接修改主配置文件
|
1 2 3 4 5 6 7 8 9 10 11 12 13 14 15 16 17 |
[root@ceph nginx]# vim nginx.conf server { listen 443 ssl http2; listen [::]:443 ssl http2; server_name _; root /usr/share/nginx/html; ssl_certificate "/etc/nginx/server.crt"; ssl_certificate_key "/etc/nginx/server.key"; # Load configuration files for the default server block. include /etc/nginx/default.d/*.conf; error_page 404 /404.html; location = /40x.html { } error_page 500 502 503 504 /50x.html; location = /50x.html { } } |
将这一段的注释全部给放开,ssl只保留需要的这2行内容,然后将证书地址改为你的证书的实际目录就可以了,然后重启nginx服务
6. Nginx热升级
Nginx热升级是指可以做到不停机升级Nginx的版本,yum安装的Nginx是不支持热升级的,如果想要热升级Nginx,那么你的Nginx必须是源码编译安装的
编译安装流程:
- 下载源码包
- 解压源码包
- 执行预编译 ./configure
- 编译 make
- 编译安装 make install
这是编译安装的流程
在执行到第5步的时候,他就会将编译好的二进制文件放在objs目录下,就是依赖于这个目录下的二进制文件我们才可以做到版本共存
nginx的热升级原理主要依赖于以下几个关键步骤:
- 启动新版本的nginx进程:在进行热升级时,首先启动一个新版本的nginx进程,这个进程会使用新的配置文件和程序文件。
- 旧版本nginx进程继续服务:启动新版本nginx进程后,旧版本的nginx进程仍然继续运行,继续处理客户端的请求。
- 新旧版本的协调切换:新版本nginx进程启动后,会逐渐接管处理新的客户端请求。同时,旧版本nginx进程在处理完当前已有的请求后逐渐退出。
- 共享监听端口:新旧版本的nginx进程可以通过共享监听的网络端口来实现平滑过渡。在大多数情况下,nginx会采用SO_REUSEPORT选项来允许多个进程监听同一个端口。
- 无缝切换:由于新旧版本nginx进程可以并行运行并共享端口,因此在没有中断服务的情况下完成从旧版本到新版本的切换,实现了热升级。
6.1 环境清理
如果你已经使用yum安装了,先卸载nginx
[root@ceph ~]# yum remove -y nginx
6.2 编译安装旧版本Nginx
Nginx下载地址
在这里面找一个相对旧一点的版本,我这里下载一个1.26.1,然后将1.26.1升级到1.27.0
|
1 2 3 4 5 6 7 8 |
[root@ceph ~]# cd /opt/ [root@ceph opt]# wget https://nginx.org/download/nginx-1.26.1.tar.gz [root@ceph opt]# tar -zxf nginx-1.26.1.tar.gz [root@ceph opt]# cd nginx-1.26.1/ [root@ceph nginx-1.26.1]# ls auto CHANGES.ru configure html man src CHANGES conf contrib LICENSE README [root@ceph nginx-1.26.1]# ./configure --prefix=/usr/local/nginx |
在这里执行的时候他可能会报错,根据他的报错你安装相对应的软件包就好了
|
1 2 3 4 5 6 7 8 9 10 11 12 13 14 15 16 17 |
Configuration summary + using system PCRE2 library + OpenSSL library is not used + using system zlib library nginx path prefix: "/usr/local/nginx" nginx binary file: "/usr/local/nginx/sbin/nginx" nginx modules path: "/usr/local/nginx/modules" nginx configuration prefix: "/usr/local/nginx/conf" nginx configuration file: "/usr/local/nginx/conf/nginx.conf" nginx pid file: "/usr/local/nginx/logs/nginx.pid" nginx error log file: "/usr/local/nginx/logs/error.log" nginx http access log file: "/usr/local/nginx/logs/access.log" nginx http client request body temporary files: "client_body_temp" nginx http proxy temporary files: "proxy_temp" nginx http fastcgi temporary files: "fastcgi_temp" nginx http uwsgi temporary files: "uwsgi_temp" nginx http scgi temporary files: "scgi_temp" |
他执行完之后会这样输出就是没有错误,可以继续往下做
|
1 |
[root@ceph nginx-1.26.1]# make -j 4 |
-j 指定并行编译的进程数为4
|
1 |
[root@ceph nginx-1.26.1]# make install |
6.3 启动旧版nginx
由于我们指定的安装路径是/usr/local/nginx,所以他会在这个目录下生成一个sbin的目录,这个目录里面有一个二进制文件nginx,执行他就可以启动nginx
|
1 2 3 4 5 6 7 8 9 10 11 12 |
[root@ceph nginx-1.26.1]# cd /usr/local/nginx/sbin/ [root@ceph sbin]# ./nginx [root@ceph sbin]# curl -I 192.168.200.210 HTTP/1.1 200 OK Server: nginx/1.26.1 Date: Tue, 02 Jul 2024 11:27:47 GMT Content-Type: text/html Content-Length: 615 Last-Modified: Tue, 02 Jul 2024 11:25:09 GMT Connection: keep-alive ETag: "6683e395-267" Accept-Ranges: bytes |
在server这一栏我们可以看见nginx的版本是1.26.1
6.4 下载新版nginx
现在我们将nginx升级到1.27.0
|
1 2 3 4 5 6 |
[root@ceph sbin]# cd /opt/ [root@ceph opt]# wget https://nginx.org/download/nginx-1.27.0.tar.gz [root@ceph opt]# tar -zxf nginx-1.27.0.tar.gz [root@ceph opt]# cd nginx-1.27.0/ [root@ceph nginx-1.27.0]# ./configure --prefix=/usr/local/nginx [root@ceph nginx-1.27.0]# make -j 4 |
这里非常需要注意,一定不要去执行make install了,因为执行这个命令的话会将原来的nginx全部覆盖掉,我们只需要替换掉nginx的二进制文件就好了
我们来到objs目录
|
1 2 3 4 5 6 7 |
[root@ceph nginx-1.27.0]# ls auto CHANGES.ru configure html Makefile objs src CHANGES conf contrib LICENSE man README [root@ceph nginx-1.27.0]# cd objs/ [root@ceph objs]# ls autoconf.err nginx ngx_auto_config.h ngx_modules.c src Makefile nginx.8 ngx_auto_headers.h ngx_modules.o |
这里面就有一个nginx的二进制文件,先别着急启动,我们先将老版本的nginx二进制文件进行备份
|
1 2 3 4 5 6 |
[root@ceph objs]# cp /usr/local/nginx/sbin/nginx /usr/local/nginx/sbin/nginx.bak [root@ceph objs]# cd /usr/local/nginx/sbin/ [root@ceph sbin]# cp /opt/nginx-1.27.0/objs/nginx . cp: overwrite './nginx'? y [root@ceph sbin]# ./nginx -v nginx version: nginx/1.27.0 |
现在我们就已经将1.27.0的二进制文件拷贝到这个地方来了,接下来我们需要将nginx1.27.0也给启动起来。
你这时候可能会有疑问,80端口不是已经被老版本的nginx给占用了吗,我现在在启动不会报错吗?答案肯定是会,所以我们在启动之前还需要进行一个操作,给老版本的nginx'发送一个USR2的信号
|
1 2 3 4 |
[root@ceph sbin]# ps -ef |grep nginx root 46538 1 0 19:27 ? 00:00:00 nginx: master process ./nginx nobody 46539 46538 0 19:27 ? 00:00:00 nginx: worker process root 49680 15412 0 19:36 pts/0 00:00:00 grep --color=auto nginx |
我们查到nginx master的进程id是46538,接下来就是发信号了
|
1 2 3 4 5 6 7 8 |
[root@ceph sbin]# kill -s USR2 46538 # 然后我们再启动nginx [root@ceph sbin]# ps -ef |grep nginx root 46538 1 0 19:27 ? 00:00:00 nginx: master process ./nginx nobody 46539 46538 0 19:27 ? 00:00:00 nginx: worker process root 49708 46538 0 19:37 ? 00:00:00 nginx: master process ./nginx nobody 49709 49708 0 19:37 ? 00:00:00 nginx: worker process root 49761 15412 0 19:38 pts/0 00:00:00 grep --color=auto nginx |
看到了吗?除了老版本的46538之外,还有一个新的nginx master进程,49708
尝试访问
|
1 2 3 4 5 6 7 8 9 10 |
[root@ceph sbin]# curl 192.168.200.210 -I HTTP/1.1 200 OK Server: nginx/1.27.0 Date: Tue, 02 Jul 2024 11:39:04 GMT Content-Type: text/html Content-Length: 615 Last-Modified: Tue, 02 Jul 2024 11:25:09 GMT Connection: keep-alive ETag: "6683e395-267" Accept-Ranges: bytes |
看,他现在处理连接的版本就是1.27.0了,如果老版本的nginx还有连接在处理的话也是不会受到影响的,等我们确认没问题之后我们只需要将老版本给kill掉
|
1 2 3 4 5 |
[root@ceph sbin]# kill 46538 [root@ceph sbin]# ps -ef |grep nginx root 49708 1 0 19:37 ? 00:00:00 nginx: master process ./nginx nobody 49709 49708 0 19:37 ? 00:00:00 nginx: worker process root 49913 15412 0 19:40 pts/0 00:00:00 grep --color=auto nginx |
这个时候老版本就成功退役了,所有的连接都交由新版本的nginx来处理,我们的热升级就搞定了