使用 Python 和 LabelMe 实现图片验证码的自动标注
在处理图片验证码时,手动标注是一项耗时且枯燥的工作。本文将介绍如何使用 Python 和 LabelMe 实现图片验证码的自动标注。通过结合 PaddleOCR 实现自动识别,再生成 LabelMe 格式的标注文件,大幅提升工作效率。
环境准备
必备工具
- Python 3.7+
- PaddleOCR(支持文字识别)
- OpenCV(图像处理)
- LabelMe(标注工具)
安装依赖
使用以下命令安装所需库:
|
1 |
pip install paddleocr labelme opencv-python |
实现自动标注
自动标注分为以下几个步骤:
- 加载图片:读取图片文件,确保格式正确。
- 图像预处理:对验证码图片进行灰度化和二值化处理,优化识别效果。
- OCR 识别:使用 PaddleOCR 获取验证码中的文字和位置。
- 生成标注文件:根据 OCR 结果创建符合 LabelMe 格式的 JSON 文件。
核心代码实现
以下是完整的自动标注脚本:
|
1 2 3 4 5 6 7 8 9 10 11 12 13 14 15 16 17 18 19 20 21 22 23 24 25 26 27 28 29 30 31 32 33 34 35 36 37 38 39 40 41 42 43 44 45 46 47 48 49 50 51 52 53 54 55 56 57 58 59 60 61 |
import os import cv2 from paddleocr import PaddleOCR def auto_label_image(image_path, output_path): # 检查文件是否存在 if not os.path.exists(image_path): print(f"Error: File not found: {image_path}") return # 加载图像 image = cv2.imread(image_path) if image is None: print(f"Error: Failed to load image. Check the file path or format: {image_path}") return # 图像预处理 gray_image = cv2.cvtColor(image, cv2.COLOR_BGR2GRAY) _, binary_image = cv2.threshold(gray_image, 128, 255, cv2.THRESH_BINARY) # 保存预处理后的图片(可选,用于调试) preprocessed_path = os.path.join(output_path, "processed_image.jpg") cv2.imwrite(preprocessed_path, binary_image) # 初始化 OCR ocr = PaddleOCR(use_angle_cls=True, lang='en') # OCR 识别 results = ocr.ocr(preprocessed_path) if not results or not results[0]: print(f"No text detected in the image: {image_path}") return # 获取图像尺寸 image_height, image_width, _ = image.shape # 构建标注 JSON label_data = { "version": "4.5.7", "flags": {}, "shapes": [], "imagePath": os.path.basename(image_path), "imageData": None, "imageHeight": image_height, "imageWidth": image_width, } # 遍历 OCR 结果 for line in results[0]: points = line[0] # 字符位置 [左上, 右上, 右下, 左下] text = line[1][0] # 识别的文本 shape = { "label": text, "points": [points[0], points[2]], # 左上角和右下角 "group_id": None, "shape_type": "rectangle", "flags": {} } label_data["shapes"].append(shape) # 保存标注 JSON json_path = os.path.join(output_path, os.path.basename(image_path).replace('.jpg', '.json')) with open(json_path, 'w') as f: import json json.dump(label_data, f, indent=4) print(f"Saved LabelMe annotation: {json_path}") # 示例 image_path = r"C:\Users\wangzq\Desktop\images\captcha.jpg" output_path = "./annotations" os.makedirs(output_path, exist_ok=True) auto_label_image(image_path, output_path) |
核心逻辑解析
图像预处理
为了提高 OCR 的识别精度,对验证码图片进行灰度化和二值化处理:
|
1 2 |
gray_image = cv2.cvtColor(image, cv2.COLOR_BGR2GRAY) _, binary_image = cv2.threshold(gray_image, 128, 255, cv2.THRESH_BINARY) |
二值化处理可以去除背景噪声,使字符更加清晰。
OCR 识别
使用 PaddleOCR 对图片进行文字检测和识别,返回检测框和文字内容:
|
1 2 |
ocr = PaddleOCR(use_angle_cls=True, lang='en') results = ocr.ocr(preprocessed_path) |
如果 results 为空,说明 OCR 未检测到任何文本。
生成标注文件
根据 OCR 结果,生成 LabelMe 格式的标注文件,关键字段包括:
- shapes:标注框信息,包括位置和对应文字。
- imageHeight 和 imageWidth:图像的尺寸。
运行结果
- 输出预处理图片:在指定路径下保存经过预处理的图片(processed_image.jpg)。
- 生成标注文件:在 output_path 目录下生成与图片同名的 .json 文件。
- 无文本检测提示:如果未检测到任何文本,提示 No text detected in the image。
扩展与优化
模型适配
如果验证码中的字符种类较复杂,可以考虑训练一个专用模型,替代通用的 PaddleOCR。
批量处理
针对多张图片验证码,可以将脚本扩展为批量处理模式:
|
1 2 3 |
for image_file in os.listdir(input_folder): image_path = os.path.join(input_folder, image_file) auto_label_image(image_path, output_path) |
标注类型扩展
目前代码仅支持矩形框标注。如果需要支持多边形标注,可以调整 shape_type 为 polygon 并提供相应点坐标。
总结
本文介绍了如何使用 Python 和 LabelMe 自动标注图片验证码,从图像预处理到生成标注文件的完整流程。通过 PaddleOCR 的结合,可以快速实现验证码字符的自动标注,节省大量时间和精力。
测试
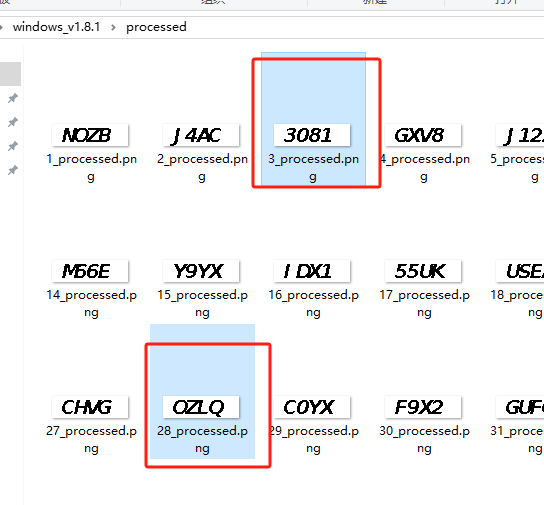
运行完脚本,出来json
|
1 2 3 4 5 6 7 8 9 10 11 12 13 14 15 16 17 18 19 20 21 22 23 24 25 26 |
{ "version": "4.5.7", "flags": {}, "shapes": [ { "label": "OZLQ", "points": [ [ 6.0, 1.0 ], [ 68.0, 21.0 ] ], "group_id": null, "shape_type": "rectangle", "flags": {} } ], "imagePath": "captcha.png", "imageData": null, "imageHeight": 22, "imageWidth": 76 } |
|
1 2 3 4 5 6 7 8 9 10 11 12 13 14 15 16 17 18 19 20 21 22 23 24 25 26 |
{ "version": "4.5.7", "flags": {}, "shapes": [ { "label": "3081", "points": [ [ 6.0, 1.0 ], [ 63.0, 21.0 ] ], "group_id": null, "shape_type": "rectangle", "flags": {} } ], "imagePath": "captcha.png", "imageData": null, "imageHeight": 22, "imageWidth": 76 } |
目前较为复杂还需要深度研究