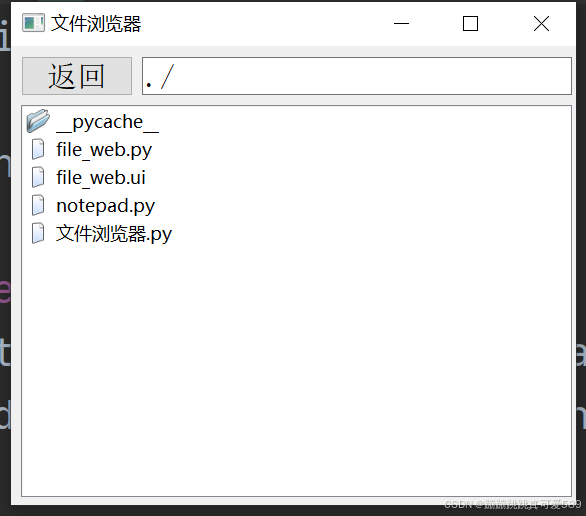
一、效果展示

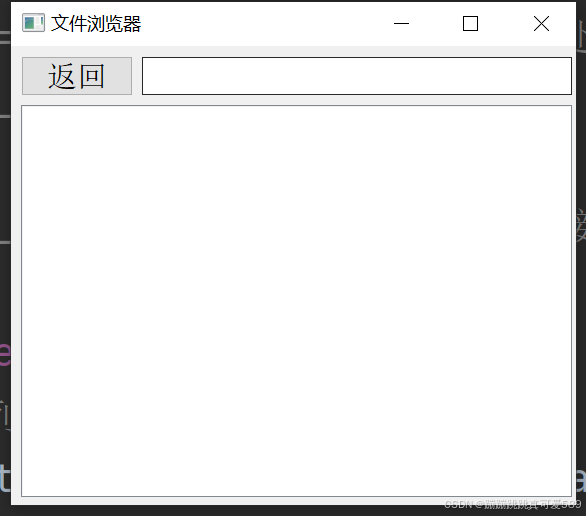
二、界面设计
该界面通过Qt Designer设计
?
|
1 2 3 4 5 6 7 8 9 10 11 12 13 14 15 16 17 18 19 20 21 22 23 24 25 26 27 28 29 30 31 32 33 34 35 36 37 38 39 40 41 42 43 44 45 46 47 48 49 50 |
# -*- coding: utf-8 -*-
# Form implementation generated from reading ui file 'file_web.ui' # # Created by: PyQt5 UI code generator 5.15.9 # # WARNING: Any manual changes made to this file will be lost when pyuic5 is # run again. Do not edit this file unless you know what you are doing.
from PyQt5 import QtCore, QtGui, QtWidgets
class Ui_Form(object): def setupUi(self, Form): Form.setObjectName("Form") Form.resize(565, 459) self.verticalLayoutWidget = QtWidgets.QWidget(Form) self.verticalLayoutWidget.setGeometry(QtCore.QRect(10, 10, 551, 441)) self.verticalLayoutWidget.setObjectName("verticalLayoutWidget") self.verticalLayout = QtWidgets.QVBoxLayout(self.verticalLayoutWidget) self.verticalLayout.setContentsMargins(0, 0, 0, 0) self.verticalLayout.setObjectName("verticalLayout") self.horizontalLayout = QtWidgets.QHBoxLayout() self.horizontalLayout.setObjectName("horizontalLayout") self.back_btn = QtWidgets.QPushButton(self.verticalLayoutWidget) self.back_btn.setMinimumSize(QtCore.QSize(40, 40)) font = QtGui.QFont() font.setPointSize(15) self.back_btn.setFont(font) self.back_btn.setObjectName("back_btn") self.horizontalLayout.addWidget(self.back_btn) self.lineEdit = QtWidgets.QLineEdit(self.verticalLayoutWidget) font = QtGui.QFont() font.setPointSize(15) self.lineEdit.setFont(font) self.lineEdit.setObjectName("lineEdit") self.horizontalLayout.addWidget(self.lineEdit) self.verticalLayout.addLayout(self.horizontalLayout) self.listWidget = QtWidgets.QListWidget(self.verticalLayoutWidget) self.listWidget.setObjectName("listWidget") self.verticalLayout.addWidget(self.listWidget)
self.retranslateUi(Form) QtCore.QMetaObject.connectSlotsByName(Form)
def retranslateUi(self, Form): _translate = QtCore.QCoreApplication.translate Form.setWindowTitle(_translate("Form", "文件浏览器")) self.back_btn.setText(_translate("Form", "返回")) |
三、 信号与槽连接
3.1、得到当前的目录路径
?
|
1 2 3 4 5 6 7 8 9 10 11 12 13 14 15 16 17 |
def show_dir(self): # 显示当前目录内容的函数 self.listWidget.clear() # 清空列表 self.dir.setPath(self.lineEdit.text()) # 设置QDir对象的路径为文本框中的路径 Dir_filter = QDir.AllEntries | QDir.NoDotAndDotDot # 过滤条件:所有条目,不包括.和.. sort_filter = QDir.DirsFirst # 排序条件:文件夹优先
self.list_list = self.dir.entryInfoList(Dir_filter, sort_filter) # 获取目录列表 for i in self.list_list: # 遍历目录列表 item = QListWidgetItem() # 创建新的列表项 # 根据条目类型设置图标 if i.isDir(): item.setIcon(QIcon('../菜单/images/icon/dir.png')) # 设置目录图标 elif i.isFile(): item.setIcon(QIcon('../菜单/images/icon/file.png')) # 设置文件图标 item.setText(i.fileName()) # 设置列表项的文本为文件或目录名 self.listWidget.addItem(item) # 将项添加到列表中 |
3.2、 选择目录中的选项双击
?
|
1 2 3 4 5 6 7 8 9 10 11 12 13 14 15 16 |
def btn_btn(self, item): # 双击列表项的槽函数 result = self.dir.cd(item.text()) # 进入选中的目录 print(result) # 打印进入结果 if result: # 如果成功进入目录 path = self.dir.absolutePath() # 获取当前目录的绝对路径 self.lineEdit.setText(path) # 更新路径文本框 self.show_dir() # 更新目录展示 else: # 如果不是目录,尝试打开文件 filepath = self.dir.absolutePath() + '/' + item.text() # 构造文件路径 # print(filepath) self.progess = QProcess(self) # 创建QProcess对象用于启动子进程 argv = [] # 存储进程的参数 argv.append("notepad.py") # 添加要执行的脚本 argv.append(filepath) # 添加文件路径作为参数 self.progess.start('python', argv) # 启动python进程 |
3.3、 返回上层目录
?
|
1 2 3 4 5 6 7 8 |
def back_slot(self): # 返回上层目录的槽函数 result = self.dir.cdUp() # 尝试进入上层目录 if result: # 如果成功 path = self.dir.absolutePath() # 获取当前目录的绝对路径 print(path) # 打印路径 self.lineEdit.setText(path) # 更新文本框中的路径 self.show_dir() # 更新目录展示 |
四、用到的库函数
1.QDir
- setPath() 设置路径
- entryInfoList() 获取当前目录下所有文件夹以及文件信息,返回一个列表
- cd() 切换目录
- cdUp() 返回上一级目录
- absolutePath() 获取当前目录的绝对路径
2.QListWidget
- addItem() 添加单元项
- clear() 清空列表
- itemDoubleClicked() 单元项双击信号
3.QListWidgetItem
- setText() 设置文本
- setIcon() 设置图标
- text() 获取文本内容
4.QFileInfoList
at() 访问元素
5.QFileInfo
- fileName() 获取文件名
- isDir() 判断是不是文件夹
- isFile() 判断是不是文件
6.QProcess
start() 启动进程
五、完整代码
?
|
1 2 3 4 5 6 7 8 9 10 11 12 13 14 15 16 17 18 19 20 21 22 23 24 25 26 27 28 29 30 31 32 33 34 35 36 37 38 39 40 41 42 43 44 45 46 47 48 49 50 51 52 53 54 55 56 57 58 59 60 61 62 63 64 65 66 67 68 69 70 71 72 73 74 75 |
import sys from PyQt5.QtGui import QIcon from file_web import Ui_Form # 导入生成的UI类 from PyQt5.QtWidgets import QApplication, QWidget, QListWidget, QListWidgetItem # 导入所需的Qt组件 from PyQt5.QtCore import QDir, QProcess # 导入目录和进程相关的类
class fileWidge(QWidget, Ui_Form): def __init__(self): super().__init__() self.setupUi(self) # 设置UI界面
self.lineEdit.setText('./') # 设置初始路径为当前目录
self.dir = QDir() # 创建QDir对象以处理目录 self.show_dir() # 显示当前目录的内容
self.slot_init() # 初始化信号和槽连接
def slot_init(self): # 连接按钮和列表项的信号到相应的槽函数 self.back_btn.clicked.connect(self.back_slot) # 返回上级目录按钮 self.listWidget.itemDoubleClicked.connect(self.btn_btn) # 双击列表项打开
def back_slot(self): # 返回上层目录的槽函数 result = self.dir.cdUp() # 尝试进入上层目录 if result: # 如果成功 path = self.dir.absolutePath() # 获取当前目录的绝对路径 print(path) # 打印路径 self.lineEdit.setText(path) # 更新文本框中的路径 self.show_dir() # 更新目录展示
def btn_btn(self, item): # 双击列表项的槽函数 result = self.dir.cd(item.text()) # 进入选中的目录 print(result) # 打印进入结果 if result: # 如果成功进入目录 path = self.dir.absolutePath() # 获取当前目录的绝对路径 self.lineEdit.setText(path) # 更新路径文本框 self.show_dir() # 更新目录展示 else: # 如果不是目录,尝试打开文件 filepath = self.dir.absolutePath() + '/' + item.text() # 构造文件路径 # print(filepath) self.progess = QProcess(self) # 创建QProcess对象用于启动子进程 argv = [] # 存储进程的参数 argv.append("notepad.py") # 添加要执行的脚本 argv.append(filepath) # 添加文件路径作为参数 self.progess.start('python', argv) # 启动python进程
def show_dir(self): # 显示当前目录内容的函数 self.listWidget.clear() # 清空列表 self.dir.setPath(self.lineEdit.text()) # 设置QDir对象的路径为文本框中的路径 Dir_filter = QDir.AllEntries | QDir.NoDotAndDotDot # 过滤条件:所有条目,不包括.和.. sort_filter = QDir.DirsFirst # 排序条件:文件夹优先
self.list_list = self.dir.entryInfoList(Dir_filter, sort_filter) # 获取目录列表 for i in self.list_list: # 遍历目录列表 item = QListWidgetItem() # 创建新的列表项 # 根据条目类型设置图标 if i.isDir(): item.setIcon(QIcon('../菜单/images/icon/dir.png')) # 设置目录图标 elif i.isFile(): item.setIcon(QIcon('../菜单/images/icon/file.png')) # 设置文件图标 item.setText(i.fileName()) # 设置列表项的文本为文件或目录名 self.listWidget.addItem(item) # 将项添加到列表中
if __name__ == '__main__': app = QApplication(sys.argv) # 创建应用程序实例 windows = fileWidge() # 创建主窗口实例
windows.show() # 显示主窗口 sys.exit(app.exec_()) # 运行应用程序并在退出时关闭 |
