环境信息
| IP | 系统 | 规格 |
|---|---|---|
| 10.0.0.10 | Ubuntu22.04 | 2c4g |
数据库服务安装步骤
下载前置依赖
|
1 2 |
# 下载libtinfo5、libnuma1依赖 [root@lb ~]# apt update -y && apt install -y libtinfo5 libnuma1 |
服务下载
方式一:进入官网下载,并上传到宿主机中,适合离线环境
官网下载地址: https://downloads.mysql.com/archives/community/
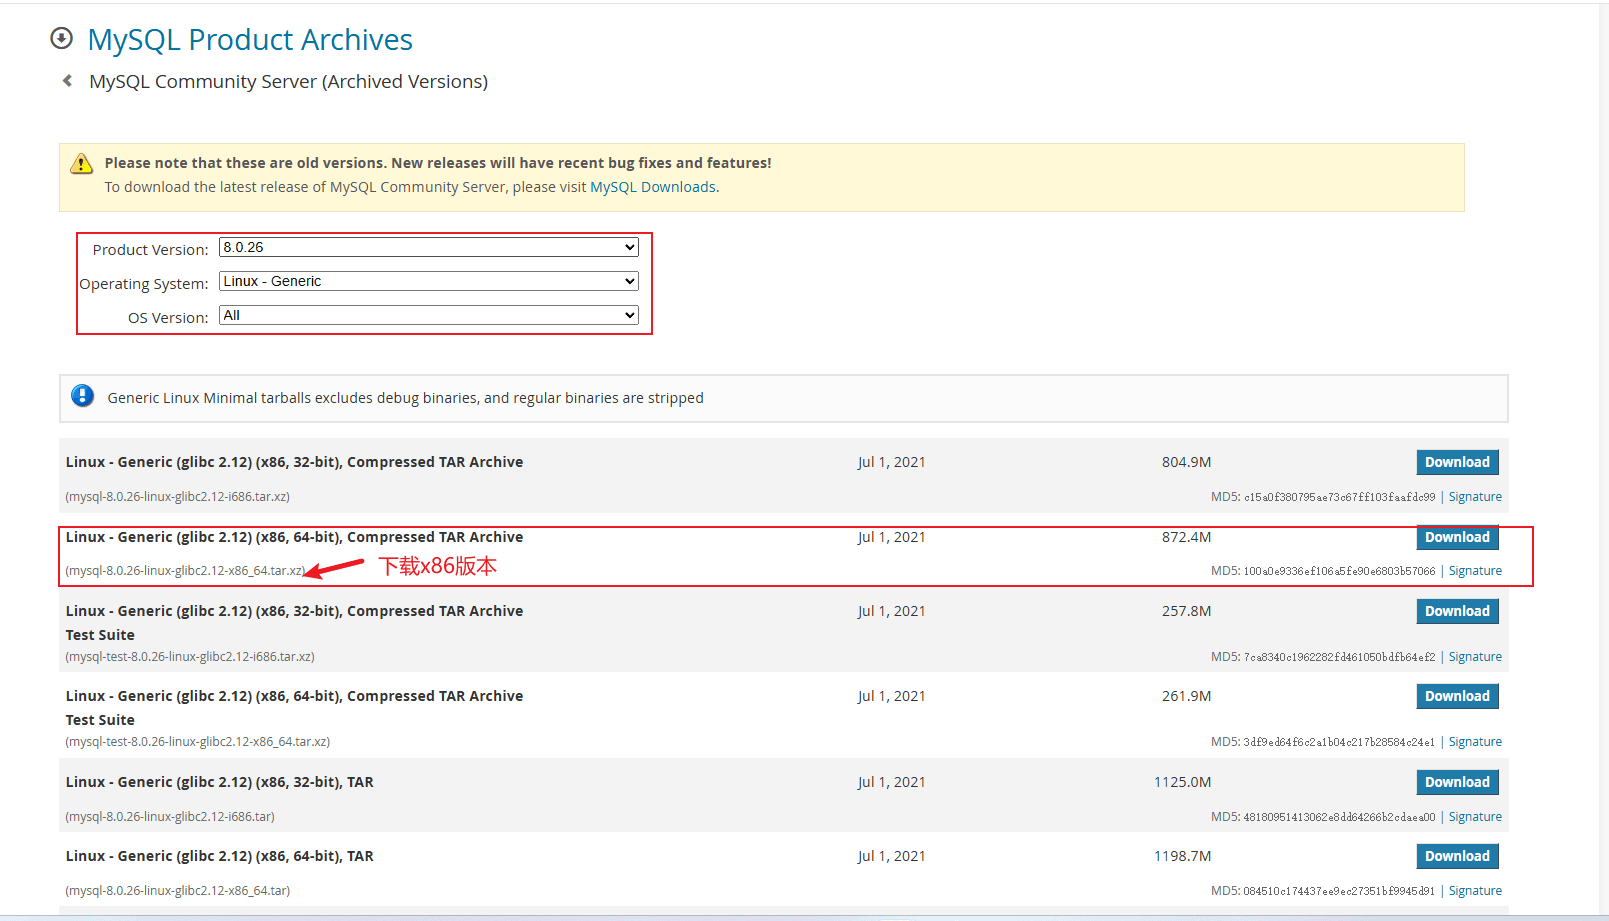
方式二:直接在宿主机中使用wget进行下载,适合宿主机联网环境
|
1 |
wget https://downloads.mysql.com/archives/get/p/23/file/mysql-8.0.26-linux-glibc2.12-x86_64.tar.xz |
服务解压并创建软链接
|
1 2 3 4 5 6 7 8 9 |
# 服务解压至家目录 [root@lb ~]# tar -xvf mysql-8.0.26-linux-glibc2.12-x86_64.tar.xz # 创建软链接 [root@lb ~]# ln -s mysql-8.0.26-linux-glibc2.12-x86_64 mysql # 查看 [root@lb ~]# ll | grep mysql lrwxrwxrwx 1 root root 35 May 1 15:43 mysql -> mysql-8.0.26-linux-glibc2.12-x86_64/ drwxr-xr-x 9 root root 4096 May 1 15:43 mysql-8.0.26-linux-glibc2.12-x86_64/ -rw-r--r-- 1 root root 914806904 Jul 2 2021 mysql-8.0.26-linux-glibc2.12-x86_64.tar.xz |
配置环境变量
|
1 2 3 |
# /root/mysql/bin根据你安装的实际地址来进行替换 [root@lb ~]# echo 'export PATH=/root/mysql/bin:$PATH' >> /etc/profile [root@lb ~]# source /etc/profile |
检查环境变量是否配置正确
|
1 2 |
[root@lb ~]# mysql -V mysql Ver 8.0.26 for Linux on x86_64 (MySQL Community Server - GPL) |
创建MySQL的虚拟用户
|
1 |
[root@lb ~]# useradd -s /sbin/nologin -M mysql |
创建数据存储目录,并修改目录的拥有者
|
1 2 |
[root@lb ~]# mkdir -p /data/mysql/data [root@lb ~]# chown -R mysql.mysql /data/mysql/data |
初始化数据库
|
1 2 3 4 5 6 7 8 |
# 初始化数据库,没有报错即代表成功 [root@lb ~]# mysqld --initialize-insecure --user=mysql --datadir=/data/mysql/data --basedir=/root/mysql 2025-05-01T07:59:04.638615Z 0 [System] [MY-013169] [Server] /root/mysql-8.0.26-linux-glibc2.12-x86_64/bin/mysqld (mysqld 8.0.26) initializing of server in progress as process 132486 2025-05-01T07:59:04.656989Z 1 [System] [MY-013576] [InnoDB] InnoDB initialization has started. 2025-05-01T07:59:05.254538Z 1 [System] [MY-013577] [InnoDB] InnoDB initialization has ended. 2025-05-01T07:59:05.950015Z 0 [Warning] [MY-013746] [Server] A deprecated TLS version TLSv1 is enabled for channel mysql_main 2025-05-01T07:59:05.950635Z 0 [Warning] [MY-013746] [Server] A deprecated TLS version TLSv1.1 is enabled for channel mysql_main 2025-05-01T07:59:06.009584Z 6 [Warning] [MY-010453] [Server] root@localhost is created with an empty password ! Please consider switching off the --initialize-insecure option. |
参数解释:
- --initialize-insecure:不安全的初始化,表示数据库启动后没有密码信息,
- --initialize:安全初始化,表示数据库启动后,会有默认的密码信息
- --user:指定用户
- --datadir:指定数据存储目录
- --basedir:指定MySQL安装的目录
数据库初始化成功之后数据目录会有以下文件
|
1 2 3 4 5 6 7 8 9 10 11 12 13 14 15 16 17 18 19 20 21 22 23 24 25 26 |
[root@lb ~]# ll /data/mysql/data/ total 177608 -rw-r----- 1 mysql mysql 196608 May 1 15:59 '#ib_16384_0.dblwr' -rw-r----- 1 mysql mysql 8585216 May 1 15:59 '#ib_16384_1.dblwr' drwxr-x--- 2 mysql mysql 4096 May 1 15:59 '#innodb_temp'/ drwxr-xr-x 6 mysql mysql 4096 May 1 15:59 ./ drwxr-xr-x 3 root root 4096 May 1 15:56 ../ -rw-r----- 1 mysql mysql 56 May 1 15:59 auto.cnf -rw------- 1 mysql mysql 1676 May 1 15:59 ca-key.pem -rw-r--r-- 1 mysql mysql 1112 May 1 15:59 ca.pem -rw-r--r-- 1 mysql mysql 1112 May 1 15:59 client-cert.pem -rw------- 1 mysql mysql 1680 May 1 15:59 client-key.pem -rw-r----- 1 mysql mysql 5995 May 1 15:59 ib_buffer_pool -rw-r----- 1 mysql mysql 50331648 May 1 15:59 ib_logfile0 -rw-r----- 1 mysql mysql 50331648 May 1 15:59 ib_logfile1 -rw-r----- 1 mysql mysql 12582912 May 1 15:59 ibdata1 drwxr-x--- 2 mysql mysql 4096 May 1 15:59 mysql/ -rw-r----- 1 mysql mysql 26214400 May 1 15:59 mysql.ibd drwxr-x--- 2 mysql mysql 4096 May 1 15:59 performance_schema/ -rw------- 1 mysql mysql 1676 May 1 15:59 private_key.pem -rw-r--r-- 1 mysql mysql 452 May 1 15:59 public_key.pem -rw-r--r-- 1 mysql mysql 1112 May 1 15:59 server-cert.pem -rw------- 1 mysql mysql 1680 May 1 15:59 server-key.pem drwxr-x--- 2 mysql mysql 4096 May 1 15:59 sys/ -rw-r----- 1 mysql mysql 16777216 May 1 15:59 undo_001 -rw-r----- 1 mysql mysql 16777216 May 1 15:59 undo_002 |
编写MySQL配置文件
|
1 2 3 4 5 6 7 8 9 10 11 12 13 14 15 16 17 18 19 20 21 22 23 24 25 26 27 28 29 30 31 32 |
[root@lb ~]# cat /etc/my.cnf [mysqld] # 数据库文件的存储路径 datadir=/data/mysql/data # 服务器监听的端口号 port=3306 # 字符集设置 character-set-server=utf8mb4 # 排序规则 collation-server=utf8mb4_general_ci # 允许的最大连接数 max_connections=1000 # MySQL服务器的缓存大小,用于缓存数据和索引 innodb_buffer_pool_size=1G # 日志文件的路径 log_error=/var/log/mysql/error.log # 慢查询日志文件的路径 slow_query_log_file=/var/log/mysql/slow-query.log # 开启慢查询日志,1表示开启,0表示关闭 slow_query_log=1 # 设定慢查询的时间阈值,单位为秒,超过此时间的查询将被记录到慢查询日志中 long_query_time=3 # 设置用户 user=mysql # 设置socket连信息 socket=/tmp/mysql.sock [client] # 客户端默认字符集 default-character-set=utf8mb4 [mysql] # MySQL命令行工具的默认字符集 default-character-set=utf8mb4 |
创建日志目录
|
1 2 |
[root@lb ~]# mkdir -p /var/log/mysql/ [root@lb ~]# chown -R mysql.mysql /var/log/mysql/ |
修改MySQL安装目录中的启动文件
拷贝启动文件至/etc/init.d目录下
|
1 2 |
[root@lb ~]# cp /root/mysql/support-files/mysql.server /etc/init.d/mysqld [root@lb ~]# chmod +x /etc/init.d/mysqld |
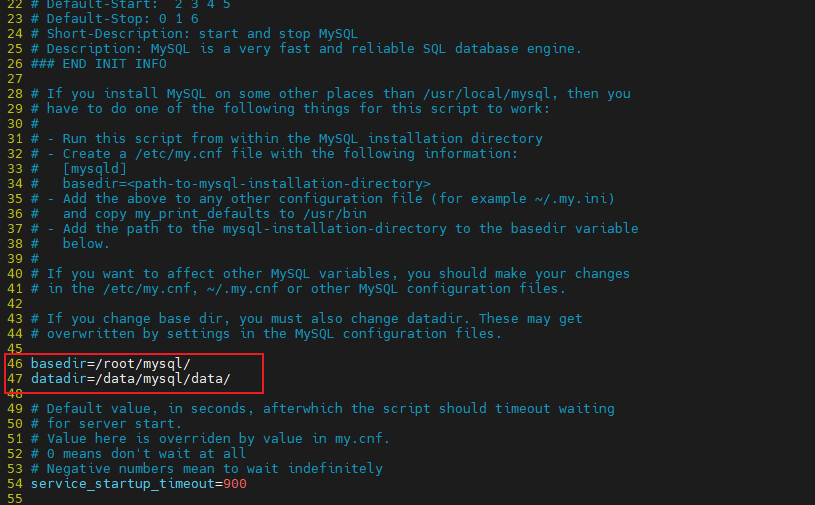
修改启动文件的内容
vim /etc/init.d/mysqld
启动MySQL服务
|
1 2 3 4 5 6 7 |
# 没报错即代表启动成功 [root@lb ~]# /etc/init.d/mysqld start Starting mysqld (via systemctl): mysqld.service. # 检查端口号 [root@lb ~]# ss -lntup | grep 3306 tcp LISTEN 0 70 *:33060 *:* users:(("mysqld",pid=144896,fd=21)) tcp LISTEN 0 1000 *:3306 *:* users:(("mysqld",pid=144896,fd=24)) |
修改root用户密码
|
1 2 3 |
[root@lb ~]# mysqladmin -u root password "huangsir" mysqladmin: [Warning] Using a password on the command line interface can be insecure. Warning: Since password will be sent to server in plain text, use ssl connection to ensure password safety. |
登录MySQL服务
|
1 2 3 4 5 6 7 8 9 10 11 |
[root@lb ~]# mysql -uroot -phuangsir mysql: [Warning] Using a password on the command line interface can be insecure. Welcome to the MySQL monitor. Commands end with ; or \g. Your MySQL connection id is 10 Server version: 8.0.26 MySQL Community Server - GPL Copyright (c) 2000, 2021, Oracle and/or its affiliates. Oracle is a registered trademark of Oracle Corporation and/or its affiliates. Other names may be trademarks of their respective owners. Type 'help;' or '\h' for help. Type '\c' to clear the current input statement. mysql> |
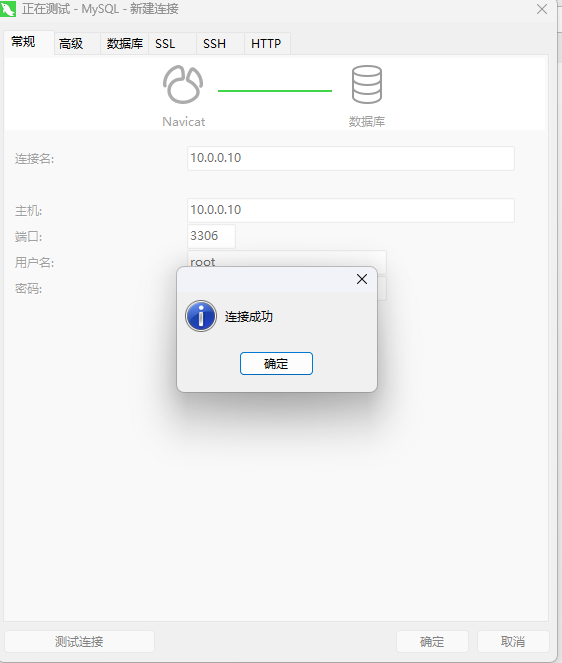
远程连接MySQL
MySQL默认的root用户是无法远程登录的,所以我们需要创建一个用户用于远程登录
|
1 2 3 4 5 6 7 8 9 |
# 创建用户,10.0.0.0/24代表网段,只有在这个网段之内的IP才能连接数据库,密码设置为huangsir mysql> CREATE USER 'root'@'10.0.0.0/24' IDENTIFIED BY 'huangsir'; Query OK, 0 rows affected (0.01 sec) # 授权,*.*代表所有的库和表 mysql> GRANT ALL PRIVILEGES ON *.* TO 'root'@'10.0.0.0/24' WITH GRANT OPTION; Query OK, 0 rows affected (0.00 sec) # 刷新权限 mysql> FLUSH PRIVILEGES; Query OK, 0 rows affected (0.00 sec) |
使用navicat连接数据库测试