本文介绍QT QML跨平台移动APP开发中的元素布局的相关问题,先看一张图,我们来分析一下其中的问题:
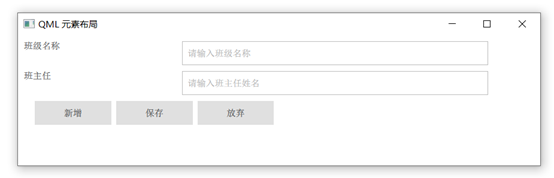
这张图片中,有如下问题:
整体的布局没有居中显示
班级名称:
没有和 请输入班级名称输入框垂直对齐
和输入框的距离太远
班主任的提示也一样
最后的Button一行,需求要求右对齐,在QML的程序中没有实现
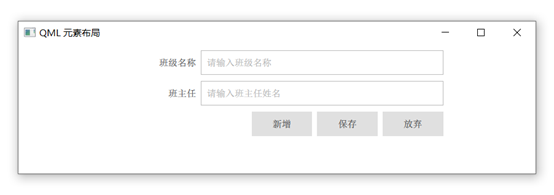
代码修改完以后的效果:

改变宽度试一下:
原代码说明:
main.qml
import QtQuick 2.12
import QtQuick.Window 2.12

Window {
    visible: true
    width: 640
    height: 480
    title: qsTr("QML 元素布局")

    InputPage{
        // 充满父类
        anchors.fill: parent
        // 设置margins
        anchors.margins: 10
    }
}
|
InputPage.qml
import QtQuick 2.0
import QtQuick.Controls 2.12

Page {
    // 定义参数,每行的高度
    property int rowHeight: 40
    // 定义参数,每行中,每列的间距
    property int rowSpacing: 8
    // 定义一列
    Column{
        id: column
        // 充满父类Page类
        anchors.fill: parent
        // 定义Column中,每行Row的间距
        spacing: 10
        Row{
            // 宽度去Page的0.8
            width: parent.width * 0.8
            height: rowHeight
            spacing: rowSpacing
            // Row水平居中显示
            anchors.horizontalCenter: parent.horizontalCenter

            Label{
                text: "班级名称"
                // 定义垂直居中显示
                verticalAlignment: className.verticalAlignment
                // 显示字符,水平靠右显示
                horizontalAlignment: Text.AlignRight

                // 设置宽度,Row的宽度的0.3
                width: parent.width * 0.3
                height: parent.height

            }

            TextField{
                id: className
                placeholderText: "请输入班级名称"
                // 设置宽度,Row的宽度的0.60
                width: parent.width * 0.60
                height: parent.height
            }
        }

        // 同上一行代码
        Row{
            width: parent.width * 0.8
            height: rowHeight
            spacing: rowSpacing
            anchors.horizontalCenter: parent.horizontalCenter

            Label{
                text: "班主任"
                verticalAlignment: teacherInChargeClass.verticalAlignment
                horizontalAlignment: Text.AlignRight

                width: parent.width * 0.3
                height: parent.height

            }

            TextField{
                id: teacherInChargeClass
                placeholderText: "请输入班主任姓名"
                width: parent.width * 0.6
                height: parent.height
            }
        }


        Row{
            width: parent.width * 0.8
            height: rowHeight
            spacing: rowSpacing
            anchors.horizontalCenter: parent.horizontalCenter

            // 设置Button一行的左侧的充满宽度
            Label{
                text: ""
                // 宽度说明
                // 上述两行(班级名称,班主任)的总宽度是id=column的宽度的0.9倍
                // 三个Button的宽度 = b1.width*3
                // 三个Button的宽度,其中间的间隔有两个间隔宽度
                // 所以本行的宽度和上两行的宽度是一致的,这样就保证了button右对齐的
                width: parent.width * 0.9 - b1.width*3 - rowSpacing*2
                height: parent.height
            }

            Button{
                id: b1
                text: "新增"
                width: parent.width * 0.15
                height: parent.height
            }

            Button{
                id: b2
                text: "保存"
                width: parent.width * 0.15
                height: parent.height
            }

            Button{
                id: b3
                text: "放弃"
                width: parent.width * 0.15
                height: parent.height
            }
        }
    }
}
|
参考课程 《》
原文链接:https://blog.csdn.net/jamescat/article/details/104517910
相关文章