环境:python3.5.2 + openCV3.4
1.算法目的
将两张相同场景的场景图片进行全景拼接。
2.算法步骤
本算法基本步骤有以下几步:
步骤1:将图形先进行桶形矫正
没有进行桶形变换的图片效果可能会像以下这样:
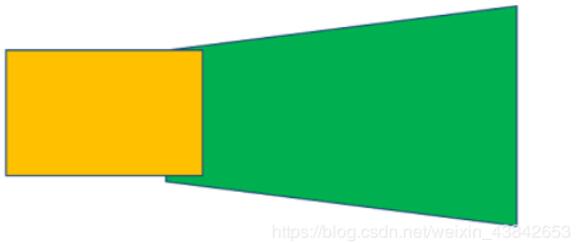
图片越多拼接可能就会越夸张。
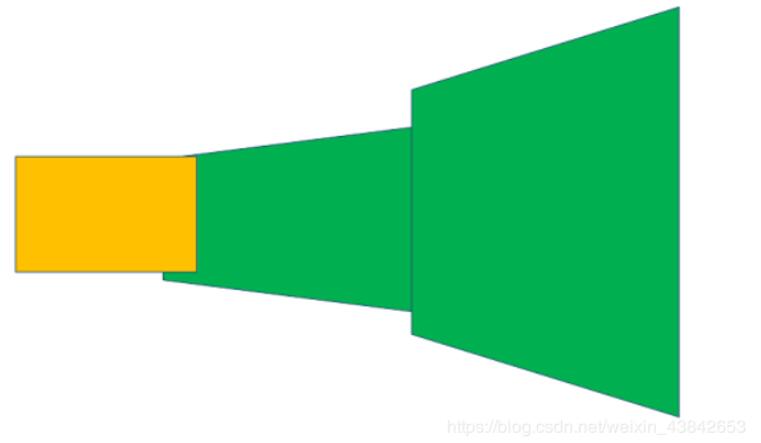
本算法是将图片进行桶形矫正。目的就是来缩减透视变换(Homography)之后图片产生的变形,从而使拼接图片变得畸形。
步骤2:特征点匹配
本算法使用的sift算法匹配,它具有旋转不变性和缩放不变性,具体原理在之后会补上一篇关于sift算法的文章,这里就不做详细介绍。
在匹配特征点的过程中,透视矩阵选取了4对特征点计算,公式为
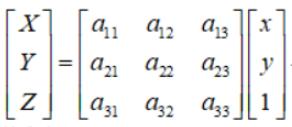
点的齐次坐标依赖于其尺度定义,因此矩阵H也仅依赖尺度定义,所以,单应性矩阵具有8个独立的自由度。
如果在选取的不正确的特征点,那么透视矩阵就可能计算错误,所以为了提高结果的鲁棒性,就要去除这些错误的特征点,而RANSAC方法就是用来删除这些错误的特征点。
**RANSAC:**用来找到正确模型来拟合带有噪声数据的迭代方法。基本思想:数据中包含正确的点和噪声点,合理的模型应该能够在描述正确数据点的同时摈弃噪声点。
RANSAC方法随机获取4对不同的特征匹配坐标,计算出透视矩阵H1,再将第二张图的特征匹配点经过这个矩阵H1映射到第一张图的坐标空间里,通过计算来验证这个H1矩阵是否满足绝大部分的特征点。
通过迭代多次,以满足最多特征匹配点的特征矩阵H作为结果。
这样正常情况就可以去除错误的特征点了,除非匹配错误的特征点比正确的还多。
下图是我在嘉庚图书馆旁拍摄的照片的特征点匹配。
步骤3:利用得到的变换矩阵进行图片的拼接。
可以看出基本做到了无缝拼接。只是在色差上还是看得出衔接的部分存在。
实现结果
我在宿舍里又多照了几组照片来实验:
室内宿舍场景的特征点匹配:
拼接结果:
在室内的效果根据结果来看效果也还可以。
我测试了宿舍里景深落差较大的两张图片:
特征点匹配:
虽然距离较远,但是还是可以粗略的匹配到特征点。
拼接结果:
从结果上来看可以看得出来,两张图片依然可以正确而粗略地拼接再一起,可以看得出是同一个区域。只是由于特征点不够,在细节上景深落差较大的还是没办法完美地拼接。
|
1
2
3
4
5
6
7
8
9
10
11
12
13
14
15
16
17
18
19
20
21
22
23
24
25
26
27
28
29
30
31
32
33
34
35
36
37
38
39
40
41
42
43
44
45
46
47
48
49
50
51
52
53
54
55
56
57
58
59
60
61
62
63
64
65
66
67
68
69
70
71
72
73
74
75
76
77
78
79
80
81
82
83
84
85
86
87
88
89
90
91
92
93
94
95
96
97
98
99
100
101
102
103
104
105
106
107
108
109
110
111
112
113
114
115
116
117
118
119
120
121
122
123
124
125
126
127
128
129
130
131
132
133
|
import numpy as npimport cv2 as cvimport imutilsclass Stitcher: def __init__(self): self.isv3 = imutils.is_cv3() def stitch(self,imgs, ratio = 0.75, reprojThresh = 4.0, showMatches = False): print('A') (img2, img1) = imgs #获取关键点和描述符 (kp1, des1) = self.detectAndDescribe(img1) (kp2, des2) = self.detectAndDescribe(img2) print(len(kp1),len(des1)) print(len(kp2), len(des2)) R = self.matchKeyPoints(kp1, kp2, des1, des2, ratio, reprojThresh) #如果没有足够的最佳匹配点,M为None if R is None: return None (good, M, mask) = R print(M) #对img1透视变换,M是ROI区域矩阵, 变换后的大小是(img1.w+img2.w, img1.h) result = cv.warpPerspective(img1, M, (img1.shape[1] + img2.shape[1], img1.shape[0])) #将img2的值赋给结果图像 result[0:img2.shape[0], 0:img2.shape[1]] = img2 #是否需要显示ROI区域 if showMatches: vis = self.drawMatches1(img1, img2, kp1, kp2, good, mask) return (result, vis) return result def detectAndDescribe(self,img): print('B') gray = cv.cvtColor(img, cv.COLOR_BGR2GRAY) #检查我们使用的是否是penCV3.x if self.isv3: sift = cv.xfeatures2d.SIFT_create() (kps, des) = sift.detectAndCompute(img, None) else: sift = cv.FastFeatureDetector_create('SIFT') kps = sift.detect(gray) des = sift.compute(gray, kps) kps = np.float32([kp.pt for kp in kps]) # ********************************** #返回关键点和描述符 return (kps, des) def matchKeyPoints(self,kp1, kp2, des1, des2, ratio, reprojThresh): print('C') #初始化BF,因为使用的是SIFT ,所以使用默认参数 matcher = cv.DescriptorMatcher_create('BruteForce') # bf = cv.BFMatcher() # matches = bf.knnMatch(des1, des2, k=2) matches = matcher.knnMatch(des1, des2, 2) #*********************************** #获取理想匹配 good = [] for m in matches: if len(m) == 2 and m[0].distance < ratio * m[1].distance: good.append((m[0].trainIdx, m[0].queryIdx)) print(len(good)) #最少要有四个点才能做透视变换 if len(good) > 4: #获取关键点的坐标 # src_pts = np.float32([kp1[m.queryIdx].pt for m in good]).reshape(-1, 1, 2) # dst_pts = np.float32([kp2[m.trainIdx].pt for m in good]).reshape(-1, 1, 2) src_pts = np.float32([kp1[i] for (_, i) in good]) dst_pts = np.float32([kp2[i] for (i, _) in good]) #通过两个图像的关键点计算变换矩阵 (M, mask) = cv.findHomography(src_pts, dst_pts, cv.RANSAC, reprojThresh) #返回最佳匹配点、变换矩阵和掩模 return (good, M, mask) #如果不满足最少四个 就返回None return None def drawMatches(img1, img2, kp1, kp2, matches, mask, M): # 获得原图像的高和宽 h, w = img1.shape[:2] # 使用得到的变换矩阵对原图像的四个角进行变换,获得目标图像上对应的坐标 pts = np.float32([[0, 0], [0, h-1], [w-1, h-1], [w-1, 0]]).reshape(-1, 1, 2) dst = cv.perspectiveTransform(pts, M) matchesMask = mask.ravel().tolist() draw_params = dict(matchColor = (0, 255, 0), singlePointColor = None, matchesMask = matchesMask, flags = 2) img = cv.drawMatches(img1, kp1, img2, kp2, matches, None, **draw_params) return img def drawMatches1(self,img1, img2, kp1, kp2, metches,mask): print('D') (hA,wA) = img1.shape[:2] (hB,wB) = img2.shape[:2] vis = np.zeros((max(hA,hB), wA+wB, 3), dtype='uint8') vis[0:hA, 0:wA] = img1 vis[0:hB, wA:] = img2 for ((trainIdx, queryIdx),s) in zip(metches, mask): if s == 1: ptA = (int(kp1[queryIdx][0]), int(kp1[queryIdx][1])) ptB = (int(kp2[trainIdx][0])+wA, int(kp2[trainIdx][1])) cv.line(vis, ptA, ptB, (0, 255, 0), 1) return vis# def show():# img1 = cv.imread('image/sedona_left_01.png')# img2 = cv.imread('image/sedona_right_01.png')# img1 = imutils.resize(img1, width=400)# img2 = imutils.resize(img2, width=400)## stitcher = cv.Stitcher()# (result, vis) = stitcher.stitch([img1, img2])# # (result, vis) = stitch([img1,img2], showMatches=True)## cv.imshow('image A', img1)# cv.imshow('image B', img2)# cv.imshow('keyPoint Matches', vis)# cv.imshow('Result', result)## cv.waitKey(0)# cv.destroyAllWindows()# show() |