Vscode作为一个轻量级的IDE,其支持丰富的插件,而通过这些插件我们就可以实现在Vscode中写任何语言的代码。Code-Server是Vscode的网页版,启动Code-Server之后我们就可以在浏览器中打开vscode来愉快的编写代码了。这种方式非常适合我们做linux编程。使用C/C++的时候,在windows上编写的代码在linux上可能跑不了,而且安装linux图形界面,然后在图像界面中使用vscode又很麻烦。当然也可以使用vscode的远程开发。但是我认为启动code-server来在浏览器上使用vscode也是非常方便的。
随着容器化的发展,现在涌现出了很多云IDE,比如腾讯的Cloud Studio,但是其也是基于Code-Server进行开发部署的,用了它的云IDE后,我便产生出了自己部署一个这样的云IDE的想法。
1、Code-Server下载部署
1.1 Code-Server下载
下载地址:https://github.com/coder/code-server/releases/
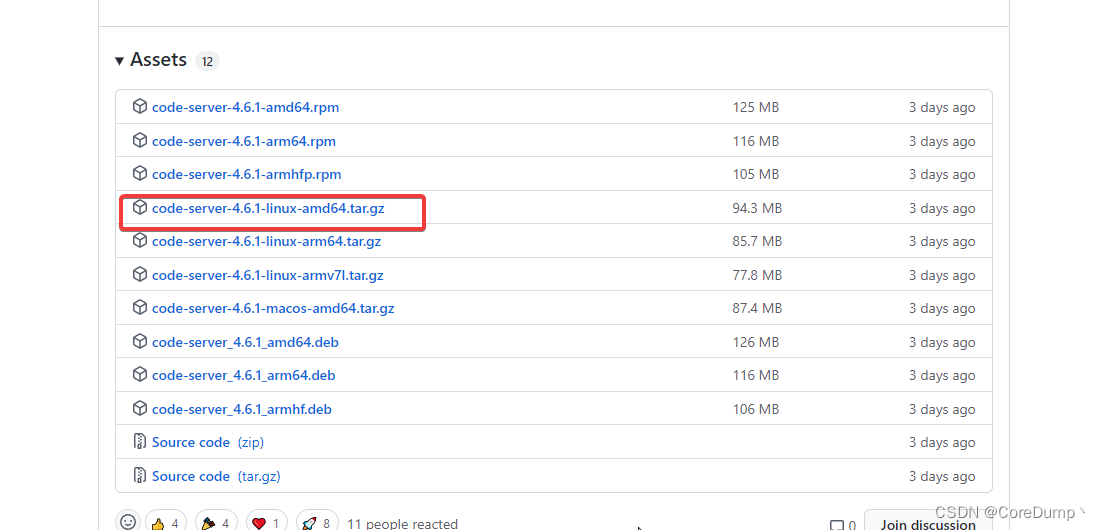
在上面的网址中下载code-server,并将其传输到linux服务器上。
也可以在linux服务器中直接使用命令来下载:
|
1
|
wget https://github.com/coder/code-server/releases/download/v4.6.1/code-server-4.6.1-linux-amd64.tar.gz
|
1.2 Code-Server部署
1.解压tar.gz文件:
|
1
|
tar -zxvf code-server-4.6.1-linux-amd64.tar.gz
|
2.进入code-server目录:
|
1
|
cd code-server-4.6.1-linux-amd64
|
3.设置密码到环境变量中
4.启动code-server
|
1
|
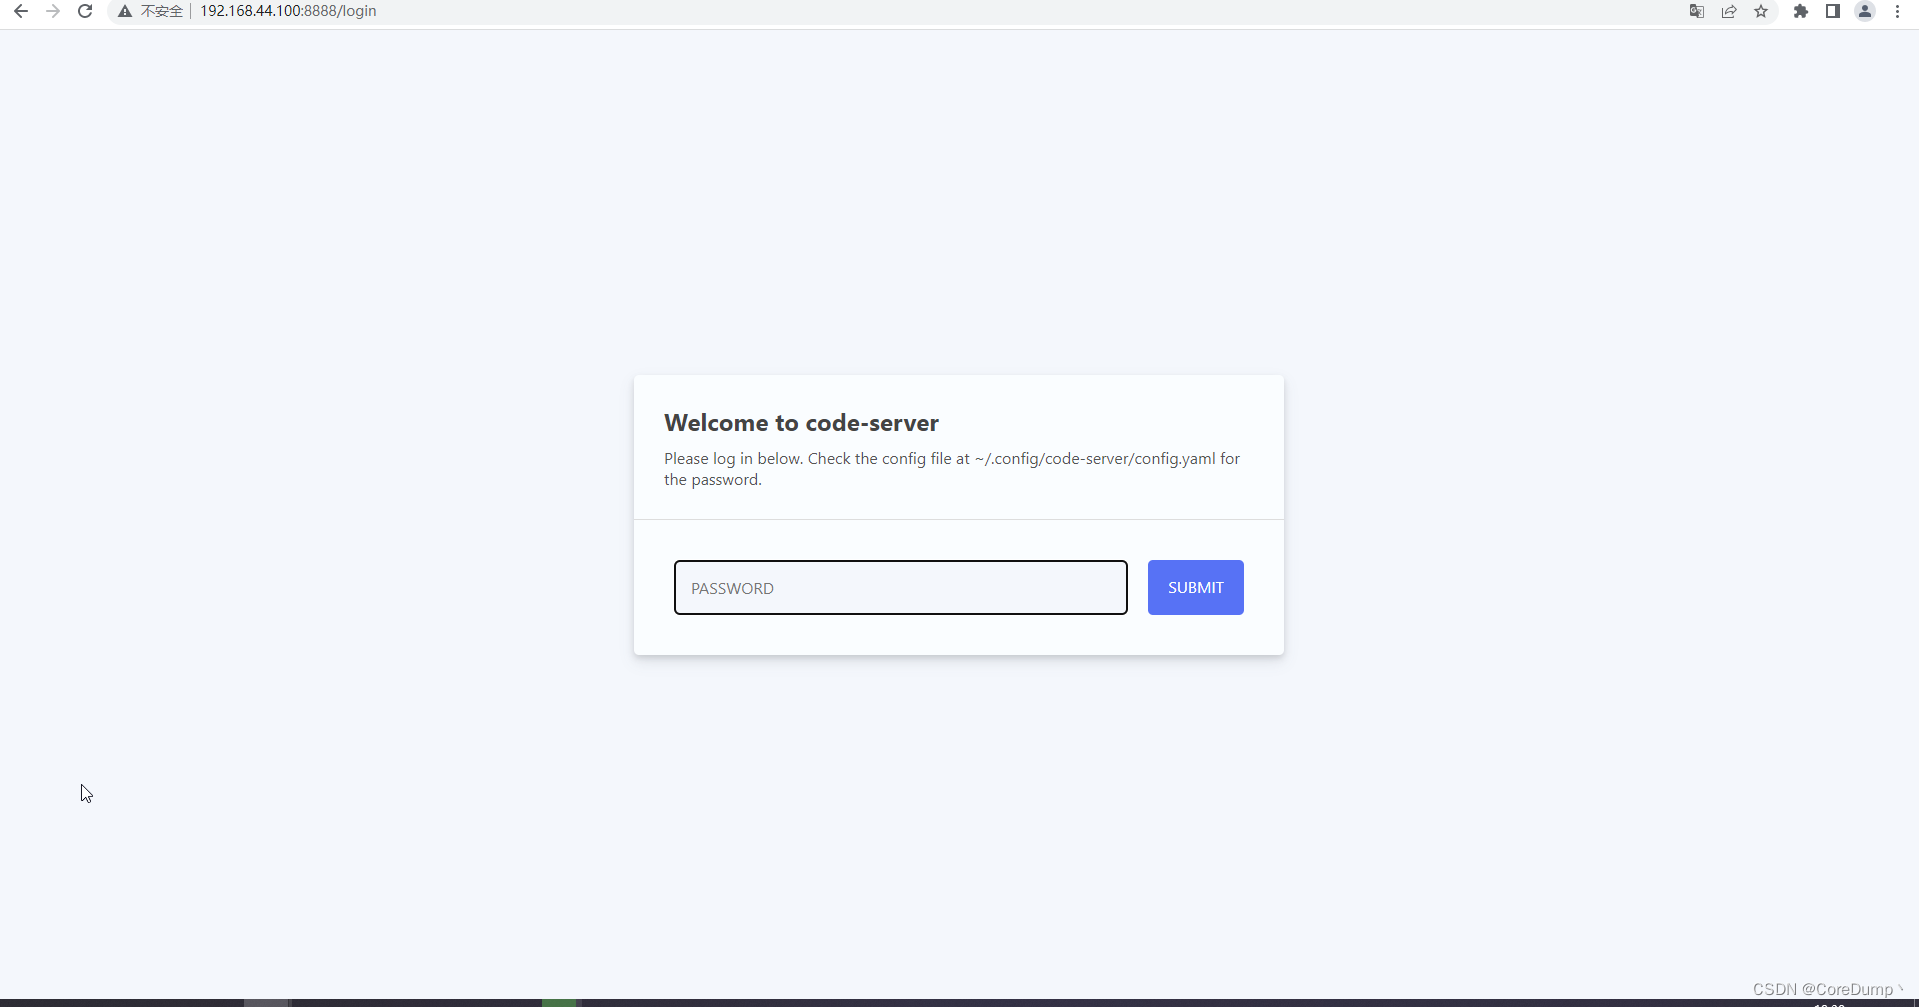
./code-server --port 8888 --host 0.0.0.0 --auth password
|
在浏览器中输入ip:8888来访问如下:
后台运行的方式:
|
1
|
nohup ./code-server --port 8888 --host 0.0.0.0 --auth password &
|
1.3 Docker部署Code-Server
接下来将介绍使用Docker的方式来部署Code-Server:
下面的Dockerfile创建了一个带有Golang开发环境的容器,然后在容器中运行Code-Server,将Dockerfile放在跟code-server-4.4.0-linux-amd64.tar.gz同目录。
1.创建名为Dockerfile的文件(Dockerfile要跟code-server的tar.gz文件在同一目录中),将下面内容复制进去
|
1
2
3
4
5
6
7
8
9
10
11
12
13
14
15
16
17
|
FROM golang
WORKDIR /workspace
RUN cp /usr/local/go/bin/* /usr/local/bin
COPY code-server-4.4.0-linux-amd64.tar.gz .
RUN tar zxvf code-server-4.4.0-linux-amd64.tar.gz
ENV GO111MODULE on
ENV GOPROXY https://goproxy.cn
ENV PASSWORD abc123
WORKDIR /workspace/code-server-4.4.0-linux-amd64
EXPOSE 9999
CMD ["./code-server", "--port", "9999", "--host", "0.0.0.0", "--auth", "password"]
|
2.然后执行命令构建Docker镜像:
|
1
|
docker build -t code-server .
|
3.运行容器
|
1
|
docker run -d --name code-server -p 9999:9999 code-server
|
2. 一个小问题
下面的内容针对Docker部署的Code-Server。
想象这样一个场景,我们开发了一个类似Cloud Studio的云IDE,每启动一个工作空间我们就通过Docker或者Kubernetes来创建一个容器,然后在容器中部署一个Code-Server,最后通过将端口暴露出去给用户使用。
云IDE使用起来很方便,打开和销毁的很迅速,即开即用。用户使用Golang在云IDE中写了一个http服务器,想要在他电脑的浏览器上访问,却发现访问不了。那么为什么Code-Server的端口就可以访问,其它端口无法访问呢。因为我们在启动容器的时候就已经预想到要访问这个端口,然后将端口暴露出去了,也就是建立了端口映射。在容器中新启动的端口并没有建立映射,因此只能在服务器内部访问,而不能在用户电脑上访问。
那么如何让用户也可以访问到呢,我们可以在主机上部署一个代理服务器,用户访问这个代理服务器,然后转发请求到容器中,再将响应转发给用户。
那么如何发现用户启动服务器监听了哪个端口呢,首先我能想到的就是启动一个程序每隔一段时间查询一下是否有新的端口被监听。获取端口信息可以使用netstat命令或者lsof命令,在此我选择了netstat,就有了下面的一个程序:
2.1 端口监听
这个程序会每隔一秒获取一下有哪些端口处于LISTEN状态,然后对比上一次的状态,看是否有新的端口被监听。当我们监听了新的80端口后,就会输出:Find new port: 80
|
1
2
3
4
5
6
7
8
9
10
11
12
13
14
15
16
17
18
19
20
21
22
23
24
25
26
27
28
29
30
31
32
33
34
35
36
37
38
39
40
41
42
43
44
45
46
47
48
49
50
51
52
53
54
55
56
57
58
59
60
61
62
63
64
65
66
67
68
69
70
71
72
73
74
75
76
77
78
79
80
81
82
83
84
85
86
87
88
89
90
91
92
93
94
95
96
97
98
99
100
101
102
103
104
105
106
107
108
109
110
111
112
|
package main
import (
"bytes"
"fmt"
"os/exec"
"strconv"
"time"
)
func main() {
listener := NewPortListener()
pc := listener.GetPortChan()
go listener.FindNewPortLoop()
for {
port := <-pc
fmt.Println("Find new port:", port)
}
}
type PortListener struct {
portChan chan uint16
}
func NewPortListener() *PortListener {
return &PortListener{
portChan: make(chan uint16, 1),
}
}
func (p *PortListener) GetPortChan() <-chan uint16 {
return p.portChan
}
func (p *PortListener) FindNewPortLoop() {
ports := p.getListeningPorts() // 程序启动后先获取一次处于Listen状态的端口
set := map[uint16]struct{}{}
for _, port := range ports {
set[port] = struct{}{}
}
for { // 然后每隔一秒获取一次,并与前一次的信息进行对比,查找是否启动了新的端口
tmpSet := map[uint16]struct{}{}
ports = p.getListeningPorts()
for _, port := range ports {
if _, ok := set[port]; !ok {
p.portChan <- port
}
tmpSet[port] = struct{}{}
}
set = tmpSet
time.Sleep(time.Second * 3)
}
}
func (p *PortListener) getListeningPorts() []uint16 {
cmd := exec.Command("netstat", "-ntlp") // 运行netstat命令获取处于Listen状态的端口信息
res, err := cmd.CombinedOutput() // 获取结果
fmt.Println(string(res))
if err != nil {
fmt.Println("Execute netstat failed")
return nil
}
return p.parsePort(res) // 对结果进行解析
}
func (p *PortListener) parsePort(msg []byte) []uint16 { // 解析出处于LISTEN状态的端口,只要端口号
idx := bytes.Index(msg, []byte("tcp"))
colums := bytes.Split(msg[idx:], []byte("\n"))
res := make([]uint16, 0, len(colums)-1)
for i := 0; i < len(colums)-1; i++ {
item := p.findThirdItem(colums[i])
if item != nil {
m := bytes.IndexByte(item, ':') + 1
for item[m] == ':' {
m++
}
p, err := strconv.Atoi(string(item[m:]))
if err == nil {
res = append(res, uint16(p))
} else {
fmt.Println(err)
}
}
}
return res
}
func (p *PortListener) findThirdItem(colum []byte) []byte {
count := 0
for i := 0; i < len(colum); {
if colum[i] == ' ' {
for colum[i] == ' ' {
i++
}
count++
continue
}
if count == 3 {
start := i
for colum[i] != ' ' {
i++
}
return colum[start:i]
}
i++
}
return nil
}
|
2.2 使用VS-Code插件
但是上面的程序也无法通知到用户,在使用Cloud Studio的时候,启动了新的端口,这个云IDE就会提醒发现了新的端口,是否要在浏览器中访问。因此我就想到了实现这样一个插件,因此下面部分就是实现一个vscode的插件来发现是否有新的端口被监听了,然后提醒用户是否在浏览器中访问。
下面只是简单介绍,想要了解vscode插件的详细开发过程的自行搜索。
1.首先安装yeoman脚手架工具,以及官方提供的脚手架工具:
|
1
|
npm install -g yo generator-code
|
2.创建项目,选择要创建的项目以及其它信息
3.创建完成后,就可以编写插件了
|
1
2
3
4
5
6
7
8
9
10
11
12
13
14
15
16
17
18
19
20
21
22
23
24
25
26
27
28
29
30
31
32
33
34
35
36
37
38
39
40
41
42
43
44
45
46
47
48
49
50
51
52
53
54
55
56
57
58
59
60
61
62
63
64
65
66
67
68
69
70
71
72
73
74
75
76
77
78
79
80
81
82
83
84
85
86
87
88
89
90
91
92
93
94
95
96
97
98
99
100
101
102
103
104
105
106
107
108
109
110
111
112
113
114
115
116
117
118
119
120
121
122
123
124
|
// extension.js
// The module 'vscode' contains the VS Code extensibility API
// Import the module and reference it with the alias vscode in your code below
const vscode = require('vscode');
// this method is called when your extension is activated
// your extension is activated the very first time the command is executed
/**
* @param {vscode.ExtensionContext} context
*/
function activate(context) {
// Use the console to output diagnostic information (console.log) and errors (console.error)
// This line of code will only be executed once when your extension is activated
// The command has been defined in the package.json file
// Now provide the implementation of the command with registerCommand
// The commandId parameter must match the command field in package.json
let disposable = vscode.commands.registerCommand('port-finder.helloWorld', function () {
// The code you place here will be executed every time your command is executed
// Display a message box to the user
vscode.window.showInformationMessage('Hello World from port_finder!');
});
context.subscriptions.push(disposable);
initGetPorts()
}
var s = new Set()
function initGetPorts() {
getListeningPorts(function(ports) {
ports.forEach(p => {
s.add(p)
})
setInterval(function() { // 设置定时器,每隔一秒获取一次
listenPortChange()
}, 1000)
})
}
function listenPortChange() {
// 获取处于LISTEN状态的端口
getListeningPorts(function(ports) {
var tmpSet = new Set()
ports.forEach(p => {
if (!s.has(p)) {
// 发现新的端口被监听就提醒用户是否在浏览器中打开
vscode.window.showInformationMessage("发现新开启的端口:" + p + ",是否在浏览器中访问?", "是", "否", "不再提示")
.then(result=> {
if (result === "是") {
// 在浏览器中打开来访问代理服务器,后面带上端口信息,以便代理服务器知道访问容器的哪个端口
vscode.env.openExternal(vscode.Uri.parse(`http://192.168.44.100/proxy/` + p))
}
})
}
tmpSet.add(p)
})
s = tmpSet
})
}
function getListeningPorts(callback) {
var exec = require('child_process').exec;
exec('netstat -nlt', function(error, stdout, stderr){
if(error) {
console.error('error: ' + error);
return;
}
var ports = parsePort(stdout)
callback(ports)
})
}
function parsePort(msg) {
var idx = msg.indexOf("tcp")
msg = msg.slice(idx, msg.length)
var colums = msg.split("\n")
var ret = new Array()
colums = colums.slice(0, colums.length - 1)
colums.forEach(element => {
var port = findPort(element)
if (port != -1) {
ret.push(port)
}
});
return ret;
}
function findPort(colum) {
var idx = colum.indexOf(':')
var first = colum.slice(0, idx)
while (colum[idx] == ':') {
idx++
}
var second = colum.slice(idx, colum.length)
var fidx = first.lastIndexOf(' ')
var sidx = second.indexOf(' ')
var ip = first.slice(fidx + 1, first.length)
var port = second.slice(0, sidx)
if (ip == "127.0.0.1") {
return -1
} else {
return Number(port)
}
}
// this method is called when your extension is deactivated
function deactivate() {}
module.exports = {
activate,
deactivate
}
|
4.然后构建项目,首先安装vsce库,再打包
|
1
2
|
npm i -g vsce
vsce package
|
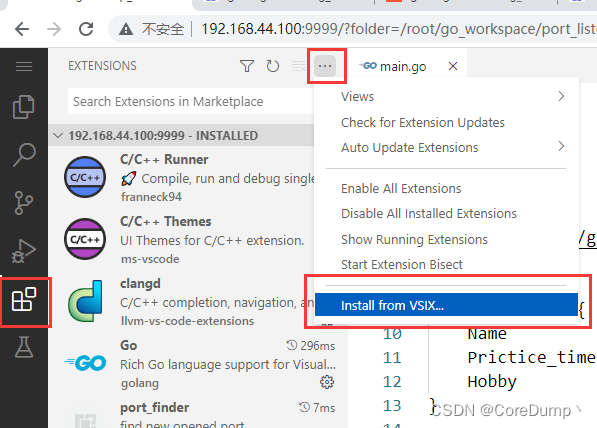
5.打包后生成了vsix文件,将vsix文件上传到服务器,然后再拷贝到docker容器中
|
1
2
|
# docker拷贝命令
docker cp 主机文件名 容器ID或容器名:/容器内路径
|
然后在浏览器中的vscode中选择vsix文件来安装插件
安装完之后,我们的插件在vscode打开后就会启动,然后每隔一秒查询一个端口情况。
测试
接下来,测试一下插件:
在vscode中写了一个http服务器,然后启动这个服务器,看插件是否能发现这个端口被监听了
|
1
2
3
4
5
6
7
8
9
10
11
12
13
14
15
16
17
18
19
20
21
22
23
24
25
26
|
package main
import (
"net/http"
"github.com/gin-gonic/gin"
)
type KK struct {
Name string `json:"name"`
Prictice_time string `json:"prictice time"`
Hobby string `json:"hobby"`
}
func main() {
engine := gin.Default()
engine.GET("/", func(ctx *gin.Context) {
ctx.JSON(http.StatusOK, &KK{
Name: "kunkun",
Prictice_time: "two and a half years",
Hobby: "sing jump and rap",
})
})
engine.Run(":8080")
}
|
运行http服务器:
可以看到,它弹出了提示,提示我们是否在浏览器中打开
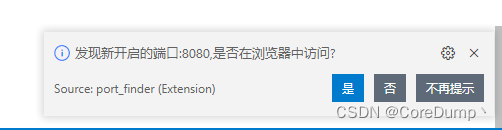
但是现在在浏览器中打开是访问不了容器中的http服务器的,因为端口没有被映射到主机端口上。
2.3 代理服务器实现
在此,为了验证我的想法是否能成功,只是实现了一个简单的代理服务器,它将请求转发的容器中,然后再转发容器中服务器的响应。(因为代理服务器是直接运行在主机上的,因此可以通过容器IP+端口来访问)
代码如下:
|
1
2
3
4
5
6
7
8
9
10
11
12
13
14
15
16
17
18
19
20
21
22
23
24
25
26
27
28
29
30
31
32
33
34
35
36
37
38
|
package main
import (
"fmt"
"io"
"net/http"
"strings"
"github.com/gin-gonic/gin"
)
func main() {
engine := gin.Default()
engine.GET("/proxy/*all", func(ctx *gin.Context) {
all := ctx.Param("all") // 获取/proxy后面的参数
if len(all) <= 0 {
ctx.Status(http.StatusBadRequest)
return
}
all = all[1:] // 丢弃第一个'/'
idx := strings.Index(all, "/")
var url string
if idx < 0 { // 只有端口
url = fmt.Sprintf("http://172.17.0.3:%s", all)
} else { // 有端口和其它访问路径
port := all[:idx]
url = fmt.Sprintf("http://172.17.0.3:%s%s", port, all[idx:])
}
resp, err := http.Get(url) // 访问容器中的服务器
if err != nil {
ctx.Status(http.StatusBadRequest)
return
}
io.Copy(ctx.Writer, resp.Body) // 转发响应
})
engine.Run(":80")
}
|
在主机服务器上运行代理服务器,不要使用容器来启动:
|
1
2
|
go build
nohup ./porxy_server & # 后台运行
|
然后我们再启动浏览器vscode中的服务器看是否可以访问到:
选择"是",然后在新弹出的窗口中就可以访问到容器中的服务了:

这里实现的只是一个非常简易的版本,只是提供了一个这样的思路。如何要实现一个类似Cloud Studio的云IDE要考虑的还要更多。
最终效果如下:
Vscode作为一个轻量级的IDE,其支持丰富的插件,而通过这些插件我们就可以实现在Vscode中写任何语言的代码。Code-Server是Vscode的网页版,启动Code-Server之后我们就可以在浏览器中打开vscode来愉快的编写代码了。这种方式非常适合我们做linux编程。使用C/C++的时候,在windows上编写的代码在linux上可能跑不了,而且安装linux图形界面,然后在图像界面中使用vscode又很麻烦。当然也可以使用vscode的远程开发。但是我认为启动code-server来在浏览器上使用vscode也是非常方便的。
随着容器化的发展,现在涌现出了很多云IDE,比如腾讯的Cloud Studio,但是其也是基于Code-Server进行开发部署的,用了它的云IDE后,我便产生出了自己部署一个这样的云IDE的想法。
1、Code-Server下载部署
1.1 Code-Server下载
下载地址:https://github.com/coder/code-server/releases/
在上面的网址中下载code-server,并将其传输到linux服务器上。
也可以在linux服务器中直接使用命令来下载:
|
1
|
wget https://github.com/coder/code-server/releases/download/v4.6.1/code-server-4.6.1-linux-amd64.tar.gz
|
1.2 Code-Server部署
1.解压tar.gz文件:
|
1
|
tar -zxvf code-server-4.6.1-linux-amd64.tar.gz
|
2.进入code-server目录:
|
1
|
cd code-server-4.6.1-linux-amd64
|
3.设置密码到环境变量中
4.启动code-server
|
1
|
./code-server --port 8888 --host 0.0.0.0 --auth password
|
在浏览器中输入ip:8888来访问如下:
后台运行的方式:
|
1
|
nohup ./code-server --port 8888 --host 0.0.0.0 --auth password &
|
1.3 Docker部署Code-Server
接下来将介绍使用Docker的方式来部署Code-Server:
下面的Dockerfile创建了一个带有Golang开发环境的容器,然后在容器中运行Code-Server,将Dockerfile放在跟code-server-4.4.0-linux-amd64.tar.gz同目录。
1.创建名为Dockerfile的文件(Dockerfile要跟code-server的tar.gz文件在同一目录中),将下面内容复制进去
|
1
2
3
4
5
6
7
8
9
10
11
12
13
14
15
16
17
|
FROM golang
WORKDIR /workspace
RUN cp /usr/local/go/bin/* /usr/local/bin
COPY code-server-4.4.0-linux-amd64.tar.gz .
RUN tar zxvf code-server-4.4.0-linux-amd64.tar.gz
ENV GO111MODULE on
ENV GOPROXY https://goproxy.cn
ENV PASSWORD abc123
WORKDIR /workspace/code-server-4.4.0-linux-amd64
EXPOSE 9999
CMD ["./code-server", "--port", "9999", "--host", "0.0.0.0", "--auth", "password"]
|
2.然后执行命令构建Docker镜像:
|
1
|
docker build -t code-server .
|
3.运行容器
|
1
|
docker run -d --name code-server -p 9999:9999 code-server
|
2. 一个小问题
下面的内容针对Docker部署的Code-Server。
想象这样一个场景,我们开发了一个类似Cloud Studio的云IDE,每启动一个工作空间我们就通过Docker或者Kubernetes来创建一个容器,然后在容器中部署一个Code-Server,最后通过将端口暴露出去给用户使用。
云IDE使用起来很方便,打开和销毁的很迅速,即开即用。用户使用Golang在云IDE中写了一个http服务器,想要在他电脑的浏览器上访问,却发现访问不了。那么为什么Code-Server的端口就可以访问,其它端口无法访问呢。因为我们在启动容器的时候就已经预想到要访问这个端口,然后将端口暴露出去了,也就是建立了端口映射。在容器中新启动的端口并没有建立映射,因此只能在服务器内部访问,而不能在用户电脑上访问。
那么如何让用户也可以访问到呢,我们可以在主机上部署一个代理服务器,用户访问这个代理服务器,然后转发请求到容器中,再将响应转发给用户。
那么如何发现用户启动服务器监听了哪个端口呢,首先我能想到的就是启动一个程序每隔一段时间查询一下是否有新的端口被监听。获取端口信息可以使用netstat命令或者lsof命令,在此我选择了netstat,就有了下面的一个程序:
2.1 端口监听
这个程序会每隔一秒获取一下有哪些端口处于LISTEN状态,然后对比上一次的状态,看是否有新的端口被监听。当我们监听了新的80端口后,就会输出:Find new port: 80
|
1
2
3
4
5
6
7
8
9
10
11
12
13
14
15
16
17
18
19
20
21
22
23
24
25
26
27
28
29
30
31
32
33
34
35
36
37
38
39
40
41
42
43
44
45
46
47
48
49
50
51
52
53
54
55
56
57
58
59
60
61
62
63
64
65
66
67
68
69
70
71
72
73
74
75
76
77
78
79
80
81
82
83
84
85
86
87
88
89
90
91
92
93
94
95
96
97
98
99
100
101
102
103
104
105
106
107
108
109
110
111
112
|
package main
import (
"bytes"
"fmt"
"os/exec"
"strconv"
"time"
)
func main() {
listener := NewPortListener()
pc := listener.GetPortChan()
go listener.FindNewPortLoop()
for {
port := <-pc
fmt.Println("Find new port:", port)
}
}
type PortListener struct {
portChan chan uint16
}
func NewPortListener() *PortListener {
return &PortListener{
portChan: make(chan uint16, 1),
}
}
func (p *PortListener) GetPortChan() <-chan uint16 {
return p.portChan
}
func (p *PortListener) FindNewPortLoop() {
ports := p.getListeningPorts() // 程序启动后先获取一次处于Listen状态的端口
set := map[uint16]struct{}{}
for _, port := range ports {
set[port] = struct{}{}
}
for { // 然后每隔一秒获取一次,并与前一次的信息进行对比,查找是否启动了新的端口
tmpSet := map[uint16]struct{}{}
ports = p.getListeningPorts()
for _, port := range ports {
if _, ok := set[port]; !ok {
p.portChan <- port
}
tmpSet[port] = struct{}{}
}
set = tmpSet
time.Sleep(time.Second * 3)
}
}
func (p *PortListener) getListeningPorts() []uint16 {
cmd := exec.Command("netstat", "-ntlp") // 运行netstat命令获取处于Listen状态的端口信息
res, err := cmd.CombinedOutput() // 获取结果
fmt.Println(string(res))
if err != nil {
fmt.Println("Execute netstat failed")
return nil
}
return p.parsePort(res) // 对结果进行解析
}
func (p *PortListener) parsePort(msg []byte) []uint16 { // 解析出处于LISTEN状态的端口,只要端口号
idx := bytes.Index(msg, []byte("tcp"))
colums := bytes.Split(msg[idx:], []byte("\n"))
res := make([]uint16, 0, len(colums)-1)
for i := 0; i < len(colums)-1; i++ {
item := p.findThirdItem(colums[i])
if item != nil {
m := bytes.IndexByte(item, ':') + 1
for item[m] == ':' {
m++
}
p, err := strconv.Atoi(string(item[m:]))
if err == nil {
res = append(res, uint16(p))
} else {
fmt.Println(err)
}
}
}
return res
}
func (p *PortListener) findThirdItem(colum []byte) []byte {
count := 0
for i := 0; i < len(colum); {
if colum[i] == ' ' {
for colum[i] == ' ' {
i++
}
count++
continue
}
if count == 3 {
start := i
for colum[i] != ' ' {
i++
}
return colum[start:i]
}
i++
}
return nil
}
|
2.2 使用VS-Code插件
但是上面的程序也无法通知到用户,在使用Cloud Studio的时候,启动了新的端口,这个云IDE就会提醒发现了新的端口,是否要在浏览器中访问。因此我就想到了实现这样一个插件,因此下面部分就是实现一个vscode的插件来发现是否有新的端口被监听了,然后提醒用户是否在浏览器中访问。
下面只是简单介绍,想要了解vscode插件的详细开发过程的自行搜索。
1.首先安装yeoman脚手架工具,以及官方提供的脚手架工具:
|
1
|
npm install -g yo generator-code
|
2.创建项目,选择要创建的项目以及其它信息
3.创建完成后,就可以编写插件了
|
1
2
3
4
5
6
7
8
9
10
11
12
13
14
15
16
17
18
19
20
21
22
23
24
25
26
27
28
29
30
31
32
33
34
35
36
37
38
39
40
41
42
43
44
45
46
47
48
49
50
51
52
53
54
55
56
57
58
59
60
61
62
63
64
65
66
67
68
69
70
71
72
73
74
75
76
77
78
79
80
81
82
83
84
85
86
87
88
89
90
91
92
93
94
95
96
97
98
99
100
101
102
103
104
105
106
107
108
109
110
111
112
113
114
115
116
117
118
119
120
121
122
123
124
|
// extension.js
// The module 'vscode' contains the VS Code extensibility API
// Import the module and reference it with the alias vscode in your code below
const vscode = require('vscode');
// this method is called when your extension is activated
// your extension is activated the very first time the command is executed
/**
* @param {vscode.ExtensionContext} context
*/
function activate(context) {
// Use the console to output diagnostic information (console.log) and errors (console.error)
// This line of code will only be executed once when your extension is activated
// The command has been defined in the package.json file
// Now provide the implementation of the command with registerCommand
// The commandId parameter must match the command field in package.json
let disposable = vscode.commands.registerCommand('port-finder.helloWorld', function () {
// The code you place here will be executed every time your command is executed
// Display a message box to the user
vscode.window.showInformationMessage('Hello World from port_finder!');
});
context.subscriptions.push(disposable);
initGetPorts()
}
var s = new Set()
function initGetPorts() {
getListeningPorts(function(ports) {
ports.forEach(p => {
s.add(p)
})
setInterval(function() { // 设置定时器,每隔一秒获取一次
listenPortChange()
}, 1000)
})
}
function listenPortChange() {
// 获取处于LISTEN状态的端口
getListeningPorts(function(ports) {
var tmpSet = new Set()
ports.forEach(p => {
if (!s.has(p)) {
// 发现新的端口被监听就提醒用户是否在浏览器中打开
vscode.window.showInformationMessage("发现新开启的端口:" + p + ",是否在浏览器中访问?", "是", "否", "不再提示")
.then(result=> {
if (result === "是") {
// 在浏览器中打开来访问代理服务器,后面带上端口信息,以便代理服务器知道访问容器的哪个端口
vscode.env.openExternal(vscode.Uri.parse(`http://192.168.44.100/proxy/` + p))
}
})
}
tmpSet.add(p)
})
s = tmpSet
})
}
function getListeningPorts(callback) {
var exec = require('child_process').exec;
exec('netstat -nlt', function(error, stdout, stderr){
if(error) {
console.error('error: ' + error);
return;
}
var ports = parsePort(stdout)
callback(ports)
})
}
function parsePort(msg) {
var idx = msg.indexOf("tcp")
msg = msg.slice(idx, msg.length)
var colums = msg.split("\n")
var ret = new Array()
colums = colums.slice(0, colums.length - 1)
colums.forEach(element => {
var port = findPort(element)
if (port != -1) {
ret.push(port)
}
});
return ret;
}
function findPort(colum) {
var idx = colum.indexOf(':')
var first = colum.slice(0, idx)
while (colum[idx] == ':') {
idx++
}
var second = colum.slice(idx, colum.length)
var fidx = first.lastIndexOf(' ')
var sidx = second.indexOf(' ')
var ip = first.slice(fidx + 1, first.length)
var port = second.slice(0, sidx)
if (ip == "127.0.0.1") {
return -1
} else {
return Number(port)
}
}
// this method is called when your extension is deactivated
function deactivate() {}
module.exports = {
activate,
deactivate
}
|
4.然后构建项目,首先安装vsce库,再打包
|
1
2
|
npm i -g vsce
vsce package
|
5.打包后生成了vsix文件,将vsix文件上传到服务器,然后再拷贝到docker容器中
|
1
2
|
# docker拷贝命令
docker cp 主机文件名 容器ID或容器名:/容器内路径
|
然后在浏览器中的vscode中选择vsix文件来安装插件
安装完之后,我们的插件在vscode打开后就会启动,然后每隔一秒查询一个端口情况。
测试
接下来,测试一下插件:
在vscode中写了一个http服务器,然后启动这个服务器,看插件是否能发现这个端口被监听了
|
1
2
3
4
5
6
7
8
9
10
11
12
13
14
15
16
17
18
19
20
21
22
23
24
25
26
|
package main
import (
"net/http"
"github.com/gin-gonic/gin"
)
type KK struct {
Name string `json:"name"`
Prictice_time string `json:"prictice time"`
Hobby string `json:"hobby"`
}
func main() {
engine := gin.Default()
engine.GET("/", func(ctx *gin.Context) {
ctx.JSON(http.StatusOK, &KK{
Name: "kunkun",
Prictice_time: "two and a half years",
Hobby: "sing jump and rap",
})
})
engine.Run(":8080")
}
|
运行http服务器:
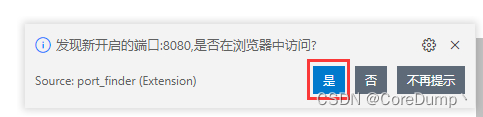
可以看到,它弹出了提示,提示我们是否在浏览器中打开
但是现在在浏览器中打开是访问不了容器中的http服务器的,因为端口没有被映射到主机端口上。
2.3 代理服务器实现
在此,为了验证我的想法是否能成功,只是实现了一个简单的代理服务器,它将请求转发的容器中,然后再转发容器中服务器的响应。(因为代理服务器是直接运行在主机上的,因此可以通过容器IP+端口来访问)
代码如下:
|
1
2
3
4
5
6
7
8
9
10
11
12
13
14
15
16
17
18
19
20
21
22
23
24
25
26
27
28
29
30
31
32
33
34
35
36
37
38
|
package main
import (
"fmt"
"io"
"net/http"
"strings"
"github.com/gin-gonic/gin"
)
func main() {
engine := gin.Default()
engine.GET("/proxy/*all", func(ctx *gin.Context) {
all := ctx.Param("all") // 获取/proxy后面的参数
if len(all) <= 0 {
ctx.Status(http.StatusBadRequest)
return
}
all = all[1:] // 丢弃第一个'/'
idx := strings.Index(all, "/")
var url string
if idx < 0 { // 只有端口
url = fmt.Sprintf("http://172.17.0.3:%s", all)
} else { // 有端口和其它访问路径
port := all[:idx]
url = fmt.Sprintf("http://172.17.0.3:%s%s", port, all[idx:])
}
resp, err := http.Get(url) // 访问容器中的服务器
if err != nil {
ctx.Status(http.StatusBadRequest)
return
}
io.Copy(ctx.Writer, resp.Body) // 转发响应
})
engine.Run(":80")
}
|
在主机服务器上运行代理服务器,不要使用容器来启动:
|
1
2
|
go build
nohup ./porxy_server & # 后台运行
|
然后我们再启动浏览器vscode中的服务器看是否可以访问到:
选择"是",然后在新弹出的窗口中就可以访问到容器中的服务了:
这里实现的只是一个非常简易的版本,只是提供了一个这样的思路。如何要实现一个类似Cloud Studio的云IDE要考虑的还要更多。
最终效果如下: