广告位联系
返回顶部
分享到

Spring Cache框架应用介绍

java 来源:互联网 作者:佚名 发布时间:2022-09-16 20:29:01 人浏览
摘要

介绍 Spring Cache是一个框架,实现了基于注解的缓存功能,只需要简单地加一个注解,就能实现缓存功能。 Spring Cache提供了一层抽象,底层可以切换不同的cache实现。具体就是通过Cache

介绍

Spring Cache是一个框架,实现了基于注解的缓存功能,只需要简单地加一个注解,就能实现缓存功能。

Spring Cache提供了一层抽象,底层可以切换不同的cache实现。具体就是通过CacheManager接口来统一不同的缓存技术。

CacheManager是Spring提供的各种缓存技术抽象接口。

针对不同的缓存技术需要实现不同的CacheManager:

CacheManager 描述
EhCacheCacheManager 使用EhCache作为缓存技术
GuavaCacheManager 使用Google的GuavaCache作为缓存技术
RedisCacheManager 使用Redis作为缓存技术

常用注解

注解 说明
@EnableCaching 开启缓存注解功能
@Cacheable 在方法执行前spring先查看缓存中是否有数据,如果有数据,则直接返回缓存数据;若没有数据,调用方法并将方法返回值放到缓存中
@CachePut 将方法的返回值放到缓存中
@CacheEvict 将一条或多条数据从缓存中删除

在Spring Boot项目中,使用缓存技术只需在项目中导入相关缓存技术的依赖包,并在启动类上使用@EnableCaching开启缓存支持即可。

例如,使用Redis作为缓存技术,只需要导入spring-boot-starter-data-redis的Maven坐标即可。

实际测试

使用Spring Cache(默认缓存ConcurrentMapCacheManager)

创建Spring Boot项目,使用MybatisX插件生成对应的mapper、service、实体类等,导入相关依赖,修改配置文件,创建数据库

pom.xml如下:

1

2

3

4

5

6

7

8

9

10

11

12

13

14

15

16

17

18

19

20

21

22

23

24

25

26

27

28

29

30

31

32

33

34

35

36

37

38

39

40

41

42

43

44

45

46

47

48

49

50

51

52

53

54

55

56

57

58

59

60

61

62

63

64

<?xml version="1.0" encoding="UTF-8"?>

<project xmlns="http://maven.apache.org/POM/4.0.0"

         xmlns:xsi="http://www.w3.org/2001/XMLSchema-instance"

         xsi:schemaLocation="http://maven.apache.org/POM/4.0.0 http://maven.apache.org/xsd/maven-4.0.0.xsd">

    <modelVersion>4.0.0</modelVersion>

    <parent>

        <groupId>org.springframework.boot</groupId>

        <artifactId>spring-boot-starter-parent</artifactId>

        <version>2.4.5</version>

        <relativePath/> <!-- lookup parent from repository -->

    </parent>

    <groupId>com.itheima</groupId>

    <artifactId>cache_demo</artifactId>

    <version>1.0-SNAPSHOT</version>

    <properties>

        <java.version>1.8</java.version>

    </properties>

    <dependencies>

        <dependency>

            <groupId>org.springframework.boot</groupId>

            <artifactId>spring-boot-starter-web</artifactId>

            <scope>compile</scope>

        </dependency>

        <dependency>

            <groupId>org.projectlombok</groupId>

            <artifactId>lombok</artifactId>

            <version>1.18.20</version>

        </dependency>

        <dependency>

            <groupId>com.alibaba</groupId>

            <artifactId>fastjson</artifactId>

            <version>1.2.76</version>

        </dependency>

        <dependency>

            <groupId>commons-lang</groupId>

            <artifactId>commons-lang</artifactId>

            <version>2.6</version>

        </dependency>

        <dependency>

            <groupId>mysql</groupId>

            <artifactId>mysql-connector-java</artifactId>

            <scope>runtime</scope>

        </dependency>

        <dependency>

            <groupId>com.baomidou</groupId>

            <artifactId>mybatis-plus-boot-starter</artifactId>

            <version>3.4.2</version>

        </dependency>

        <dependency>

            <groupId>com.alibaba</groupId>

            <artifactId>druid-spring-boot-starter</artifactId>

            <version>1.1.23</version>

        </dependency>

    </dependencies>

    <build>

        <plugins>

            <plugin>

                <groupId>org.springframework.boot</groupId>

                <artifactId>spring-boot-maven-plugin</artifactId>

                <version>2.4.5</version>

            </plugin>

        </plugins>

    </build>

</project>

application.yml如下:

server:
  port: 8080
spring:
  application:
    #应用的名称,可选
    name: cache_demo
  datasource:
    druid:
      driver-class-name: com.mysql.cj.jdbc.Driver
      url: jdbc:mysql://localhost:3306/cache_demo?serverTimezone=Asia/Shanghai&useUnicode=true&characterEncoding=utf-8&zeroDateTimeBehavior=convertToNull&useSSL=false&allowPublicKeyRetrieval=true
      username: root
      password: 123456
mybatis-plus:
  configuration:
    #在映射实体或者属性时,将数据库中表名和字段名中的下划线去掉,按照驼峰命名法映射
    map-underscore-to-camel-case: true
    log-impl: org.apache.ibatis.logging.stdout.StdOutImpl
  global-config:
    db-config:
      id-type: ASSIGN_ID

数据库SQL如下:

1

2

3

4

5

6

7

8

9

10

11

12

13

14

15

16

17

18

19

20

21

22

23

24

25

26

27

28

29

/*

 Navicat Premium Data Transfer

 Source Server         : Aiw

 Source Server Type    : MySQL

 Source Server Version : 50528

 Source Host           : localhost:3306

 Source Schema         : cache_demo

 Target Server Type    : MySQL

 Target Server Version : 50528

 File Encoding         : 65001

*/

SET NAMES utf8mb4;

SET FOREIGN_KEY_CHECKS = 0;

-- ----------------------------

-- Table structure for user

-- ----------------------------

DROP TABLE IF EXISTS `user`;

CREATE TABLE `user`  (

  `id` bigint(20) NOT NULL,

  `name` varchar(255) CHARACTER SET utf8mb4 COLLATE utf8mb4_general_ci NULL DEFAULT NULL,

  `age` int(11) NULL DEFAULT NULL,

  `address` varchar(255) CHARACTER SET utf8mb4 COLLATE utf8mb4_general_ci NULL DEFAULT NULL,

  PRIMARY KEY (`id`) USING BTREE

) ENGINE = InnoDB CHARACTER SET = utf8mb4 COLLATE = utf8mb4_general_ci ROW_FORMAT = Compact;

-- ----------------------------

-- Records of user

-- ----------------------------

INSERT INTO `user` VALUES (1568896554487369729, 'Aiw', 22, '湖北省');

SET FOREIGN_KEY_CHECKS = 1;

在启动类上添加@EnableCaching注解

1

2

3

4

5

6

7

8

9

10

11

12

13

14

package com.itheima;

import lombok.extern.slf4j.Slf4j;

import org.springframework.boot.SpringApplication;

import org.springframework.boot.autoconfigure.SpringBootApplication;

import org.springframework.cache.annotation.EnableCaching;

@Slf4j

@SpringBootApplication

@EnableCaching  // 开启缓存注解功能

public class CacheDemoApplication {

    public static void main(String[] args) {

        SpringApplication.run(CacheDemoApplication.class,args);

        log.info("项目启动成功...");

    }

}

创建UserController

1

2

3

4

5

6

7

8

9

10

11

12

13

14

15

16

17

18

19

20

21

22

23

24

25

26

27

28

29

30

31

32

33

34

35

36

37

38

39

40

41

42

43

44

45

46

47

48

49

50

51

52

53

54

55

56

57

58

59

60

61

62

63

64

65

66

67

68

69

70

71

72

73

package com.itheima.controller;

import com.itheima.entity.User;

import com.itheima.service.UserService;

import lombok.extern.slf4j.Slf4j;

import org.springframework.beans.factory.annotation.Autowired;

import org.springframework.cache.CacheManager;

import org.springframework.cache.annotation.CacheEvict;

import org.springframework.cache.annotation.CachePut;

import org.springframework.cache.annotation.Cacheable;

import org.springframework.web.bind.annotation.*;

import java.util.List;

import java.util.Objects;

@RestController

@RequestMapping("/user")

@Slf4j

public class UserController {
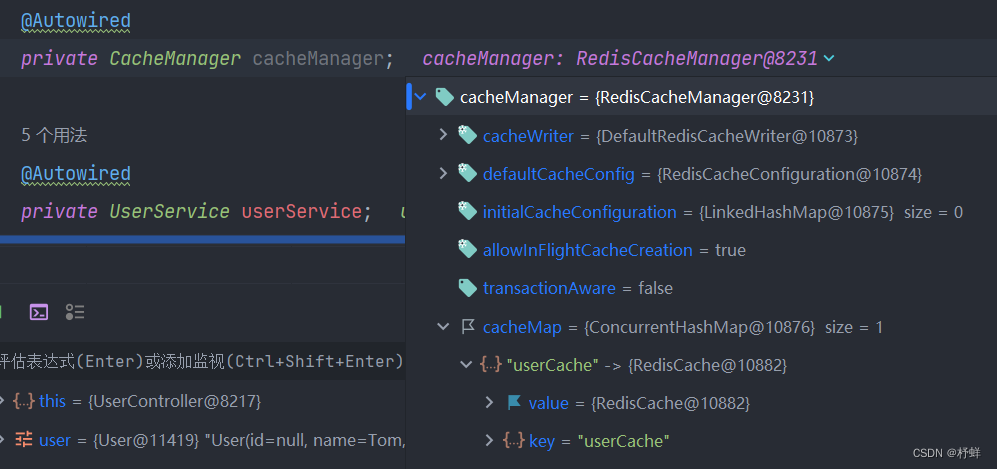
    @Autowired

    private CacheManager cacheManager;

    @Autowired

    private UserService userService;

    /**

     * CachePut:将方法返回值放入缓存

     * value:缓存的名称,每个缓存名称下面可以有多个key

     * key:缓存的key

     */

    @CachePut(value = "userCache", key = "#user.id")
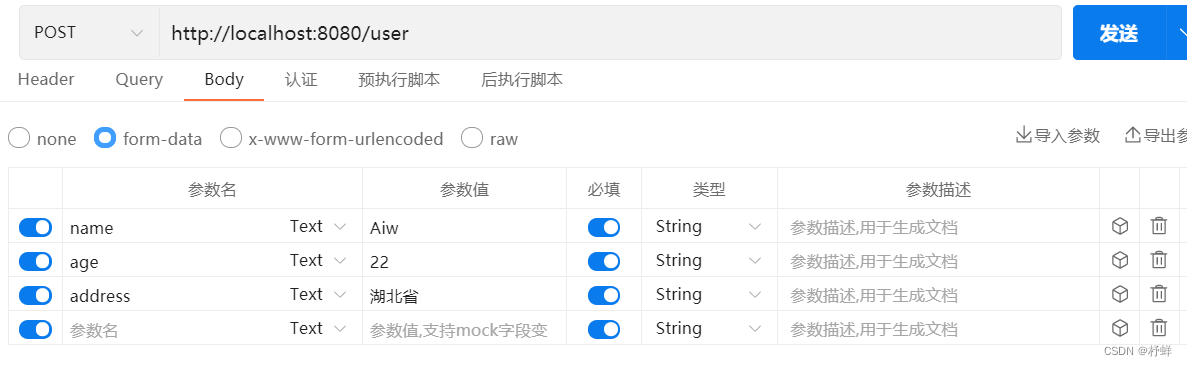
    @PostMapping

    public User save(User user) {

        userService.save(user);

        return user;

    }

    /**

     * CacheEvict:清理指定缓存

     * value:缓存的名称,每个缓存名称下面可以有多个key

     * key:缓存的key

     */

    @CacheEvict(value = "userCache", key = "#p0")

    //@CacheEvict(value = "userCache",key = "#root.args[0]")

    //@CacheEvict(value = "userCache",key = "#id")

    @DeleteMapping("/{id}")

    public void delete(@PathVariable Long id) {

        userService.removeById(id);

    }

    //@CacheEvict(value = "userCache",key = "#p0.id")

    //@CacheEvict(value = "userCache",key = "#user.id")

    //@CacheEvict(value = "userCache",key = "#root.args[0].id")

    @CacheEvict(value = "userCache", key = "#result.id")

    @PutMapping

    public User update(User user) {

        userService.updateById(user);

        return user;

    }

    /**

     * Cacheable:在方法执行前spring先查看缓存中是否有数据,如果有数据,则直接返回缓存数据;若没有数据,调用方法并将方法返回值放到缓存中

     * value:缓存的名称,每个缓存名称下面可以有多个key

     * key:缓存的key

     * condition:条件,满足条件时才缓存数据

     * unless:满足条件则不缓存

     */

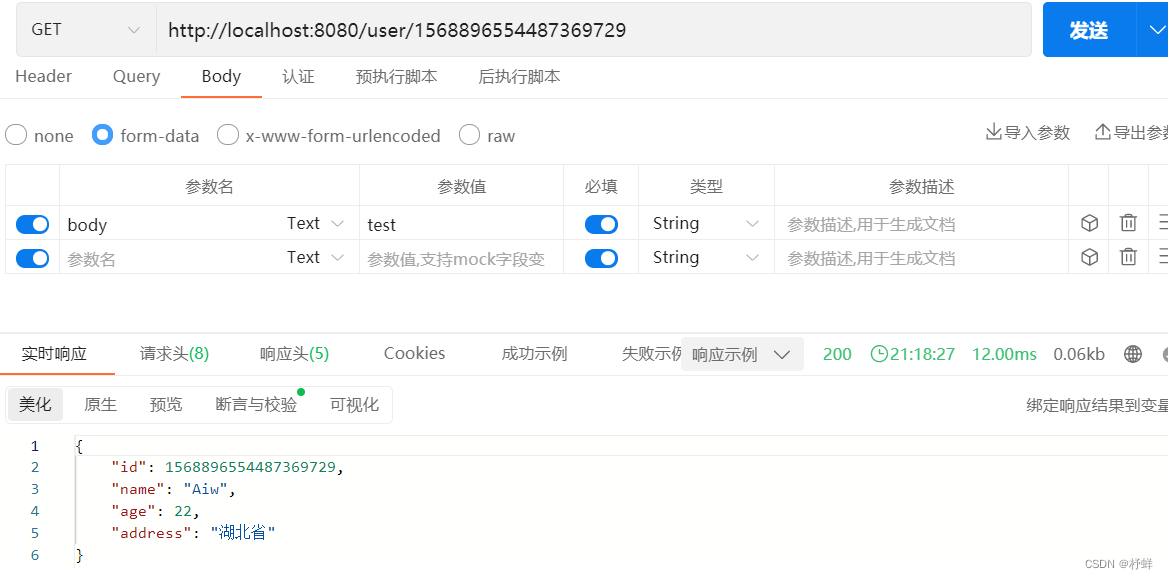
    @Cacheable(value = "userCache", key = "#id", unless = "#result == null")

    @GetMapping("/{id}")

    public User getById(@PathVariable Long id) {

        return userService.getById(id);

    }

    @Cacheable(value = "userCache", key = "#user.id + '_' + #user.name")

    @GetMapping("/list")

    public List<User> list(User user) {

        return userService.lambdaQuery()

                .eq(Objects.nonNull(user.getId()), User::getId, user.getId())

                .eq(Objects.nonNull(user.getName()), User::getName, user.getName())

                .list();

    }

}

以上不同写法均等价

使用ApiPost进行接口测试

打断点调试,发送请求,可以看到已存入缓存

该缓存底层基于Map实现,默认ConcurrentHashMap基于内存,重启服务会清空缓存数据

使用Spring Cache(redis缓存RedisCacheManager)

导入Maven坐标

1

2

3

4

5

6

7

8

<dependency>

    <groupId>org.springframework.boot</groupId>

    <artifactId>spring-boot-starter-cache</artifactId>

</dependency>

<dependency>

    <groupId>org.springframework.boot</groupId>

    <artifactId>spring-boot-starter-data-redis</artifactId>

</dependency>

修改配置文件

server:
  port: 8080
spring:
  application:
    #应用的名称,可选
    name: cache_demo
  datasource:
    druid:
      driver-class-name: com.mysql.cj.jdbc.Driver
      url: jdbc:mysql://localhost:3306/cache_demo?serverTimezone=Asia/Shanghai&useUnicode=true&characterEncoding=utf-8&zeroDateTimeBehavior=convertToNull&useSSL=false&allowPublicKeyRetrieval=true
      username: root
      password: 123456
  redis:
    host: localhost
    port: 6379
#    password: root@123456
    database: 0
  cache:
    redis:
      time-to-live: 1800000 #设置缓存过期时间(单位:秒),可选
mybatis-plus:
  configuration:
    #在映射实体或者属性时,将数据库中表名和字段名中的下划线去掉,按照驼峰命名法映射
    map-underscore-to-camel-case: true
    log-impl: org.apache.ibatis.logging.stdout.StdOutImpl
  global-config:
    db-config:
      id-type: ASSIGN_ID

启动项目,再次请求接口

启动redis命令行窗口,查看

当请求不存在的id时,不会执行缓存操作(@Cacheable注解的unless条件起作用)


版权声明 : 本文内容来源于互联网或用户自行发布贡献,该文观点仅代表原作者本人。本站仅提供信息存储空间服务和不拥有所有权,不承担相关法律责任。如发现本站有涉嫌抄袭侵权, 违法违规的内容, 请发送邮件至2530232025#qq.cn(#换@)举报,一经查实,本站将立刻删除。
原文链接 : https://blog.csdn.net/qq_45917176/article/details/126810199
相关文章
  • SpringBoot自定义错误处理逻辑介绍

    SpringBoot自定义错误处理逻辑介绍
    1. 自定义错误页面 将自定义错误页面放在 templates 的 error 文件夹下,SpringBoot 精确匹配错误信息,使用 4xx.html 或者 5xx.html 页面可以打印错误
  • Java实现手写一个线程池的代码

    Java实现手写一个线程池的代码
    线程池技术想必大家都不陌生把,相信在平时的工作中没有少用,而且这也是面试频率非常高的一个知识点,那么大家知道它的实现原理和
  • Java实现断点续传功能的代码

    Java实现断点续传功能的代码
    题目实现:网络资源的断点续传功能。 二、解题思路 获取要下载的资源网址 显示网络资源的大小 上次读取到的字节位置以及未读取的字节
  • 你可知HashMap为什么是线程不安全的
    HashMap 的线程不安全 HashMap 的线程不安全主要体现在下面两个方面 在 jdk 1.7 中,当并发执行扩容操作时会造成环形链和数据丢失的情况 在
  • ArrayList的动态扩容机制的介绍

    ArrayList的动态扩容机制的介绍
    对于 ArrayList 的动态扩容机制想必大家都听说过,之前的文章中也谈到过,不过由于时间久远,早已忘却。 所以利用这篇文章做做笔记,加
  • JVM基础之字节码的增强技术介绍

    JVM基础之字节码的增强技术介绍
    字节码增强技术 在上文中,着重介绍了字节码的结构,这为我们了解字节码增强技术的实现打下了基础。字节码增强技术就是一类对现有字
  • Java中的字节码增强技术

    Java中的字节码增强技术
    1.字节码增强技术 字节码增强技术就是一类对现有字节码进行修改或者动态生成全新字节码文件的技术。 参考地址 2.常见技术 技术分类 类
  • Redis BloomFilter布隆过滤器原理与实现

    Redis BloomFilter布隆过滤器原理与实现
    Bloom Filter 概念 布隆过滤器(英语:Bloom Filter)是1970年由一个叫布隆的小伙子提出的。它实际上是一个很长的二进制向量和一系列随机映射
  • Java C++算法题解leetcode801使序列递增的最小交换次

    Java C++算法题解leetcode801使序列递增的最小交换次
    题目要求 思路:状态机DP 实现一:状态机 Java 1 2 3 4 5 6 7 8 9 10 11 12 13 14 15 16 17 18 19 20 class Solution { public int minSwap(int[] nums1, int[] nums2) { int n
  • Mybatis结果集映射与生命周期介绍

    Mybatis结果集映射与生命周期介绍
    一、ResultMap结果集映射 1、设计思想 对简单的语句做到零配置,对于复杂一点的语句,只需要描述语句之间的关系就行了 2、resultMap的应用场
  • 本站所有内容来源于互联网或用户自行发布,本站仅提供信息存储空间服务,不拥有版权,不承担法律责任。如有侵犯您的权益,请您联系站长处理!
  • Copyright © 2017-2022 F11.CN All Rights Reserved. F11站长开发者网 版权所有 | 苏ICP备2022031554号-1 | 51LA统计