|
1
2
3
4
5
6
7
8
9
10
11
12
13
14
15
16
17
18
19
20
21
22
23
24
25
26
27
28
29
30
31
32
33
34
35
36
37
38
39
40
41
42
43
44
45
46
47
48
49
50
51
52
53
54
55
56
57
58
59
60
61
62
63
64
65
66
67
68
69
70
71
72
73
74
75
76
77
78
79
80
81
82
83
84
85
86
87
88
89
90
91
92
93
94
95
96
97
98
99
|
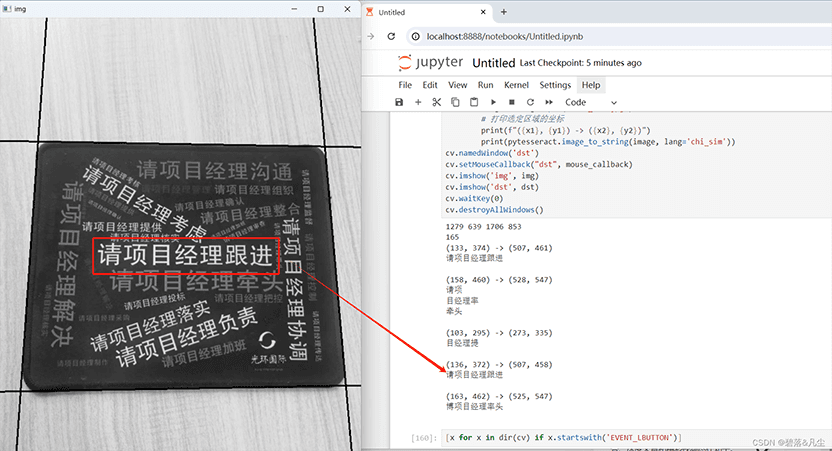
import cv2 as cv
import numpy as np
import pytesseract
from PIL import Image
img = cv.imread('test.jpg')
rows, cols, _ = img.shape
img = cv.resize(img, (int(cols/2), int(rows/2)))
img = cv.cvtColor(img, cv.COLOR_BGR2GRAY)
nrows, ncols = img.shape
print(cols, ncols, rows, nrows)
gray_blurred = cv.GaussianBlur(img, (5, 5), 0)
flag = 200
lines = []
while len(lines) != 4:
# 使用Canny边缘检测
edges = cv.Canny(gray_blurred, 50, 150, apertureSize=3)
lines = cv.HoughLines(edges, 1, np.pi / 180, flag)
if lines is None:
lines = []
if flag < 80:
raise Exception('未找到合适的边缘处理参数')
flag -= 5
print(flag)
nlines = []
# 如果找到了直线,使用它们来计算仿射变换矩阵
if lines is not None:
for rho, theta in lines[:, 0]:
a = np.cos(theta)
b = np.sin(theta)
x0 = a * rho
y0 = b * rho
x1 = int(x0 + 1000 * (-b))
y1 = int(y0 + 1000 * (a))
x2 = int(x0 - 1000 * (-b))
y2 = int(y0 - 1000 * (a))
cv.line(img, (x1, y1), (x2, y2), (0, 0, 255), 2)
nlines.append([(x1, y1), (x2, y2)])
points = []
for i in range(len(nlines) - 1):
for j in range(i + 1, len(nlines)):
line = nlines[i]
x1, y1 = line[0]
x2, y2 = line[1]
line1 = nlines[j]
x3, y3 = line1[0]
x4, y4 = line1[1]
try:
u = ((x4-x3)*(y1-y3) - (y4-y3)*(x1-x3)) / ((y4-y3)*(x2-x1) - (x4-x3)*(y2-y1))
except Exception as e:
continue
x = x1 + u * (x2 - x1)
y = y1 + u * (y2 - y1)
if x > 0 and y > 0 and x < ncols and y < nrows:
points.append((x, y))
pytesseract.pytesseract.tesseract_cmd = r'D:\Program Files\Tesseract-OCR\tesseract.exe'
center = (int(ncols/2), int(nrows/2))
pstmap = {}
for point in points:
x, y = point
cx, cy = center
if x < cx and y < cy:
pstmap['lt'] = point
elif x > cx and y < cy:
pstmap['rt'] = point
elif x > cx and y > cy:
pstmap['rb'] = point
else:
pstmap['lb'] = point
pst1 = np.float32([pstmap['lt'], pstmap['rt'], pstmap['rb'], pstmap['lb']])
pst2 = np.float32([[0, 0], [ncols, 0], [ncols, nrows], [0, nrows]])
M = cv.getPerspectiveTransform(pst1, pst2)
dst = cv.warpPerspective(img, M, (ncols, nrows))
x1, y1 = 0, 0
def mouse_callback(event, x, y, flags, param):
global x1, y1
if event == cv.EVENT_LBUTTONDOWN:
x1, y1 = x, y
elif event == cv.EVENT_LBUTTONUP:
x2, y2 = x, y
wimg = dst[y1:y2, x1:x2]
_, wimg = cv.threshold(wimg, 80, 255, cv.THRESH_BINARY)
wimg = cv.bitwise_not(wimg)
cv.imwrite('test_dst.jpg', wimg)
image = Image.open('test_dst.jpg')
# 打印选定区域的坐标
print(f"({x1}, {y1}) -> ({x2}, {y2})")
print(pytesseract.image_to_string(image, lang='chi_sim'))
cv.namedWindow('dst')
cv.setMouseCallback("dst", mouse_callback)
cv.imshow('img', img)
cv.imshow('dst', dst)
print(dst[2])
cv.waitKey(0)
cv.destroyAllWindows()
|