突然发现cla函数也可以应用到app designer控件上,因而对部分内容做出更改,将绘制隐藏像素刷新的方式改为用cla
原
|
1
2
3
4
5
|
hold(acAxes,'off');
image(acAxes,[-1,0],[-1,0],ones(1,1,3),'visible','off');
hold(acAxes,'on');
delete(findobj('tag','ax'));
|
新
0效果
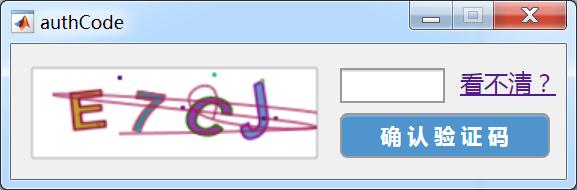
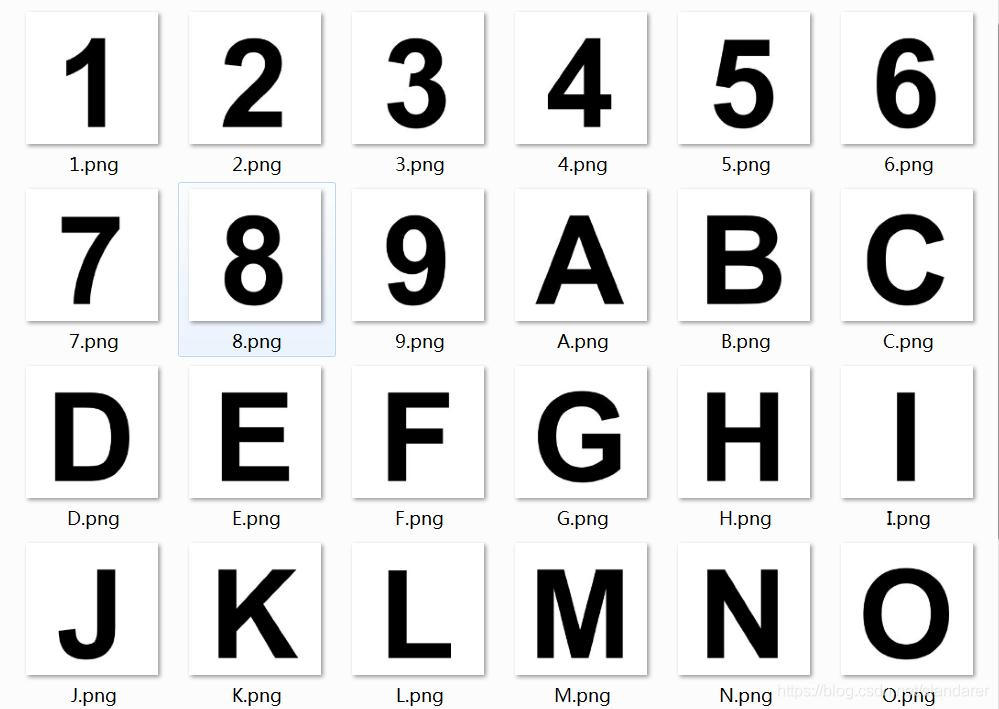
1字符图片生成
如果我们单纯的用text绘制图形,就无法做到效果中符号和符号边缘两个颜色,也无法做到更大程度的变形,因此我们需要将字符转换为矩阵形式。
想要实现也非常简单,我们只需要创建一个不可视的fig,在其上绘制字符,保存fig为png格式图片,再通过imread读取图片,就能获得字符矩阵:
第一次运行程序因为要生成字符图片因而会比较慢,再次运行就可以读取之前已经生成过的图片啦:
|
1
2
3
4
5
6
7
8
9
10
11
12
13
14
15
16
17
18
19
20
21
22
23
24
25
26
27
28
29
30
31
32
33
34
35
|
% 字符图片矩阵构造 ========================================================
% 以下为字符图片创建过程
% 原理为构造隐藏的figure和axes
% 在其上用text绘制字符并保存figure为图片
% 导入图片
if ~exist('Materials','dir')
mkdir('Materials');
end
fig=figure('units','pixels',...
'position',[20 80 200 200],...
'Numbertitle','off',...
'Color',[1 1 1],...
'resize','off',...
'visible','off',...
'menubar','none');
ax=axes('Units','pixels',...
'parent',fig,...
'Color',[1 1 1],...
'Position',[0 0 200 200],...
'XLim',[0 200],...
'YLim',[0 200],...
'XColor',[1 1 1],...
'YColor',[1 1 1]);
strPic{length(strElement)}=[];
for i=1:length(strElement)
% 若是不存在该字符图片则生成,否则直接导入
if ~exist(['.\Materials\',strElement(i),'.png'],'file')
delete(findobj('tag','textStr'));
text(ax,100,100,strElement(i),'HorizontalAlignment',...
'center','FontSize',140,'tag','textStr','FontWeigh','bold')
saveas(fig,['.\Materials\',strElement(i),'.png']); % 保存图片
end
tempPic=imread(['.\Materials\',strElement(i),'.png']); % 读取图片
strPic{i}=imresize(tempPic,[150,150]); % 重新调整图片大小
end
|
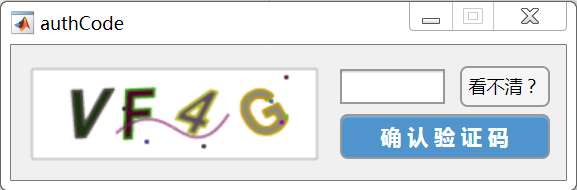
2刷新按钮生成
大家可以看到这个按钮的样式与大部分按钮不同:
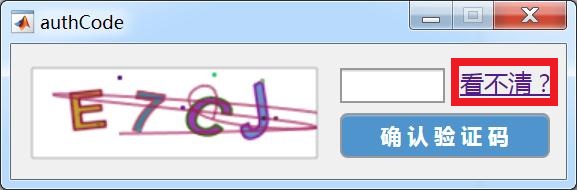
实际上这是一个HTML控件,输入html文件的位置就可以形成类似嵌入页面的效果:
|
1
2
3
4
|
acHTML=uihtml(acFigure);
acHTML.HTMLSource='.\Materials\textbtn.html';
acHTML.DataChangedFcn=@refresh;
acHTML.Position=[300 50 88 26];
|
如代码所示,我们导入的是Materials文件夹内的textbtn.html文件
textbtn.html长这样:
|
1
2
3
4
5
6
7
8
9
10
11
12
13
14
15
16
|
<!DOCTYPE html>
<html>
<head>
<meta charset=UTF-8>
<script type="text/javascript">
function setup(htmlComponent) {
document.getElementById("btnonclink").addEventListener("click", function(event) {
htmlComponent.Data="test";
});
}
</script>
</head>
<body>
<a href="" id=" rel="external nofollow" rel="external nofollow" rel="external nofollow" btnonclink">看不清?</a>
</body>
</html>
|
当然为了防止大家不会创建,我在m文件中写了一段能够自动创建html文件的代码,原理就是将字符串信息写入txt,再将txt文件后缀改为html:
|
1
2
3
4
5
6
7
8
9
10
11
12
13
14
15
16
|
% .html文件自动生成及引入 - - - - - - - - - - - - - - - - - - - - - - - - -
htmlContent={'<!DOCTYPE html><html><head><meta charset=UTF-8>';
'<script type="text/javascript">';
'function setup(htmlComponent){';
'document.getElementById("btnonclink").addEventListener("click",function(event){';
'htmlComponent.Data="test";});}</script></head>';
'<body><a href="" id=" rel="external nofollow" rel="external nofollow" rel="external nofollow" btnonclink">看不清?</a></body></html>'};
if ~exist('.\Materials\textbtn.html','file')
fid=fopen('.\Materials\textbtn.txt','w');
for i=1:length(htmlContent)
fprintf(fid,'%s\r\n',htmlContent{i});
end
fclose(fid);
copyfile('.\Materials\textbtn.txt','.\Materials\textbtn.html');
delete('.\Materials\textbtn.txt')
end
|
3图片处理
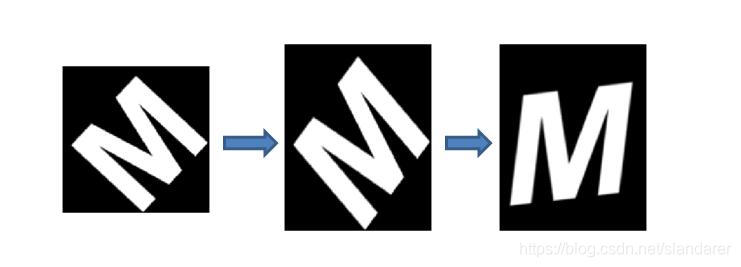
3.1图像任意方向拉伸
这部分原理就是将图像旋转一定角度后,在竖直方向进行拉伸后再旋转回去
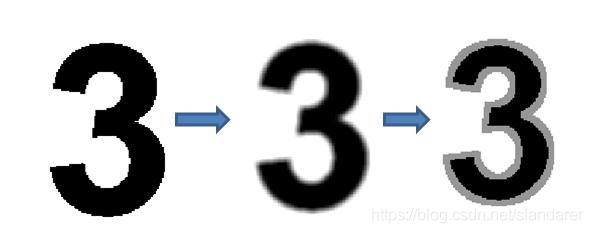
3.2字符边缘
这部分原理将字符均值滤波后,把不完全是黑色的部分设置为灰色,后期再设置为其他颜色
3.3图像处理部分代码
|
1
2
3
4
5
6
7
8
9
10
11
12
13
14
15
16
17
18
19
20
21
22
23
24
25
26
27
28
29
|
randColor=@()randi([0,200],[1,3]); % 生成随机颜色的匿名函数
% 从图像集合中提取图像
tPic=strPic{randiNums(ii)};
tPic=tPic(:,:,1);
% 将图像旋转-拉伸-旋转
randiTheta1=randi([0,90]);
randiTheta2=randi([-30,30]);
randiLenth=randi([0,70]);
tPic=imrotate(255-tPic,randiTheta1,'bilinear','crop');
tPic=imresize(tPic,[150+randiLenth,150]);
tPic=imrotate(tPic,-randiTheta1+randiTheta2,'bilinear','crop');
% 将图像边缘进行模糊,并将模糊的部分数值设置为150
tPic=255-imfilter(tPic,I_5);
tPic(tPic~=0&tPic~=255)=150;
% 为符号和符号边缘赋予不同颜色
tempColor1=randColor();tempColor2=randColor();
tempPicR=tPic;tempPicG=tPic;tempPicB=tPic;
tempPicR(tPic==150)=tempColor1(1);tempPicR(tPic==0)=tempColor2(1);
tempPicG(tPic==150)=tempColor1(2);tempPicG(tPic==0)=tempColor2(2);
tempPicB(tPic==150)=tempColor1(3);tempPicB(tPic==0)=tempColor2(3);
tempPic_3=uint8(zeros([size(tPic),3]));
tempPic_3(:,:,1)=tempPicR;
tempPic_3(:,:,2)=tempPicG;
tempPic_3(:,:,3)=tempPicB;
|
4线条和散点生成
散点就是生成一堆随机位置点和一些随机颜色后用scatter函数绘制,线条是生成散点后使用’spline’插值方法插值成线后再绘制:
|
1
2
3
4
5
6
7
8
9
10
11
12
13
14
15
16
17
18
|
randColor=@()randi([0,200],[1,3]); % 生成随机颜色的匿名函数
randColor_n=@(n)randi([0,200],[n,3])./255; % 生成n个随机颜色的匿名函数
randPoint_n=@(n)[randi([5,195],[n,1]),randi([5,65],[n,1])];% 生成n个随机点的匿名函数
% 绘制散点
pPonintsNum=randi([6,10]);
pPoints=randPoint_n(pPonintsNum);
pPointsColor=randColor_n(pPonintsNum);
scatter(acAxes,pPoints(:,1),pPoints(:,2),6,'filled',...
'CData',pPointsColor,'AlphaData',0.6)
% 绘制线
lPonintsNum=randi([5,7]);
lPoints=randPoint_n(lPonintsNum);
lPointsColor=[randColor()./255,0.6];
x_lPoints=interp1(1:lPonintsNum,lPoints(:,1),1:0.01:lPonintsNum,'spline');
y_lPoints=interp1(1:lPonintsNum,lPoints(:,2),1:0.01:lPonintsNum,'spline');
plot(acAxes,x_lPoints,y_lPoints,'Color',lPointsColor,'LineWidth',1.5)
|
5关于图像存储
由于目前版本uifigure还不支持存储为图像,因此我们绘制图像是在figure和uifigure分别绘制一遍,其中figure依旧是不可见状态,主要用于将图片验证码保存为png格式,可以在完整代码中看出这一点。
同时,本程序的设置为,每次刷新图形验证码,都会刷新当前文件夹下authCode.png为最新的验证码,如需要保存请及时将其改名或复制另存:

6关于验证码对比
首先就是需要提取框内验证码:
|
1
|
codeInPut=acEditField.Value;
|
因为我们的验证码字符都是大写的,将输入的文本用upper函数变为大写:
|
1
|
codeInPut=upper(codeInPut);
|
同时我们因为0和O长的太像,所以不对其进行区分,直接将输入的验证码中的0改为O:
|
1
|
codeInPut(codeInPut=='0')='O';
|
之后就能够用strcmp函数将当前验证码和输入的验证码进行对比:
|
1
2
3
4
5
|
if strcmp(codeInPut,authCode)
msgbox('验证码正确')
else
msgbox('验证码错误')
end
|
7完整代码
|
1
2
3
4
5
6
7
8
9
10
11
12
13
14
15
16
17
18
19
20
21
22
23
24
25
26
27
28
29
30
31
32
33
34
35
36
37
38
39
40
41
42
43
44
45
46
47
48
49
50
51
52
53
54
55
56
57
58
59
60
61
62
63
64
65
66
67
68
69
70
71
72
73
74
75
76
77
78
79
80
81
82
83
84
85
86
87
88
89
90
91
92
93
94
95
96
97
98
99
100
101
102
103
104
105
106
107
108
109
110
111
112
113
114
115
116
117
118
119
120
121
122
123
124
125
126
127
128
129
130
131
132
133
134
135
136
137
138
139
140
141
142
143
144
145
146
147
148
149
150
151
152
153
154
155
156
157
158
159
160
161
162
163
164
165
166
167
168
169
170
171
172
173
174
175
176
177
178
179
180
181
182
183
184
185
186
187
188
189
190
191
192
193
194
|
function authCode
strElement=char([49:57,65:90]); % 1-9,A-Z的字符
randColor=@()randi([0,200],[1,3]); % 生成随机颜色的匿名函数
randColor_n=@(n)randi([0,200],[n,3])./255; % 生成n个随机颜色的匿名函数
randPoint_n=@(n)[randi([5,195],[n,1]),randi([5,65],[n,1])];% 生成n个随机点的匿名函数
global authCode; % 全局变量:验证码
% 字符图片矩阵构造 ========================================================
% 以下为字符图片创建过程
% 原理为构造隐藏的figure和axes
% 在其上用text绘制字符并保存figure为图片
% 导入图片
if ~exist('Materials','dir')
mkdir('Materials');
end
fig=figure('units','pixels',...
'position',[20 80 200 200],...
'Numbertitle','off',...
'Color',[1 1 1],...
'resize','off',...
'visible','off',...
'menubar','none');
ax=axes('Units','pixels',...
'parent',fig,...
'Color',[1 1 1],...
'Position',[0 0 200 200],...
'XLim',[0 200],...
'YLim',[0 200],...
'XColor',[1 1 1],...
'YColor',[1 1 1]);
strPic{length(strElement)}=[];
for i=1:length(strElement)
% 若是不存在该字符图片则生成,否则直接导入
if ~exist(['.\Materials\',strElement(i),'.png'],'file')
delete(findobj('tag','textStr'));
text(ax,100,100,strElement(i),'HorizontalAlignment',...
'center','FontSize',140,'tag','textStr','FontWeigh','bold')
saveas(fig,['.\Materials\',strElement(i),'.png']); % 保存图片
end
tempPic=imread(['.\Materials\',strElement(i),'.png']); % 读取图片
strPic{i}=imresize(tempPic,[150,150]); % 重新调整图片大小
end
% 更改fig ax样式,为方便后期验证码存储
fig.Position=[100 100 200 70];
ax.Position=[1 1 199.5 70];
ax.XTick=[];
ax.YTick=[];
ax.XLim=[0,200];
ax.YLim=[0,70];
ax.XColor=[0.7 0.7 0.7];
ax.YColor=[0.7 0.7 0.7];
ax.Box='on';
ax.YDir='reverse';
hold(ax,'on');
% APP designer窗口构建 ====================================================
acFigure=uifigure();
acFigure.Position=[100 100 370 90];
acFigure.Name='authCode';
acFigure.Resize='off';
acAxes=uiaxes(acFigure);
acAxes.Position=[10 10 200 70];
acAxes.XTick=[];
acAxes.YTick=[];
acAxes.XLim=[0,200];
acAxes.YLim=[0,70];
acAxes.XColor=[0.7 0.7 0.7];
acAxes.YColor=[0.7 0.7 0.7];
acAxes.Box='on';
acAxes.YDir='reverse';
hold(acAxes,'on');
acEditField=uieditfield(acFigure,'text');
acEditField.Position=[220 52 70 23];
acEditField.FontSize=16;
acEditField.FontWeight='bold';
acEditField.FontColor=[0.3,0.3,0.3];
% .html文件自动生成及引入 - - - - - - - - - - - - - - - - - - - - - - - - -
htmlContent={'<!DOCTYPE html><html><head><meta charset=UTF-8>';
'<script type="text/javascript">';
'function setup(htmlComponent){';
'document.getElementById("btnonclink").addEventListener("click",function(event){';
'htmlComponent.Data="test";});}</script></head>';
'<body><a href="" id=" rel="external nofollow" rel="external nofollow" rel="external nofollow" btnonclink">看不清?</a></body></html>'};
if ~exist('.\Materials\textbtn.html','file')
fid=fopen('.\Materials\textbtn.txt','w');
for i=1:length(htmlContent)
fprintf(fid,'%s\r\n',htmlContent{i});
end
fclose(fid);
copyfile('.\Materials\textbtn.txt','.\Materials\textbtn.html');
delete('.\Materials\textbtn.txt')
end
acHTML=uihtml(acFigure);
acHTML.HTMLSource='.\Materials\textbtn.html';
acHTML.DataChangedFcn=@refresh;
acHTML.Position=[300 50 88 26];
% - - - - - - - - - - - - - - - - - - - - - - - - - - - - - - - - - - - - -
acButton=uibutton(acFigure);
acButton.Position=[220 15 140 30];
acButton.Text='确 认 验 证 码';
acButton.BackgroundColor=[0.31 0.58 0.80];
acButton.FontColor=[1 1 1];
acButton.FontWeight='bold';
acButton.FontSize=14;
acButton.ButtonPushedFcn=@verify;
% 回调函数 ================================================================
function refresh(~,~)
cla(acAxes)
cla(ax)
I_5=fspecial('average',[5,5]); % 5*5均值滤波模板
randiNums=randi([1,length(strElement)],[1,4]);
authCode=strElement(randiNums); % 验证码
disp(authCode)
for ii=1:4
tPic=strPic{randiNums(ii)};
tPic=tPic(:,:,1);
%tempPic(tempPic<250)=150;
% 将图像旋转-拉伸-旋转
randiTheta1=randi([0,90]);
randiTheta2=randi([-30,30]);
randiLenth=randi([0,70]);
tPic=imrotate(255-tPic,randiTheta1,'bilinear','crop');
tPic=imresize(tPic,[150+randiLenth,150]);
tPic=imrotate(tPic,-randiTheta1+randiTheta2,'bilinear','crop');
% 将图像边缘进行模糊,并将模糊的部分数值设置为150
tPic=255-imfilter(tPic,I_5);
tPic(tPic~=0&tPic~=255)=150;
% 为符号和符号边缘赋予不同颜色
tempColor1=randColor();tempColor2=randColor();
tempPicR=tPic;tempPicG=tPic;tempPicB=tPic;
tempPicR(tPic==150)=tempColor1(1);tempPicR(tPic==0)=tempColor2(1);
tempPicG(tPic==150)=tempColor1(2);tempPicG(tPic==0)=tempColor2(2);
tempPicB(tPic==150)=tempColor1(3);tempPicB(tPic==0)=tempColor2(3);
tempPic_3=uint8(zeros([size(tPic),3]));
tempPic_3(:,:,1)=tempPicR;
tempPic_3(:,:,2)=tempPicG;
tempPic_3(:,:,3)=tempPicB;
% 显示图片
image(acAxes,[-size(tempPic_3,2)/2,size(tempPic_3,2)/2]./3.5+40*ii+randi([-5,5]),...
[-size(tempPic_3,1)/2,size(tempPic_3,1)/2]./3.5+35+randi([-5,5]),...
tempPic_3,'AlphaData',tempPic_3(:,:,1)~=255,'Interpolation','bilinear')
image(ax,[-size(tempPic_3,2)/2,size(tempPic_3,2)/2]./3.5+40*ii+randi([-5,5]),...
[-size(tempPic_3,1)/2,size(tempPic_3,1)/2]./3.5+35+randi([-5,5]),...
tempPic_3,'AlphaData',tempPic_3(:,:,1)~=255,'Interpolation','bilinear')
end
% 绘制散点
pPonintsNum=randi([6,10]);
pPoints=randPoint_n(pPonintsNum);
pPointsColor=randColor_n(pPonintsNum);
scatter(acAxes,pPoints(:,1),pPoints(:,2),6,'filled',...
'CData',pPointsColor,'AlphaData',0.6)
scatter(ax,pPoints(:,1),pPoints(:,2),6,'filled',...
'CData',pPointsColor,'AlphaData',0.6)
% 绘制线
lPonintsNum=randi([5,7]);
lPoints=randPoint_n(lPonintsNum);
lPointsColor=[randColor()./255,0.6];
x_lPoints=interp1(1:lPonintsNum,lPoints(:,1),1:0.01:lPonintsNum,'spline');
y_lPoints=interp1(1:lPonintsNum,lPoints(:,2),1:0.01:lPonintsNum,'spline');
plot(acAxes,x_lPoints,y_lPoints,'Color',lPointsColor,'LineWidth',1.5)
plot(ax,x_lPoints,y_lPoints,'Color',lPointsColor,'LineWidth',1.5)
saveas(fig,'.\authCode.png');
end
refresh()
function verify(~,~)
codeInPut=acEditField.Value;
codeInPut=upper(codeInPut);
codeInPut(codeInPut=='0')='O';
if strcmp(codeInPut,authCode)
msgbox('验证码正确')
else
msgbox('验证码错误')
end
end
end
|
注:程序第一次运行由于有html文件及png文件需要生成,因而会比较慢,之后的运行速度会快很多。
对于以前版本没有uihtml控件可以先尝试如下代码:
这里用正常按钮替换了uihtml控件
|
1
2
3
4
5
6
7
8
9
10
11
12
13
14
15
16
17
18
19
20
21
22
23
24
25
26
27
28
29
30
31
32
33
34
35
36
37
38
39
40
41
42
43
44
45
46
47
48
49
50
51
52
53
54
55
56
57
58
59
60
61
62
63
64
65
66
67
68
69
70
71
72
73
74
75
76
77
78
79
80
81
82
83
84
85
86
87
88
89
90
91
92
93
94
95
96
97
98
99
100
101
102
103
104
105
106
107
108
109
110
111
112
113
114
115
116
117
118
119
120
121
122
123
124
125
126
127
128
129
130
131
132
133
134
135
136
137
138
139
140
141
142
143
144
145
146
147
148
149
150
151
152
153
154
155
156
157
158
159
160
161
162
163
164
165
166
167
168
169
170
171
172
173
174
175
176
177
178
179
180
181
182
|
function authCode2
strElement=char([49:57,65:90]); % 1-9,A-Z的字符
randColor=@()randi([0,200],[1,3]); % 生成随机颜色的匿名函数
randColor_n=@(n)randi([0,200],[n,3])./255; % 生成n个随机颜色的匿名函数
randPoint_n=@(n)[randi([5,195],[n,1]),randi([5,65],[n,1])];% 生成n个随机点的匿名函数
global authCode; % 全局变量:验证码
% 字符图片矩阵构造 ========================================================
% 以下为字符图片创建过程
% 原理为构造隐藏的figure和axes
% 在其上用text绘制字符并保存figure为图片
% 导入图片
if ~exist('Materials','dir')
mkdir('Materials');
end
fig=figure('units','pixels',...
'position',[20 80 200 200],...
'Numbertitle','off',...
'Color',[1 1 1],...
'resize','off',...
'visible','off',...
'menubar','none');
ax=axes('Units','pixels',...
'parent',fig,...
'Color',[1 1 1],...
'Position',[0 0 200 200],...
'XLim',[0 200],...
'YLim',[0 200],...
'XColor',[1 1 1],...
'YColor',[1 1 1]);
strPic{length(strElement)}=[];
for i=1:length(strElement)
% 若是不存在该字符图片则生成,否则直接导入
if ~exist(['.\Materials\',strElement(i),'.png'],'file')
delete(findobj('tag','textStr'));
text(ax,100,100,strElement(i),'HorizontalAlignment',...
'center','FontSize',140,'tag','textStr','FontWeigh','bold')
saveas(fig,['.\Materials\',strElement(i),'.png']); % 保存图片
end
tempPic=imread(['.\Materials\',strElement(i),'.png']); % 读取图片
strPic{i}=imresize(tempPic,[150,150]); % 重新调整图片大小
end
% 更改fig ax样式,为方便后期验证码存储
fig.Position=[100 100 200 70];
ax.Position=[1 1 199.5 70];
ax.XTick=[];
ax.YTick=[];
ax.XLim=[0,200];
ax.YLim=[0,70];
ax.XColor=[0.7 0.7 0.7];
ax.YColor=[0.7 0.7 0.7];
ax.Box='on';
ax.YDir='reverse';
hold(ax,'on');
% APP designer窗口构建 ====================================================
acFigure=uifigure();
acFigure.Position=[100 100 370 90];
acFigure.Name='authCode';
acFigure.Resize='off';
acAxes=uiaxes(acFigure);
acAxes.Position=[10 10 200 70];
acAxes.XTick=[];
acAxes.YTick=[];
acAxes.XLim=[0,200];
acAxes.YLim=[0,70];
acAxes.XColor=[0.7 0.7 0.7];
acAxes.YColor=[0.7 0.7 0.7];
acAxes.Box='on';
acAxes.YDir='reverse';
hold(acAxes,'on');
acEditField=uieditfield(acFigure,'text');
acEditField.Position=[220 52 70 23];
acEditField.FontSize=16;
acEditField.FontWeight='bold';
acEditField.FontColor=[0.3,0.3,0.3];
acfreshBtn=uibutton(acFigure);
acfreshBtn.Text='看不清?';
acfreshBtn.ButtonPushedFcn=@refresh;
acfreshBtn.Position=[300 50 60 27];
% - - - - - - - - - - - - - - - - - - - - - - - - - - - - - - - - - - - - -
acButton=uibutton(acFigure);
acButton.Position=[220 15 140 30];
acButton.Text='确 认 验 证 码';
acButton.BackgroundColor=[0.31 0.58 0.80];
acButton.FontColor=[1 1 1];
acButton.FontWeight='bold';
acButton.FontSize=14;
acButton.ButtonPushedFcn=@verify;
% 回调函数 ================================================================
function refresh(~,~)
cla(acAxes)
cla(ax)
% hold(acAxes,'off');
% image(acAxes,[-1,0],[-1,0],ones(1,1,3),'visible','off');
% hold(acAxes,'on');
% delete(findobj('tag','ax'));
I_5=fspecial('average',[5,5]); % 5*5均值滤波模板
randiNums=randi([1,length(strElement)],[1,4]);
authCode=strElement(randiNums); % 验证码
disp(authCode)
for ii=1:4
tPic=strPic{randiNums(ii)};
tPic=tPic(:,:,1);
%tempPic(tempPic<250)=150;
% 将图像旋转-拉伸-旋转
randiTheta1=randi([0,90]);
randiTheta2=randi([-30,30]);
randiLenth=randi([0,70]);
tPic=imrotate(255-tPic,randiTheta1,'bilinear','crop');
tPic=imresize(tPic,[150+randiLenth,150]);
tPic=imrotate(tPic,-randiTheta1+randiTheta2,'bilinear','crop');
% 将图像边缘进行模糊,并将模糊的部分数值设置为150
tPic=255-imfilter(tPic,I_5);
tPic(tPic~=0&tPic~=255)=150;
% 为符号和符号边缘赋予不同颜色
tempColor1=randColor();tempColor2=randColor();
tempPicR=tPic;tempPicG=tPic;tempPicB=tPic;
tempPicR(tPic==150)=tempColor1(1);tempPicR(tPic==0)=tempColor2(1);
tempPicG(tPic==150)=tempColor1(2);tempPicG(tPic==0)=tempColor2(2);
tempPicB(tPic==150)=tempColor1(3);tempPicB(tPic==0)=tempColor2(3);
tempPic_3=uint8(zeros([size(tPic),3]));
tempPic_3(:,:,1)=tempPicR;
tempPic_3(:,:,2)=tempPicG;
tempPic_3(:,:,3)=tempPicB;
% 显示图片
image(acAxes,[-size(tempPic_3,2)/2,size(tempPic_3,2)/2]./3.5+40*ii+randi([-5,5]),...
[-size(tempPic_3,1)/2,size(tempPic_3,1)/2]./3.5+35+randi([-5,5]),...
tempPic_3,'AlphaData',tempPic_3(:,:,1)~=255,'Interpolation','bilinear')
image(ax,[-size(tempPic_3,2)/2,size(tempPic_3,2)/2]./3.5+40*ii+randi([-5,5]),...
[-size(tempPic_3,1)/2,size(tempPic_3,1)/2]./3.5+35+randi([-5,5]),...
tempPic_3,'AlphaData',tempPic_3(:,:,1)~=255,'Interpolation','bilinear')
end
% 绘制散点
pPonintsNum=randi([6,10]);
pPoints=randPoint_n(pPonintsNum);
pPointsColor=randColor_n(pPonintsNum);
scatter(acAxes,pPoints(:,1),pPoints(:,2),6,'filled',...
'CData',pPointsColor,'AlphaData',0.6)
scatter(ax,pPoints(:,1),pPoints(:,2),6,'filled',...
'CData',pPointsColor,'AlphaData',0.6)
% 绘制线
lPonintsNum=randi([5,7]);
lPoints=randPoint_n(lPonintsNum);
lPointsColor=[randColor()./255,0.6];
x_lPoints=interp1(1:lPonintsNum,lPoints(:,1),1:0.01:lPonintsNum,'spline');
y_lPoints=interp1(1:lPonintsNum,lPoints(:,2),1:0.01:lPonintsNum,'spline');
plot(acAxes,x_lPoints,y_lPoints,'Color',lPointsColor,'LineWidth',1.5)
plot(ax,x_lPoints,y_lPoints,'Color',lPointsColor,'LineWidth',1.5)
saveas(fig,'.\authCode.png');
end
refresh()
function verify(~,~)
codeInPut=acEditField.Value;
codeInPut=upper(codeInPut);
codeInPut(codeInPut=='0')='O';
if strcmp(codeInPut,authCode)
msgbox('验证码正确')
else
msgbox('验证码错误')
end
end
end
|
|