广告位联系
返回顶部
分享到

PHP8.0的编译安装与使用的介绍

php 来源:互联网 作者:F11站长开发者 发布时间:2022-08-11 09:00:54 人浏览
摘要

安装与配置 本次使用的操作系统Ubuntu 18.04.4 LTS 安装 1.准备必要库 1 2 apt-get install -y autoconf libxml2-dev libsqlite3-dev \ libcurl4-openssl-dev libssl-dev libonig-dev libtidy-dev zlib1g-dev 2.去官网下载8.0正式版

安装与配置

本次使用的操作系统Ubuntu 18.04.4 LTS

安装

1.准备必要库

1

2

apt-get install -y autoconf libxml2-dev libsqlite3-dev \

libcurl4-openssl-dev libssl-dev libonig-dev libtidy-dev zlib1g-dev

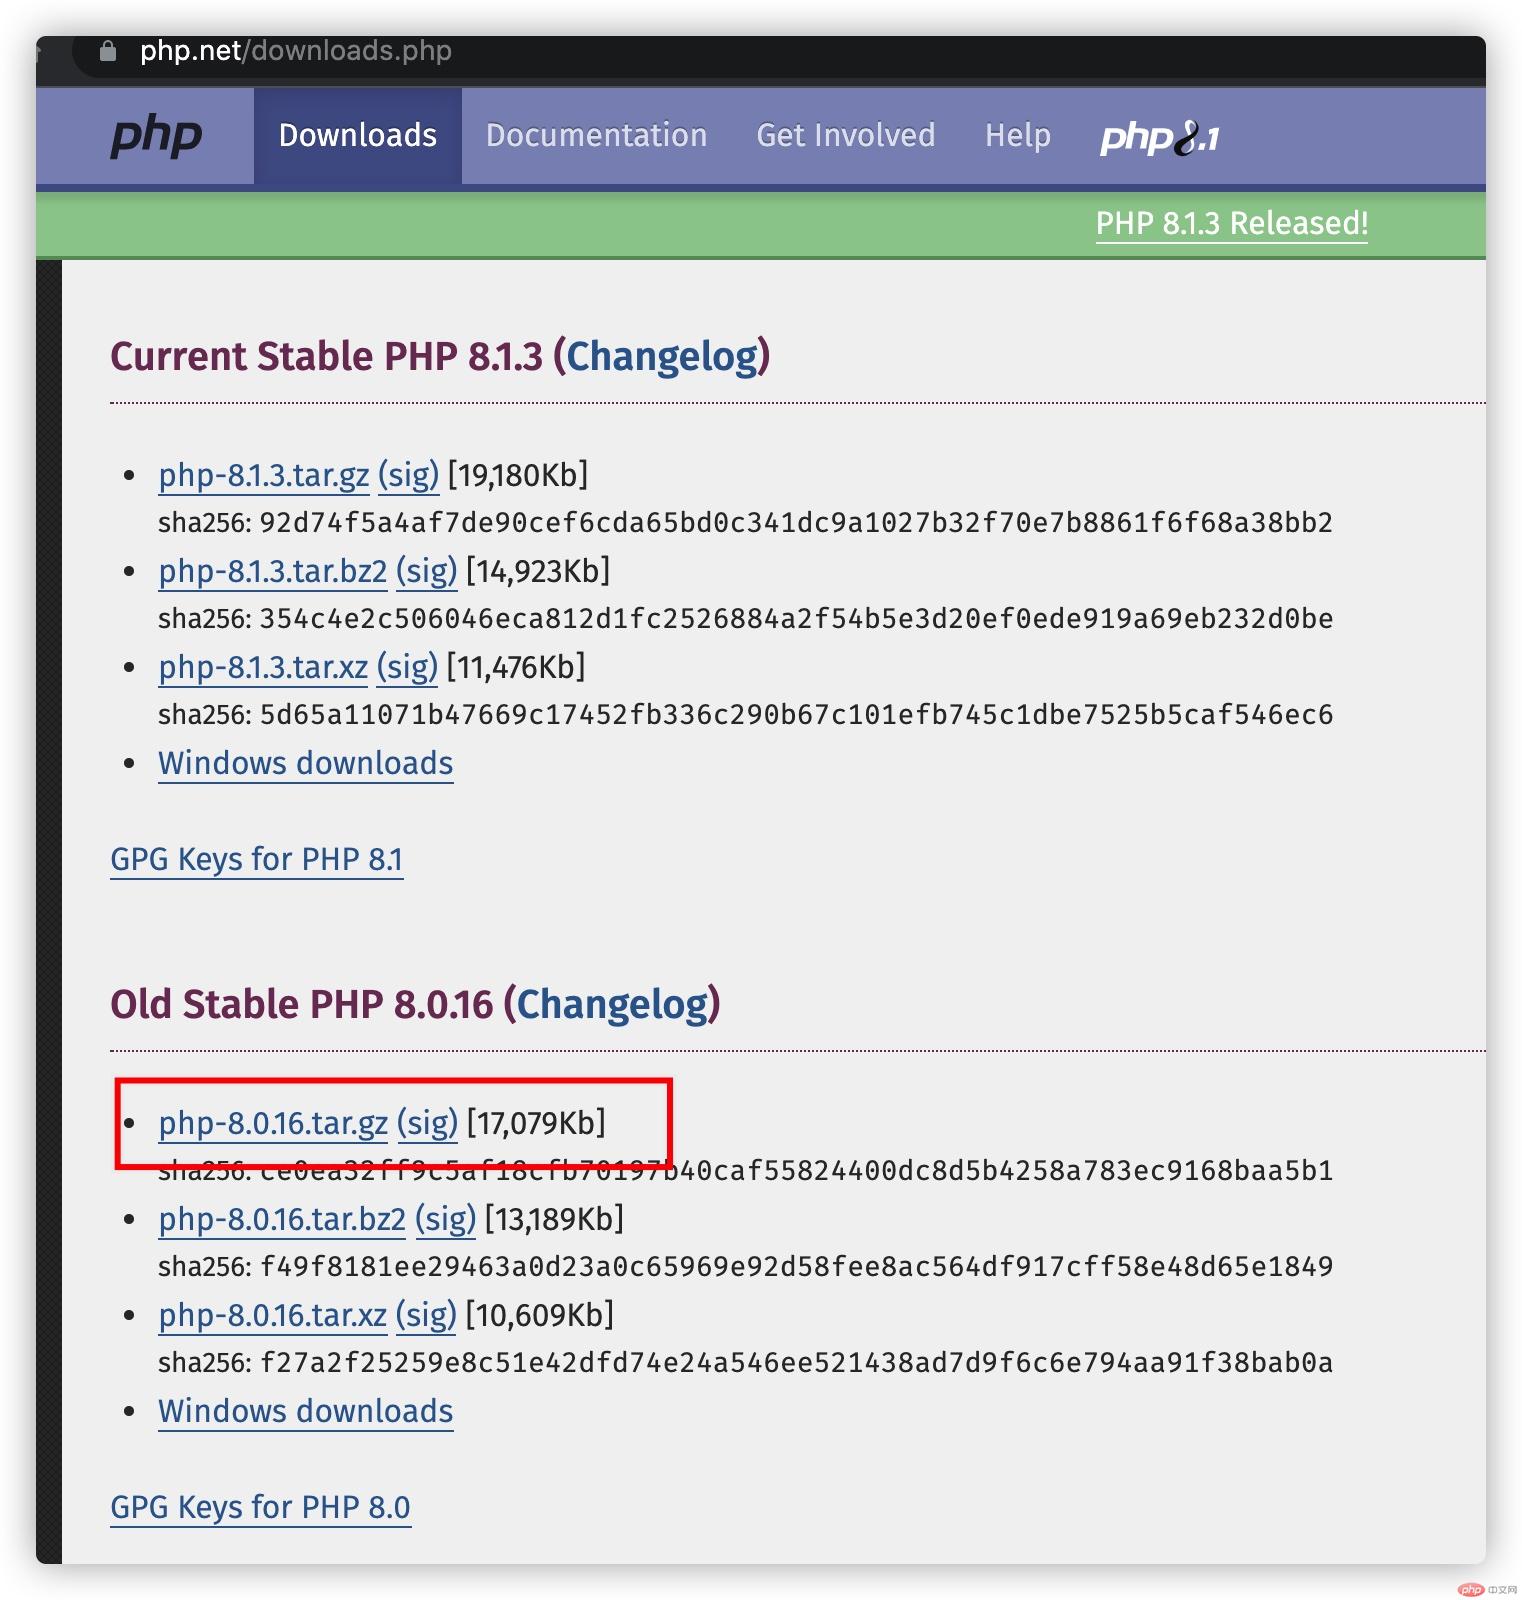
2.去官网下载8.0正式版 https://www.php.net/releases/8.0/en.php

3.解压安装

1

2

3

4

5

6

7

8

tar php-8.0.0.tar.gzcd php-8.0.0

./configure --prefix=/opt/php8 --with-config-file-path=/opt/php8/etc \

--enable-fpm --enable-mysqlnd --enable-opcache --enable-pcntl \

--enable-mbstring --enable-soap --enable-zip --enable-calendar \

--enable-bcmath --enable-exif --enable-ftp --enable-intl --with-mysqli \

--with-pdo-mysql --with-openssl --with-curl --with-gd --with-gettext \

--with-mhash --with-openssl --with-mcrypt --with-tidy --enable-wddx \

--with-xmlrpc --with-zlibmakemake installcp php.ini-production /opt/php/etc/php.inicd /opt/php8/etccp php-fpm.conf.default php-fpm.confcp ./php-fpm.d/www.conf.default ./php-fpm.d/www.conf

4.做个软连接

1

ln -s /opt/php8/bin/php /usr/bin/php8

5.安装composer

1

2

cd /opt/php8/bin/curl -sS https://getcomposer.org/installer | php8ln -s /opt/php8/bin/composer.phar /usr/bin/composer8

composer8 config -g repo.packagist composer https://mirrors.aliyun.com/composer/

6.添加一个php8.0的system service

1

vim /lib/systemd/system/php8.0-fpm.service

内容如下

1

2

3

4

5

6

7

8

9

10

11

12

13

[Unit]

Description=The PHP 8.0 FastCGI Process Manager

Documentation=man:php-fpm8.0(8)

After=network.target


[Service]

Type=simple

PIDFile=/var/run/php8.0-fpm.pid

ExecStart=/opt/php8/sbin/php-fpm --nodaemonize --fpm-config /opt/php8/etc/php-fpm.conf

ExecReload=/bin/kill -USR2 $MAINPID


[Install]

WantedBy=multi-user.target

配置

fpm-fpm,php.ini配置

和PHP7一样,注意下用户权限

opcache配置

PHP8多了一个jit配置,如下

1

2

3

4

5

[opcache]

zend_extension=opcache.so

opcache.enable=1

opcache.jit_buffer_size=100M

opcache.jit=1255

启动

1

systemctl start php8.0-fpm

laravel

创建一个laravel项目【推荐:laravel视频教程】

1

2

cd /opt/web

composer8 create-project --prefer-dist laravel/laravel php8

配置一下.env文件

nginx配置

nginx的配置和PHP7的一致

1

2

3

4

5

6

7

8

9

10

11

12

13

14

15

16

17

18

19

20

21

22

23

24

server {

    listen 94;


    access_log  /tmp/test94.log main;


    root /opt/web/php8/public;

    index index.php index.html index.htm;


    location / {

        try_files $uri $uri/ /index.php?$query_string;

    }


    location ~ \.php {

        fastcgi_pass unix:/run/php/php8.0-fpm.sock;

        fastcgi_index /index.php;


        include fastcgi_params;


        fastcgi_split_path_info       ^(.+\.php)(/.+)$;

        fastcgi_param PATH_INFO       $fastcgi_path_info;

        fastcgi_param PATH_TRANSLATED $document_root$fastcgi_path_info;

        fastcgi_param SCRIPT_FILENAME $document_root$fastcgi_script_name;

    }

}

添加一个接口

laravel7的路由写法在laravel8中有点问题,改下RouteServiceProvider.php的写法。
比如API路由,将$this->namespace改为App\Http\Controllers\Api。

1

2

3

4

5

6

7

8

9

10

11

12

13

14

15

public function boot()

    {

        $this->configureRateLimiting();


        $this->routes(function () {

            Route::prefix('api')

                ->middleware('api')

        ->namespace('App\Http\Controllers\Api')

                ->group(base_path('routes/api.php'));


            Route::middleware('web')

                ->namespace($this->namespace)

                ->group(base_path('routes/web.php'));

        });

    }

其他一样,不用修改。

加个测试接口看看:
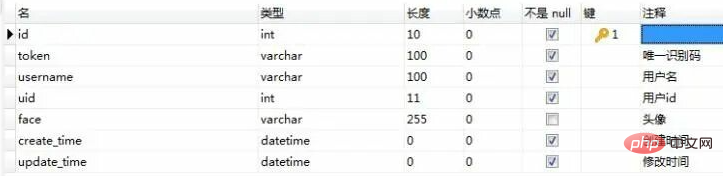
1

Route::get('/test','WxController@test');

test接口查一条数据并返回

1

2

3

4

5

6

7

<?phpnamespace App\Http\Controllers\Api;use App\Models\WareHouses;use Illuminate\Foundation\Auth\Access\AuthorizesRequests;use Illuminate\Foundation\Bus\DispatchesJobs;use Illuminate\Foundation\Validation\ValidatesRequests;use Illuminate\Http\Request;use Illuminate\Routing\Controller as BaseController;class WxController extends BaseController{

    use AuthorizesRequests, DispatchesJobs, ValidatesRequests;


    public function test(Request $request)

    {

        return WareHouses::find(1)->toarray();

    }}

对比测试PHP7

本次使用PHP7.3,接口代码和PHP8一致,两者都开启opcache。

服务器配置是1核2G,用ab简单测试下。

1

ab -n 100 -c 10

PHP7.3的测试结果如下:

1

2

3

4

5

6

7

8

9

10

11

12

13

14

15

16

17

18

19

20

21

22

23

24

25

26

27

28

29

30

31

32

33

34

35

36

37

38

39

40

41

42

This is ApacheBench, Version 2.3 <$Revision: 1843412 $>

Copyright 1996 Adam Twiss, Zeus Technology Ltd, http://www.zeustech.net/

Licensed to The Apache Software Foundation, http://www.apache.org/


Benchmarking 192.168.10.10 (be patient).....done


Server Software:        nginx/1.14.0

Server Hostname:        192.168.10.10

Server Port:            94


Document Path:          /api/test

Document Length:        255 bytes


Concurrency Level:      10

Time taken for tests:   0.400 seconds

Complete requests:      10

Failed requests:        0

Total transferred:      5720 bytes

HTML transferred:       2550 bytes

Requests per second:    25.00 [#/sec] (mean)

Time per request:       399.994 [ms] (mean)

Time per request:       39.999 [ms] (mean, across all concurrent requests)

Transfer rate:          13.97 [Kbytes/sec] received


Connection Times (ms)

              min  mean[+/-sd] median   max

Connect:        8   10   2.1     11      13

Processing:   101  159  42.8    174     228

Waiting:      101  159  42.8    174     228

Total:        114  170  42.0    186     235


Percentage of the requests served within a certain time (ms)

  50%    186

  66%    186

  75%    197

  80%    219

  90%    235

  95%    235

  98%    235

  99%    235

 100%    235 (longest request)

PHP8.0的测试结果如下:

1

2

3

4

5

6

7

8

9

10

11

12

13

14

15

16

17

18

19

20

21

22

23

24

25

26

27

28

29

30

31

32

33

34

35

36

37

38

39

40

41

42

43

44

This is ApacheBench, Version 2.3 <$Revision: 1843412 $>

Copyright 1996 Adam Twiss, Zeus Technology Ltd, http://www.zeustech.net/

Licensed to The Apache Software Foundation, http://www.apache.org/


Benchmarking 192.168.10.10 (be patient).....done


Server Software:        nginx/1.14.0

Server Hostname:        192.168.10.10

Server Port:            94


Document Path:          /api/test

Document Length:        255 bytes


Concurrency Level:      10

Time taken for tests:   2.441 seconds

Complete requests:      100

Failed requests:        33

   (Connect: 0, Receive: 0, Length: 33, Exceptions: 0)

Non-2xx responses:      33

Total transferred:      268489 bytes

HTML transferred:       234720 bytes

Requests per second:    40.97 [#/sec] (mean)

Time per request:       244.096 [ms] (mean)

Time per request:       24.410 [ms] (mean, across all concurrent requests)

Transfer rate:          107.42 [Kbytes/sec] received


Connection Times (ms)

              min  mean[+/-sd] median   max

Connect:        7   15  18.1     10     132

Processing:    47  210 224.4    106     817

Waiting:       17  118 107.4    101     787

Total:         55  226 222.1    122     828


Percentage of the requests served within a certain time (ms)

  50%    122

  66%    137

  75%    164

  80%    289

  90%    640

  95%    809

  98%    820

  99%    828

 100%    828 (longest request)


版权声明 : 本文内容来源于互联网或用户自行发布贡献,该文观点仅代表原作者本人。本站仅提供信息存储空间服务和不拥有所有权,不承担相关法律责任。如发现本站有涉嫌抄袭侵权, 违法违规的内容, 请发送邮件至2530232025#qq.cn(#换@)举报,一经查实,本站将立刻删除。
原文链接 : https://www.php.cn/topic/php8/488887.html
相关文章
  • PHP数据加密方式的总结

    PHP数据加密方式的总结
    首先我们来了解一下为什么要加密? 在网络通信的过程中攻击者可以伪造请求和返回,从而达到不可告人的目的。如下图所示: 数据加密之
  • PHP四种统计在线人数方式介绍

    PHP四种统计在线人数方式介绍
    1 用表统计方式 用数据表统计在线人数,这种方式只能用在并发量不大的情况下。 首先我们先新建表:user_login 编辑 user_login 表 模拟用户登
  • PHP获取系统毫秒数时间方法
    前言 php中获取时间方法是date(),在php中获取时间戳方法有time()、strtotime(); date():date(format, timestamp),format为格式、timestamp为时间戳(可选
  • PHP中的DI依赖注入的详细介绍
    什么是 DI / 依赖注入 依赖注入DI 其实本质上是指对类的依赖通过构造器完成 自动注入 通俗来说,就是你当前操作一个类,但是这个类的某
  • PHP8.1 Fiber交叉执行多任务(附代码)
    拿平时大家写的 for 循环举例。像 go 你可以写两个go每个里面各写一个循环同时输入,你可以看到输出是交替。在过去的php版本中,如果只开
  • PHP8.0的编译安装与使用的介绍
    安装与配置 本次使用的操作系统Ubuntu 18.04.4 LTS 安装 1.准备必要库 1 2 apt-get install -y autoconf libxml2-dev libsqlite3-dev \ libcurl4-openssl-dev libssl-dev l
  • Mac如何编译PHP 8.0 到MxSrvs工具

    Mac如何编译PHP 8.0 到MxSrvs工具
    开始准备工作 下载 PHP 8.0 PHP 官方下载 https://www.php.net/downloads.php 进入到 MxSrvs 的主程序路径下的/Applications/MxSrvs/bin,根据 Mxsrvs 的命名规则,
  • PHP8 中的 JIT的详细介绍

    PHP8 中的 JIT的详细介绍
    PHP 8 的 JIT(Just In Time)编译器将作为扩展集成到 php 中 Opcache 扩展 用于运行时将某些操作码直接转换为从 cpu 指令。 这意味着使用JIT后,
  • PHP8.2不再支持字符串中用${}插入变量了

    PHP8.2不再支持字符串中用${}插入变量了
    PHP 社区 4 月底通过了一项只有一张反对票的提案,提案内容是在即将发布的 PHP 8.2 中,不再支持使用 ${} 在字符串中插入变量的语法(标记
  • PHP8.2两个新的强类型:null和false的详细介绍

    PHP8.2两个新的强类型:null和false的详细介绍
    PHP 从 7.0 开始不断地在完善强类型,我们可以给方法参数、返回值、类属性等声明类型。 强类型可以让代码更加健壮,易于维护,可读性增
  • 本站所有内容来源于互联网或用户自行发布,本站仅提供信息存储空间服务,不拥有版权,不承担法律责任。如有侵犯您的权益,请您联系站长处理!
  • Copyright © 2017-2022 F11.CN All Rights Reserved. F11站长开发者网 版权所有 | 苏ICP备2022031554号-1 | 51LA统计