
Python快速实现定时器的五种常见方法

1.sleep法(阻塞) 通过 while + sleep 实现定时任务 (1) 存在时间漂移(等待运行时间) 1 2 3 4 5 6 7 import time def loopMonitor(): while True: MonitorSystem() # 1min检查一次 time.sleep(60) loopMonitor() (2) 维护sleep时间
1.sleep法(阻塞)通过 while + sleep 实现定时任务 (1) 存在时间漂移(等待运行时间)
(2) 维护sleep时间
2.自定义法 (+线程、非阻塞)
3.Twisted更加健壮,并且实现了许多功能:守护进程、日志记录或异常处理
4.schedule (简单方便,推荐)
5.Apscheduler (功能多,推荐)调度器(scheduler)BlockingScheduler: 调度器在当前进程的主线程中运行,会阻塞当前线程。 BackgroundScheduler: 调度器在后台线程中运行,不会阻塞当前线程。 AsyncIOScheduler: 结合asyncio模块一起使用。 GeventScheduler: 程序中使用gevent作为IO模型和GeventExecutor配合使用。 TornadoScheduler: 程序中使用Tornado的IO模型,用 ioloop.add_timeout 完成定时唤醒。 TwistedScheduler: 配合TwistedExecutor,用reactor.callLater完成定时唤醒。 QtScheduler: 应用是一个Qt应用,需使用QTimer完成定时唤醒。 触发器(trigger)date是最基本的一种调度,作业任务只会执行一次。 interval触发器,固定时间间隔触发。 cron 触发器,在特定时间周期性地触发,和Linux crontab格式兼容。它是功能最强大的触发器。 作业存储(job store)添加任务,有两种添加方法,一种add_job(), 另一种是scheduled_job()修饰器来修饰函数。
删除任务,两种方法:remove_job() 和 job.remove()。remove_job()是根据任务的id来移除,所以要在任务创建的时候指定一个 id。job.remove()则是对任务执行remove方法。
获取任务列表,通过scheduler.get_jobs()方法能够获取当前调度器中的所有任务的列表
关闭任务,使用scheduler.shutdown()默认情况下调度器会等待所有正在运行的作业完成后,关闭所有的调度器和作业存储。
注意点时区问题 报错:ValueError: Timezone offset does not match system offset: 0 != 28800. Please, check your config files. 分析:通过分析异常日志,发现APScheduler的默认timezone,而“0”是获取的系统环境变量的TZ时间28800对应timezone为“Asia/Shanghai”, 而0对应timezone为“UTC”,所以需将系统环境变量的时区与APScheduler的时区设置为一致。 解决:
其他解决方案: 如果部署应用dockerfile配置,也可以在dockerfile中设定系统时区。 |
您可能感兴趣的文章 :

-
Python实现自动化GIT提交的代码
在日常开发中,我们经常需要频繁地向 Git 仓库提交代码。虽然git add、git commit、git push这几个命令并不复杂,但重复操作容易出错,也浪费 -
Python快速实现定时器的五种常见方法
1.sleep法(阻塞) 通过 while + sleep 实现定时任务 (1) 存在时间漂移(等待运行时间) 1 2 3 4 5 6 7 import time def loopMonitor(): while True: MonitorSystem( -
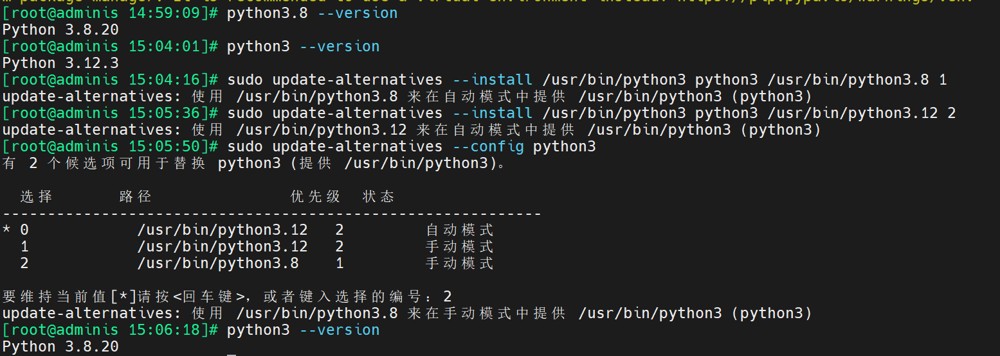
同时安装了Python 3.8.20和Python 3.12.3如何指定默认版
同时安装了 Python 3.8.20 和 Python 3.12.3如何指定默认版本 使用 update-alternatives 管理版本 1 2 3 4 5 6 # 注册Python 3.8到系统备选方案 sudo update-alter -
Python使用Pyecharts绘制精美饼状图的代码
Pyecharts 简介 Pyecharts 是一个基于 ECharts 的 Python 数据可视化库,它能够帮助用户轻松创建各种交互式图表。作为 ECharts 的 Python 接口,Pyecha -
利用Python脚本实现批量将图片转换为WebP格式
Python语言的简洁语法和库支持使其成为图像处理的理想选择。本文将介绍如何利用Python实现批量将图片转换为WebP格式的脚本。WebP作为一种高 -
python怎么调用java的jar包
一、安装包 1 pip3 install JPype1 二、使用步骤 1、导入jpype模块 2、python要调用的java的jar包路径 3、获取jvm.dll的文件路径 4、使用jpype开启虚拟机 -
PyTorch张量操作指南(cat、stack、split与chunk)
在深度学习实践中,张量的维度变换是数据处理和模型构建的基础技能。无论是多模态数据的融合(如图像与文本),还是批处理数据的拆 -

Python osgeo库安装失败问题的解决方案
Osgeo(Open Source Geospatial Foundation)是一个支持开源地理空间数据处理的基金会,我们可以在python中使用osgeo库来访问其提供的高效地理空间数 -
python ftplib上传文件名乱码的解决办法
公司安排我用RPA把各电商平台昨天直播和视频相关的曝光、销售等数据下载下来,我用rpa基本一个星期完成了,最后用影刀RPA自带的ftp文件 -
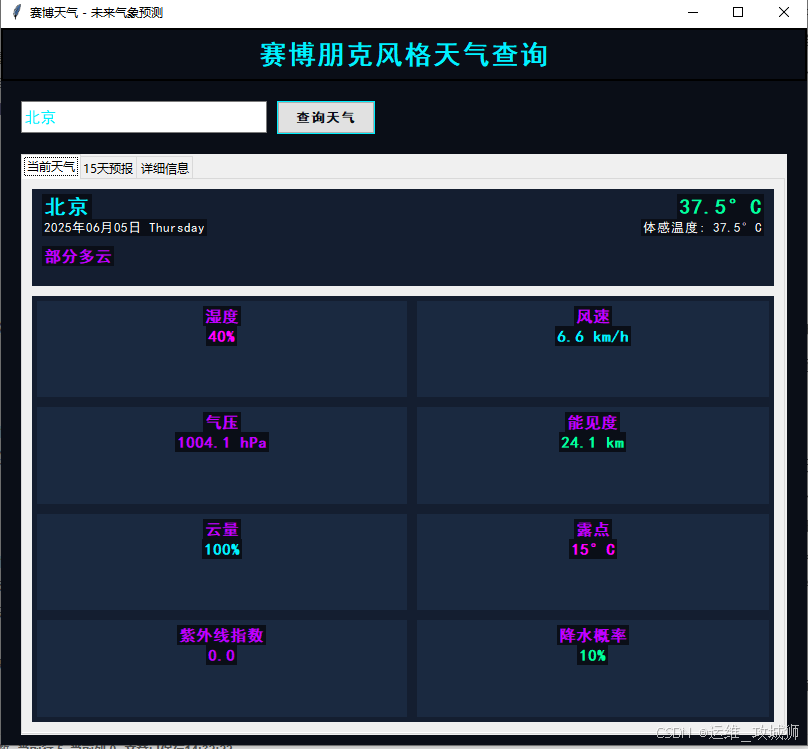
python编写朋克风格的天气查询程序
这个天气查询工具是一个基于 Python 的桌面应用程序,使用了tkinter库来创建图形用户界面(GUI),并通过requests库调用 Open - Meteo API 获取天气


-
python批量下载抖音视频
2019-06-18
-
利用Pyecharts可视化微信好友的方法
2019-07-04
-
python爬取豆瓣电影TOP250数据
2021-05-23
-
基于tensorflow权重文件的解读
2021-05-27
-
解决Python字典查找报Keyerror的问题
2021-05-27

