
广告位联系
返回顶部
分享到

OpenClaw数据加密实现敏感信息保护的完整方案

Ai 来源:互联网 作者:佚名 发布时间:2026-07-09 22:17:17 人浏览
摘要

摘要 AI Agent 处理的数据中,API Key、用户Token、对话记录、配置密钥等敏感信息随处可见。本文从数据安全的分层模型出发,系统讲解 OpenClaw 中的加密策略包括传输层 TLS 终结、存储层 AES-256 加

摘要

AI Agent 处理的数据中,API Key、用户Token、对话记录、配置密钥等敏感信息随处可见。本文从数据安全的分层模型出发,系统讲解 OpenClaw 中的加密策略——包括传输层 TLS 终结、存储层 AES-256 加密、环境变量脱敏、Secret 管理最佳实践。通过三个实战场景(配置加密存储、对话记录脱敏归档、多环境密钥轮转),你将掌握让 Agent 既能高效工作又不泄露敏感数据的完整方案。读完你会发现:安全不是"事后补救",而是设计之初就嵌入的能力。

1. 引言:你的 Agent 在裸奔吗?

1.1 先看一个触目惊心的场景

你的 OpenClaw Gateway 配置文件里写着:

1

2

3

4

5

6

7

8

9

model:

  providers:

    openai:

      api_key: sk-proj-abc123def456...

channels:

  feishu:

    app_secret: x8Kj2mP9qR5v...

  wecom:

    corp_secret: wL7nQ3tY6bV1...

如果这个文件被泄露——无论是误传到 GitHub、被攻击者读取、还是运维人员误操作——你的 API Key 就裸奔在网上了。

更隐蔽的是:Agent 的对话记录中可能包含用户手机号、身份证、银行卡信息。日志文件里可能躺着完整 Token。环境变量 printenv 一下就能看到所有密钥。

1.2 数据安全分层模型

层级 保护范围 如果没有这一层
传输安全 网络间的数据传输 中间人攻击可直接截获敏感信息
存储安全 落盘的数据 硬盘被盗或日志泄露直接暴露原文
访问控制 谁能读写数据 任何内部人员都能读到所有密钥
审计追踪 事后追查 数据泄露后不知道是谁、何时、做了什么

2. 传输层安全:TLS 终结配置

2.1 TLS 基础配置

1

2

3

4

5

6

7

8

9

10

11

12

13

14

15

16

17

18

19

20

21

22

# openclaw.yaml - TLS 配置段

gateway:

  port: 18789

  # TLS 配置

  tls:

    enabled: true

    cert_file: /etc/openclaw/tls/cert.pem

    key_file: /etc/openclaw/tls/key.pem

    # 最低 TLS 版本

    min_version: "1.2"

    # 支持的加密套件(白名单模式)

    cipher_suites:

      - TLS_ECDHE_RSA_WITH_AES_256_GCM_SHA384

      - TLS_ECDHE_RSA_WITH_AES_128_GCM_SHA256

    # 证书自动续期

    auto_renew:

      enabled: true

      provider: letsencrypt

      domains:

        - openclaw.your-domain.com

      email: admin@your-domain.com

      renew_before_days: 30

2.2 自签名证书(开发环境)

1

2

3

4

5

6

7

8

# 生成自签名证书(仅开发/测试用)

openssl req -x509 -nodes -days 365 -newkey rsa:4096 \

  -keyout /etc/openclaw/tls/key.pem \

  -out /etc/openclaw/tls/cert.pem \

  -subj "/CN=localhost" \

  -addext "subjectAltName=DNS:localhost,IP:127.0.0.1"

# 验证证书

openssl x509 -in /etc/openclaw/tls/cert.pem -text -noout | head -20

生产环境务必使用受信任的 CA 证书(Let’s Encrypt 或企业 CA),自签名证书仅用于本地开发。

3. 存储层加密:AES-256 实战

3.1 加密工具实现

1

2

3

4

5

6

7

8

9

10

11

12

13

14

15

16

17

18

19

20

21

22

23

24

25

26

27

28

29

30

31

32

33

34

35

36

37

38

39

40

41

42

43

44

45

46

47

48

49

50

51

52

53

54

55

56

57

58

59

60

61

62

63

64

65

66

67

68

69

70

71

72

73

74

75

76

77

78

79

80

81

82

83

84

85

86

87

88

89

90

91

92

93

94

95

96

97

98

99

100

101

102

103

104

105

106

107

108

109

110

111

112

113

114

115

116

117

118

119

120

121

122

123

"""

secure_storage.py

OpenClaw 安全存储模块 - AES-256-GCM 加密

设计原则:

1. AES-256-GCM 提供认证加密(同时保证机密性和完整性)

2. 每次加密生成随机 IV(初始化向量),防止相同明文产生相同密文

3. 密钥从环境变量读取,绝不硬编码

4. 支持密钥版本化,方便轮转

"""

import os

import json

import base64

import hashlib

from typing import Dict, Optional, Any

from cryptography.hazmat.primitives.ciphers.aead import AESGCM

class SecureStorage:

    """

    敏感数据加密存储管理器

    使用 AES-256-GCM 认证加密算法:

    - GCM 模式同时提供加密和完整性验证

    - 256 位密钥,当前计算能力下暴力 破解不可行

    - 每次加密使用随机 Nonce(12字节)

    """

    def __init__(self, key_version: str = "v1"):

        """

        初始化加密管理器

        密钥从环境变量 OPENCLAW_ENCRYPTION_KEY 读取

        支持多版本密钥(key_version)用于密钥轮转

        """

        # 从环境变量读取主密钥

        master_key_hex = os.environ.get("OPENCLAW_ENCRYPTION_KEY")

        if not master_key_hex:

            raise ValueError(

                "? 未设置 OPENCLAW_ENCRYPTION_KEY 环境变量\n"

                "???? 生成密钥: python3 -c \"import os; print(os.urandom(32).hex())\""

            )

        # 多版本密钥派生

        self.key_version = key_version

        self._keys = self._derive_keys(bytes.fromhex(master_key_hex))

        self._aesgcm = AESGCM(self._keys[key_version])

    def _derive_keys(self, master_key: bytes) -> Dict[str, bytes]:

        """从主密钥派生多版本密钥(支持密钥轮转)"""

        keys = {}

        for version in ["v1", "v2", "v3"]:

            salt = f"openclaw-key-{version}".encode()

            derived = hashlib.pbkdf2_hmac(

                "sha256", master_key, salt, 100000, dklen=32

            )

            keys[version] = derived

        return keys

    def encrypt(self, plaintext: str) -> str:

        """

        加密字符串

        返回格式: base64(version || nonce || ciphertext)

        前缀 version 用于解密时选择正确的密钥版本

        """

        # 生成 12 字节随机 Nonce

        nonce = os.urandom(12)

        # 加密(AESGCM 自动附加认证标签)

        plaintext_bytes = plaintext.encode("utf-8")

        ciphertext = self._aesgcm.encrypt(nonce, plaintext_bytes, None)

        # 打包:版本(2字节) + Nonce(12字节) + 密文

        packed = (

            self.key_version.encode() +

            nonce +

            ciphertext

        )

        return base64.b64encode(packed).decode("ascii")

    def decrypt(self, encrypted: str) -> str:

        """

        解密密文

        自动识别密钥版本,支持密钥轮转期间的平滑过渡

        """

        try:

            packed = base64.b64decode(encrypted)

            # 解析版本(前2字节)

            version = packed[:2].decode()

            if version not in self._keys:

                raise ValueError(f"不支持的密钥版本: {version}")

            nonce = packed[2:14]

            ciphertext = packed[14:]

            aesgcm = AESGCM(self._keys[version])

            plaintext = aesgcm.decrypt(nonce, ciphertext, None)

            return plaintext.decode("utf-8")

        except Exception as e:

            raise DecryptionError(f"解密失败: {e}")

    def encrypt_dict(self, data: Dict[str, Any]) -> str:

        """加密字典(自动序列化为 JSON)"""

        return self.encrypt(json.dumps(data, ensure_ascii=False))

    def decrypt_dict(self, encrypted: str) -> Dict[str, Any]:

        """解密密文并反序列化为字典"""

        return json.loads(self.decrypt(encrypted))

class DecryptionError(Exception):

    """解密异常"""

    pass

# ============================================

# 使用示例

# ============================================

if __name__ == "__main__":

    # 1. 生成主密钥(一次性操作)

    # python3 -c "import os; print(os.urandom(32).hex())"

    store = SecureStorage()

    # 2. 加密敏感数据

    api_key = "sk-proj-this-is-a-secret-key-12345"

    encrypted = store.encrypt(api_key)

    print(f"???? 加密后: {encrypted[:50]}...")

    # 3. 解密验证

    decrypted = store.decrypt(encrypted)

    print(f"???? 解密后: {decrypted}")

    assert decrypted == api_key, "加解密不匹配!"

    print("? 加解密验证通过")

    # 4. 加密结构化数据

    config = {

        "openai_key": "sk-xxx",

        "feishu_secret": "abc123",

        "db_password": "p@ssw0rd"

    }

    encrypted_config = store.encrypt_dict(config)

    print(f"???? 加密配置: {encrypted_config[:50]}...")

    # 5. 相同明文产生不同密文(随机Nonce保证)

    encrypted2 = store.encrypt(api_key)

    print(f"???? 再次加密: {encrypted2[:50]}...")

    print(f"   与上次不同: {encrypted != encrypted2}")  # True

3.2 配置文件加密存储

1

2

3

4

5

6

7

8

9

# openclaw.yaml - 使用加密占位符

model:

  providers:

    openai:

      # 使用 ENC() 标记加密值

      api_key: "ENC(A8f3kL9mX2...加密后的密文...)"

channels:

  feishu:

    app_secret: "ENC(pQ7wR2sY5b...)"

1

2

3

4

5

6

7

8

9

10

11

12

13

14

15

16

17

18

19

20

21

22

23

24

25

26

27

28

29

30

31

32

"""

config_decrypt.py

配置文件解密加载器

在 Gateway 启动时自动解密 ENC() 占位符

"""

import re

import os

from secure_storage import SecureStorage

ENC_PATTERN = re.compile(r'^ENC\((.*)\)$')

def load_config_with_decrypt(config_path: str) -> dict:

    """

    加载配置文件并自动解密集 ENC() 标记的值

    支持递归解密嵌套结构

    """

    import yaml

    with open(config_path, "r") as f:

        config = yaml.safe_load(f)

    store = SecureStorage()

    def decrypt_values(obj):

        """递归解密所有 ENC() 标记的值"""

        if isinstance(obj, dict):

            return {k: decrypt_values(v) for k, v in obj.items()}

        elif isinstance(obj, list):

            return [decrypt_values(v) for v in obj]

        elif isinstance(obj, str):

            match = ENC_PATTERN.match(obj)

            if match:

                return store.decrypt(match.group(1))

            return obj

        else:

            return obj

    return decrypt_values(config)

4. 对话记录脱敏归档

4.1 脱敏策略

1

2

3

4

5

6

7

8

9

10

11

12

13

14

15

16

17

18

19

20

21

22

23

24

25

26

27

28

29

30

31

32

33

34

35

36

37

38

39

40

41

42

43

44

45

46

47

48

49

50

51

52

53

54

55

56

57

58

59

60

61

62

63

64

65

66

67

68

69

70

71

72

73

74

75

76

77

78

79

80

81

82

83

84

85

86

87

88

89

90

91

92

"""

conversation_anonymizer.py

对话记录脱敏归档模块

支持的脱敏类型:

- 手机号: 138****1234

- 身份证: 3101**********1234

- 邮箱: ab****@domain.com

- API Key: sk-****...****

- IP地址: 192.168.*.*

- 自定义关键字列表

"""

import re

import json

import hashlib

from typing import List, Dict, Optional

from datetime import datetime

class ConversationAnonymizer:

    """

    对话脱敏器——归档前自动清理敏感信息

    设计原则:

    1. 不可逆脱敏(脱敏后无法恢复原文)

    2. 保留语义(脱敏后的内容仍可用于分析和搜索)

    3. 可配置规则(不同业务场景使用不同规则)

    """

    DEFAULT_RULES = [

        # (名称, 正则, 替换函数)

        ("手机号", r'1[3-9]\d{9}',

         lambda m: m.group()[:3] + "****" + m.group()[-4:]),

        ("身份证", r'\d{17}[\dXx]',

         lambda m: m.group()[:4] + "**********" + m.group()[-4:]),

        ("邮箱", r'[a-zA-Z0-9._%+-]+@[a-zA-Z0-9.-]+\.[a-zA-Z]{2,}',

         lambda m: m.group().split("@")[0][:2] + "****@" + m.group().split("@")[1]),

        ("API Key", r'(?:sk|api[_-]?key|token)[-=:]\s*["\']?([\w-]{20,})["\']?',

         lambda m: m.group(0).replace(m.group(1), m.group(1)[:3] + "***..." + m.group(1)[-4:])),

        ("IPv4", r'\d{1,3}\.\d{1,3}\.\d{1,3}\.\d{1,3}',

         lambda m: ".".join(m.group().split(".")[:2]) + ".*.*"),

    ]

    def __init__(self, extra_keywords: Optional[List[str]] = None):

        self.rules = self.DEFAULT_RULES.copy()

        self.keywords = set(extra_keywords or [])

        self.stats = {"total_processed": 0, "total_redacted": 0}

    def anonymize(self, text: str) -> Dict:

        """对单条文本进行脱敏"""

        clean = text

        redactions = []

        # 正则规则脱敏

        for rule_name, pattern, mask_fn in self.rules:

            for match in re.finditer(pattern, clean):

                original = match.group()

                masked = mask_fn(match)

                clean = clean.replace(original, masked)

                redactions.append({

                    "type": rule_name,

                    "position": match.start(),

                    "length": len(original)

                })

        # 关键词脱敏

        for kw in self.keywords:

            if kw in clean:

                clean = clean.replace(kw, "*" * len(kw))

                redactions.append({"type": "keyword", "keyword": kw})

        self.stats["total_processed"] += 1

        if redactions:

            self.stats["total_redacted"] += 1

        return {

            "original_length": len(text),

            "anonymized_text": clean,

            "redaction_count": len(redactions),

            "redaction_types": list(set(r["type"] for r in redactions))

        }

    def anonymize_conversation(

        self, messages: List[Dict], archive_path: str

    ) -> str:

        """

        脱敏并归档完整对话

        输出 JSONL 格式,每条一行,方便后续分析

        """

        anonymized = []

        for msg in messages:

            content = msg.get("content", "")

            result = self.anonymize(content)

            anonymized.append({

                "role": msg.get("role", "unknown"),

                "content": result["anonymized_text"],

                "redacted": result["redaction_count"] > 0,

                "timestamp": msg.get("timestamp", datetime.now().isoformat())

            })

        # 写入归档文件

        with open(archive_path, "w", encoding="utf-8") as f:

            for record in anonymized:

                f.write(json.dumps(record, ensure_ascii=False) + "\n")

        return archive_path

4.2 脱敏效果对比

1

2

3

4

5

6

7

8

9

10

11

12

13

14

15

16

17

# 测试脱敏效果

anonymizer = ConversationAnonymizer(

    extra_keywords=["内部机密", "工资"]

)

test_conversation = [

    {"role": "user", "content": "我的手机号是13812345678,帮我查下订单"},

    {"role": "assistant", "content": "好的,已查到您的订单。发货地址是北京市朝阳区xx路xx号。"},

    {"role": "user", "content": "我的身份证310101199001011234,帮我验证下"},

    {"role": "user", "content": "API Key 是 sk-abcdefghijklmn1234567890"},

    {"role": "assistant", "content": "您的token已激活,这是内部机密请勿外传"},

]

for msg in test_conversation:

    result = anonymizer.anonymize(msg["content"])

    status = "????" if result["redaction_count"] > 0 else "????"

    print(f"{status} [{msg['role']}] {result['anonymized_text']}")

print(f"\n???? 脱敏统计: 处理{anonymizer.stats['total_processed']}条, "

      f"脱敏{anonymizer.stats['total_redacted']}条")

预期输出:

1

2

3

4

5

6

7

???? [user] 我的手机号是138****5678,帮我查下订单

???? [assistant] 好的,已查到您的订单。发货地址是北京市朝阳区xx路xx号。

???? [user] 我的身份证3101**********1234,帮我验证下

???? [user] API Key 是 sk-***...7890

???? [assistant] 您的token已激活,这是****请勿外传


???? 脱敏统计: 处理5条, 脱敏4条

截图位置:终端运行脱敏测试的输出,展示五种敏感信息类型的脱敏效果。

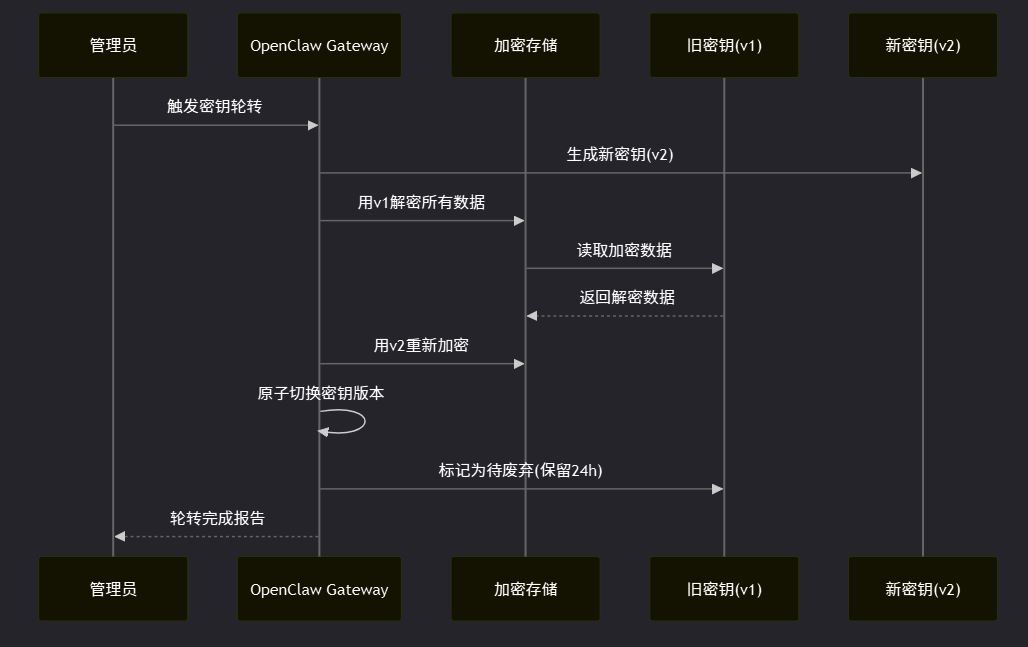
5. 密钥轮转策略

5.1 轮转流程

5.2 轮转脚本

1

2

3

4

5

6

7

8

9

10

11

12

13

14

15

16

17

18

19

20

21

22

23

24

25

26

27

28

29

30

31

32

33

34

35

36

37

38

39

40

41

42

43

44

45

46

47

48

49

50

51

52

"""

key_rotation.py

密钥轮转工具——平滑切换加密密钥

"""

import os

import json

import glob

from datetime import datetime, timedelta

from secure_storage import SecureStorage

def rotate_keys(data_dir: str = "/data/openclaw/encrypted"):

    """

    密钥轮转主流程

    1. 用旧密钥解密所有数据

    2. 用新密钥重新加密

    3. 验证新密钥可解密

    4. 保留旧密钥24小时(应急回滚)

    """

    print("???? 开始密钥轮转...")

    # 使用旧密钥解密

    old_store = SecureStorage(key_version="v1")

    new_store = SecureStorage(key_version="v2")

    encrypted_files = glob.glob(f"{data_dir}/**/*.enc", recursive=True)

    print(f"???? 找到 {len(encrypted_files)} 个加密文件")

    rotated = 0

    errors = []

    for filepath in encrypted_files:

        try:

            # 读入 → 解密 → 重新加密

            with open(filepath, "r") as f:

                old_cipher = f.read()

            plaintext = old_store.decrypt(old_cipher)

            new_cipher = new_store.encrypt(plaintext)

            # 验证

            verified = new_store.decrypt(new_cipher)

            assert verified == plaintext, f"验证失败: {filepath}"

            # 写入(原子替换)

            tmp_path = filepath + ".tmp"

            with open(tmp_path, "w") as f:

                f.write(new_cipher)

            os.replace(tmp_path, filepath)

            rotated += 1

            print(f"  ? {os.path.basename(filepath)}")

        except Exception as e:

            errors.append((filepath, str(e)))

            print(f"  ? {os.path.basename(filepath)}: {e}")

    # 报告

    print(f"\n???? 轮转完成: 成功 {rotated}/{len(encrypted_files)}")

    if errors:

        print(f"?? 失败 {len(errors)} 个文件:")

        for f, e in errors:

            print(f"   - {f}: {e}")

    return {"rotated": rotated, "errors": len(errors)}

6. 安全最佳实践清单

类别 实践 为什么重要
密钥管理 绝不在代码或配置中硬编码密钥 Git 历史会永久保留
密钥管理 使用环境变量或 Secret Manager 代码和密钥分离
密钥管理 定期轮转密钥(建议90天) 降低密钥泄露的影响范围
传输 强制 TLS 1.2+,禁用旧协议 防止降级攻击
传输 API 通信使用 HTTPS 防止中间人抓包
存储 敏感数据落盘前加密 硬盘被盗也不泄露
存储 日志自动脱敏 日志是最容易被忽略的泄露 点
访问 最小权限原则 减少内部泄露风险
审计 记录所有敏感操作 事后可追溯

7. 总结

核心要点:

  1. 四层安全模型:传输(TLS) → 存储(AES-256) → 访问(RBAC) → 审计(日志),层层递进
  2. AES-256-GCM 认证加密:同时保证机密性和完整性,每次加密使用随机 Nonce
  3. 密钥派生 + 版本化:从主密钥派生多版本子密钥,支持无缝密钥轮转
  4. 对话脱敏归档:正则规则 + 关键词匹配,脱敏后保留语义可供分析
  5. 配置加密占位符:ENC(...) 标记让敏感配置在文件中以密文存在,Gateway 启动时自动解密

思考题:

  1. AES-256-GCM 提供了认证加密,如果有人篡改了密文,解密时会发生什么?这种机制如何保护数据完整性?
  2. 密钥轮转期间(部分数据用 v1 加密、部分用 v2),如果 Gateway 重启,如何确保两种版本的密钥同时可用?你有什么设计思路?
  3. 如果你的 OpenClaw 部署在多云环境中(AWS + 阿里云),密钥管理策略应该如何调整?是统一用一个 KMS,还是各云用各的?

版权声明 : 本文内容来源于互联网或用户自行发布贡献,该文观点仅代表原作者本人。本站仅提供信息存储空间服务和不拥有所有权,不承担相关法律责任。如发现本站有涉嫌抄袭侵权, 违法违规的内容, 请发送邮件至2530232025#qq.cn(#换@)举报,一经查实,本站将立刻删除。
原文链接 :
相关文章
  • 本站所有内容来源于互联网或用户自行发布,本站仅提供信息存储空间服务,不拥有版权,不承担法律责任。如有侵犯您的权益,请您联系站长处理!
  • Copyright © 2017-2022 F11.CN All Rights Reserved. F11站长开发者网 版权所有 | 苏ICP备2022031554号-1 | 51LA统计